重定向,顾名思义,就是重新定向到一个新的位置,比如我们在浏览器的页面自动跳转到了另一个页面,又比如访问了一个页面,然后观察网址之后并不是我们输入的网址,这个过程就是重定向完成的。
| http状态码 | 应用场景 | 优势 | |
|---|---|---|---|
| 暂时性重定向 | 302 | 访问一些需要权限的页面,会自动重定向到权限认证的页面 | 重定向在设计上会提升用户体验 |
| 永久性重定向 | 301 | 废弃原有的网址被访问,会自动重定向到新的网址确保用户访问成功 | 重定向在设计上会提升用户体验,有利于搜索引擎优化 |
例1:访问淘宝的时候,你选择了已经购买的商品,但是你并没有登录过淘宝,那么这个时候如果只是提示 “请登录再访问!”,那么相信这种设计是留不住用户的,不如直接为用户重定向到登录页面。
例2:比如想废弃原本的网址,那么用户并不知道这个事情,所以用户还是会访问原来的网址,那么就会内部做一个重定向到新启用的网址,重定向的过程会有状态码的返回,搜索引擎捕捉到重定向的代码,有利于搜索引擎优化。
关键词:重定向在设计上会提升用户体验 ,有利于搜索引擎优化
首先从flask模块中把导入redirect
from flask import Flask,redirect
from flask import Flask,redirect
...
@app.route(‘/user_info/‘)
def user_info():
    name = request.args.get(‘name‘)
    pwd = request.args.get(‘pwd‘)
    if name==‘mark‘ and pwd == ‘123‘:
        return ‘{}的信息‘.format(name)
    return redirect(‘/login/‘)  # 可以换成 return redirect(url_for(‘login‘))


@app.route(‘/login/‘)
def login():
    return ‘这是登录页面‘
...
没有通过权限验证的情况


通过权限验证的情况

关键词:暂时性重定向return redirect(‘/login/‘) 即可实现重定向
from flask import Flask,redirect
...
@app.route(‘/user_info/‘)
def user_info():
    name = request.args.get(‘name‘)
    pwd = request.args.get(‘pwd‘)
    if name==‘mark‘ and pwd == ‘123‘:
        return ‘{}的信息‘.format(name)
   return redirect(‘/login/‘, code=301)  # 会返回301状态码给浏览器


@app.route(‘/login/‘)
def login():
    return ‘这是登录页面‘
...
关键词:永久性重定向只给redirect(‘/login/‘, code=301)多加了个code=301参数
实现视图的业务逻辑和返回给前端的页面逻辑分离的工具,我们称之为模板引擎。
什么是模板?
模板可以理解为一个特殊的html文件,特殊之处就在于这个html文件包含固定内容和动态部分,其动态部分可以借助模板引擎进行传参
在上一章其实我们已经应用过模板引擎,试想一下如果没有模板引擎,直接给把模板的html代码写在视图函数里面,会给程序员的日常开发带来了多大的困扰,模板引擎帮我们分开了业务逻辑和页面逻辑,并且我们每次修改一个大字符串会非常不方便。模板引擎还可以读取并执行模板中的特殊语法标记,并根据传入的数据将变量替换为实际值,然后返回给浏览器,这个过程我们称之为渲染。
关键字:完成了业务逻辑和页面逻辑的分离,实现了动态的去渲染页面。
Flask如何使用模板引擎?Flask使用jinja2作为框架的默认模板引擎,Jinja2是基于python的模板引擎,功能比较类似于于PHP的smarty,J2ee的Freemarker和velocity。Jinja2除了设置变量,还允许我们在模板中添加if判断,执行for迭代,调用函数等,以各种方式控制模板的输出。并且jinja2不限制模板的格式为html,可以是任何格式的文本文件。
项目目录
项目代码
(1)login01.html
<!DOCTYPE html>
<html lang="en">
<head>
    <meta charset="UTF-8">
    <title>登录界面</title>
</head>
<body>
<h1>login01</h1>  <!--login02.html文件的这一行的内容是:‘ <h1>login02</h1> ’  -->
<form action="" method="POST">
    用户:<input type="text" name="username">
    密码:<input type="text" name="password">
    <input type="submit" value="提交">
</form>
</body>
</html>
(2)login02.html
<meta charset="UTF-8">
    <title>登录界面</title>
</head>
<body>
<h1>login01</h1>  <!--login02.html文件的这一行的内容是:‘ <h1>login02</h1> ’  -->
<form action="" method="POST">
    用户:<input type="text" name="username">
    密码:<input type="text" name="password">
    <input type="submit" value="提交">
</form>
</body>
</html>
(3) server.py
from flask import Flask, render_template
import config

app = Flask(__name__)
app.config.from_object(config)


@app.route(‘/demo/‘)
def demo():
    return ‘<h2>手写html</h2>‘

@app.route(‘/demo02/‘)
def demo02():
    return ‘‘‘<!DOCTYPE html>
<html lang="en">
<head>
    <meta charset="UTF-8">
    <title>登录界面</title>
</head>
<body>
<!--<form action="/login_request/" method="POST">-->
<form action="" method="POST">
    用户:<input type="text" name="username">
    密码:<input type="text" name="password">
    <input type="submit" value="提交">
</form>
</body>
</html>‘‘‘

@app.route(‘/demo03/‘)
def demo03():
    return render_template(‘login01.html‘)

@app.route(‘/demo04/‘)
def demo04():
    return render_template(‘box/login02.html‘)


if __name__ == ‘__main__‘:
    app.run()
server.py代码逻辑分析:
render_template(‘box/login02.html‘)的路径是templates文件夹的相对路径Flask类中的template_folder参数可以指定模板寻找路径
基于上2.3.1的项目
C:/Users/Administrator/Desktop/template_box中,并且删除项目中的templates的文件。app = Flask(__name__)为app = Flask(__name__,template_folder=‘C:/Users/Administrator/Desktop/template_box‘)分析:
渲染一切正常 说明Flask类中的template_folder参数可以指定模板寻找路径。
我们之前提到过,模板引擎还可以读取并执行模板中的特殊语法标记,并根据传入的数据将变量替换为实际值,这个步骤我们就称之为模板引擎传参。
我们传参的时候要应用render_template()利用render_template的第二个参数进行传参,该函数在定义时候,第二个参数是可变长形参,所以在传值的时候我们可以传入多个关键字实参。
在模板中接收的时候使用{{}}包裹参数进行接收。
目录结构
Copy│ server.py
│
└─templates # 文件夹
        index.html
server.py
@app.route(‘/‘)
def index():

    return render_template(‘index.html‘,name="mark",age=18)
index.html
Copy<!DOCTYPE html>
<html lang="en">
<head>
    <meta charset="UTF-8">
    <title>模板传参</title>
</head>
<body>
    {{name}}
    {{age}}
</body>
</html>

目录结构:同上
server.py
@app.route(‘/demo1/‘)
def demo1():
    context_dict = {"name":"mark",
               "age":"mark",
               "sex":"girl"}

    return render_template(‘index.html‘,context_dict = context_dict)
index.html
<!DOCTYPE html>
<html lang="en">
<head>
    <meta charset="UTF-8">
    <title>模板传参</title>
</head>
<body>
    {{context_dict.name}}
    {{context_dict.age}}
    {{context_dict.sex}}
</body>
</html>

目录结构:同上
server.py
def demo2():
    context_dict = {"name": "mark",
               "age": "mark",
               "sex": "girl",
                "other_info":{"tel":1365,
                               "qq":565656}}

    return render_template(‘index.html‘,**context_dict)
index.html
<!DOCTYPE html>
<html lang="en">
<head>
    <meta charset="UTF-8">
    <title>模板传参</title>
</head>
<body>
    {{name}}
    {{age}}
    {{sex}}
    {{other_info.tel}}
    {{other_info["qq"]}}
</body>
</html>

在视图函数中
在模板中
{{}}包裹参数进行接收.字典里面的key取出value值。也可以直接字典跟[]进行取值。url_for()在模板中如果有使用url的需求,我们可以直接手写一个url,也可以使用{{ url_for(‘视图函数名‘) }动态翻转一个url。
项目目录:
│ server.py
│
└─templates # 文件夹
        index.html
        info.html
server.py
...
@app.route(‘/‘)
def index():

    return render_template(‘index.html‘, name="mark", age=18)


@app.route(‘/info/‘)
def info():

    return render_template(‘info.html‘)
...
info.html
<!DOCTYPE html>
<html lang="en">
<head>
    <meta charset="UTF-8">
    <title>信息页面</title>
</head>
<body>
    <h1>这是信息页面</h1>
</body>
</html>
index.html
<!DOCTYPE html>
<html lang="en">
<head>
    <meta charset="UTF-8">
    <title>模板传参</title>
</head>
<body>
    <a href="/info/">正常跳转</a>
    <a href="{{ url_for(‘info‘) }}">urlfor跳转</a>
</body>
</html>


正常跳转 和 urlfor跳转,皆可以实现跳转到info.html页面。
正常跳转就不做演示了

在jinja2中用{% %}特殊符号来编辑控制语句,一个语句以{% ... %}为起始 并且以{% end... %}来标记结束。
可以使用> , < , <=, ==,!=,进行判断,
也可以使用 and,or,not,()来进行逻辑合并
    {% if age > 18 %}
        <p>成年人</p>
    {% elif age == 18 %}
        <p>刚刚成年</p>
    {% else %}
        <p>未成年</p>
    {% endif %}
注意:<p>只是为了渲染明显
项目目录:
│ server.py
│
└─templates # 文件夹
        index.html
server.py
...
@app.route(‘/‘)
def hello_world():
    context_dict = {
        ‘age‘: 17,
        ‘sex‘: ‘man‘,
    }
    return render_template(‘index.html‘,**context_dict)
...
index.html
<!DOCTYPE html>
<html lang="en">
<head>
    <meta charset="UTF-8">
    <title>jinja2分支</title>
</head>
<body>
    {% if sex == ‘man‘ %}
        <p>男人</p>
    {% else %}
        <p>女人</p>
    {% endif %}

    {% if age > 18 %}
        <p>成年人</p>
    {% elif age == 18 %}
        <p>刚刚成年</p>
    {% else %}
        <p>未成年</p>
    {% endif %}
</body>
</html>

for循环可以便利任何一个可迭代对象,包括列表、字典等,支持反向遍历
列表循环:
    {% for country in countrys%}
        <p>{{ country }}</p>
    {% else %}
        <p>没有值</p>
    {% endfor %}
项目目录:
│ server.py
│
└─templates # 文件夹
        index.html
sever.py
@app.route(‘/‘)
def hello_world():
    context_dict = {
        ‘countrys‘:["1-china","2-America","3-French"]
    }
    return render_template(‘index.html‘,**context_dict)
index.html
<!DOCTYPE html>
<html lang="en">
<head>
    <meta charset="UTF-8">
    <title>for循环</title>
</head>
<body>
    {% for country in countrys %}  {#    {% for country in countrys|reverse %} 可以实现反向遍历#}
        <p>{{ country }}</p>
    {% else %}
        <p>没有值</p>
    {% endfor %}

</body>
</html>

反向遍历实例
server.py`的 `{% for country in countrys %}` 改为 `{% for country in countrys|reverse %}
可以实现反向遍历,运行效果如下图

项目目录
│ server.py
│
└─templates # 文件夹
        index.html
sever.py
@app.route(‘/‘)
def hello_world():
    context_dict = {
        ‘countrys‘:["1-china","2-America","3-French"]
    }
    return render_template(‘index.html‘,**context_dict)

@app.route(‘/demo/‘)
def demo():
    context_dict ={
        ‘colleges‘:[
            {
                ‘name‘: ‘清华大学‘,
                ‘area‘: ‘北京‘
            },
            {
                ‘name‘: ‘复旦大学‘,
                ‘area‘: ‘上海‘
                ‘‘
            },
            {
                ‘name‘: ‘吉林大学‘,
                ‘area‘: ‘吉林‘
            },
            {

                ‘name‘: ‘中山大学‘,
                ‘area‘: ‘广东‘
            }
        ]
    }
    return render_template(‘index.html‘,**context_dict)
index.html
<!DOCTYPE html>
<html lang="en">
<head>
    <meta charset="UTF-8">
    <title>for循环</title>
</head>
<body>

    <table>
        <tr>
            <th>1开始的序号</th>
            <th>0开始的序号</th>
            <th>大学名称</th>
            <th>所属地区</th>
            <th>总数</th>

        </tr>
        {% for college in colleges %}
            {% if loop.first %}
                <tr style="background: blue">
            {% elif loop.last %}
                <tr style="background: yellow ">
            {% else %}
                <tr>
            {% endif %}
                <td>{{ loop.index }}</td>
                <td>{{ loop.index0 }}</td>
                <td>{{ college.name }}</td>
                <td>{{ college.area }}</td>
                <td>{{ loop.length }}</td>
            </tr>
        {% endfor %}
    </table>

</body>
</html>
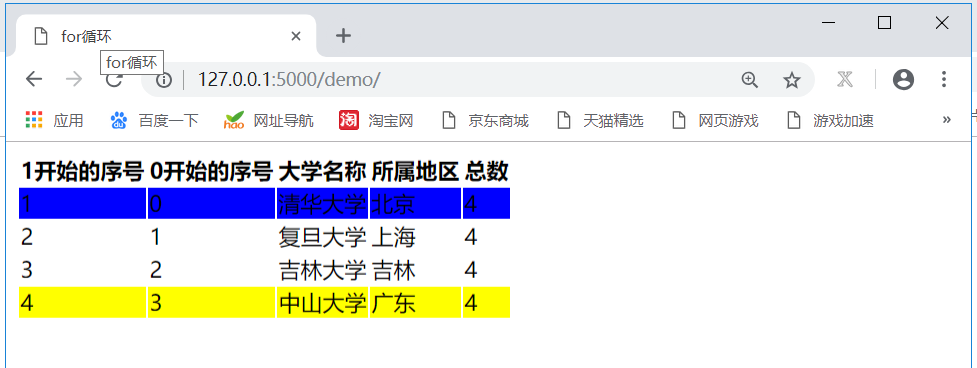
for循环常用变量表
| for循环常用变量 | 功能描述 |
|---|---|
| loop.index | 当前循环的索引(从1开始) |
| loop.index0 | 当前循环的索引(从0开始) |
| loop.first | 是否是第一次循环,是返回True,否则返回Flase |
| loop.last | 是否是最后一次循环,是返回True,否则返回Flase |
| loop.length | 总共可以循环的次数 / 迭代器的长度 |
for还可以else分支语法,如果for内部没有遍历出来内容,那么就会走else分支,反之如果for循环遍历出了内容,则不会运行else分支。
注意:jinja2中的for 和 else逻辑不通于python在此不要类比python中的 for 和 else 。
{% for country in countrys|reverse %}
        <p>{{ country }}</p>
    {% else %}
        <p>没有值</p>
    {% endfor %}

在模板中加载静态文件的时候也要使用到url_for()函数,去寻找具体的静态文件资源。第一个参数是定位到static文件夹,filename参数定位到static文件夹内的具体资源。
{{ url_for(‘static‘,filename=‘相对于static文件夹的路径‘) }}
项目目录:
│  app.py
│
├─static  # 文件夹
│  ├─css  # 文件夹
│  │      demo.css
│  │
│  ├─images  # 文件夹
│  │      1.png
│  │
│  └─js  # 文件夹
│          demo.js
│
├─templates  # 文件夹
     index.html
app.py
...

@app.route(‘/‘)
def hello_world():
    return render_template(‘index.html‘)
...
index.html
<!DOCTYPE html>
<html lang="en">
<head>
    <meta charset="UTF-8">
    <title>静态文件加载</title>

    <link rel="stylesheet" href="{{ url_for(‘static‘,filename=‘css/demo.css‘) }}">
    <script src="{{ url_for(‘static‘,filename=‘js/demo.js‘) }}"></script>

</head>
<body>
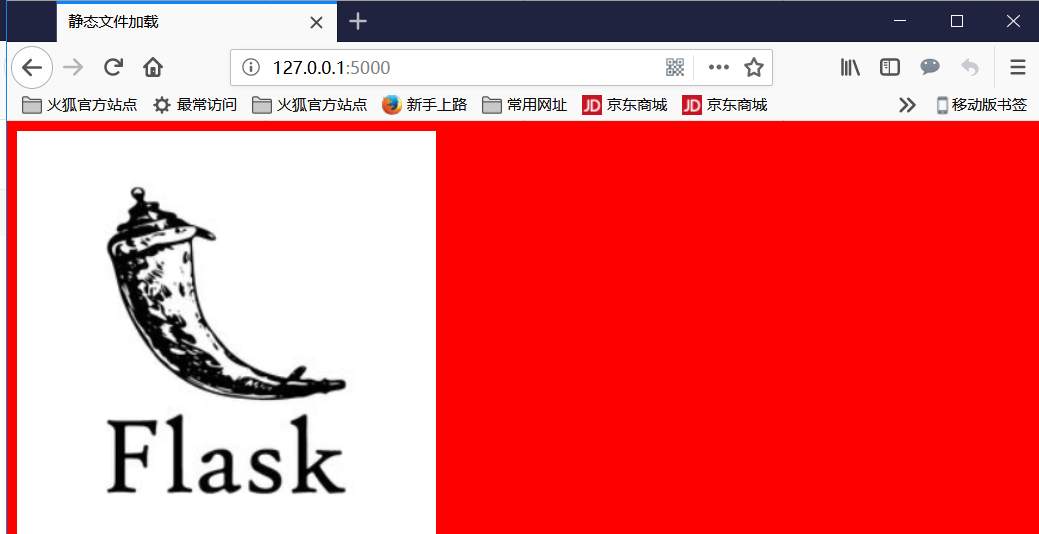
    <img src="{{ url_for(‘static‘,filename=‘images/1.png‘) }}">
</body>
</html>
demo.css
Copybody{
    background: red;
}
demo.js
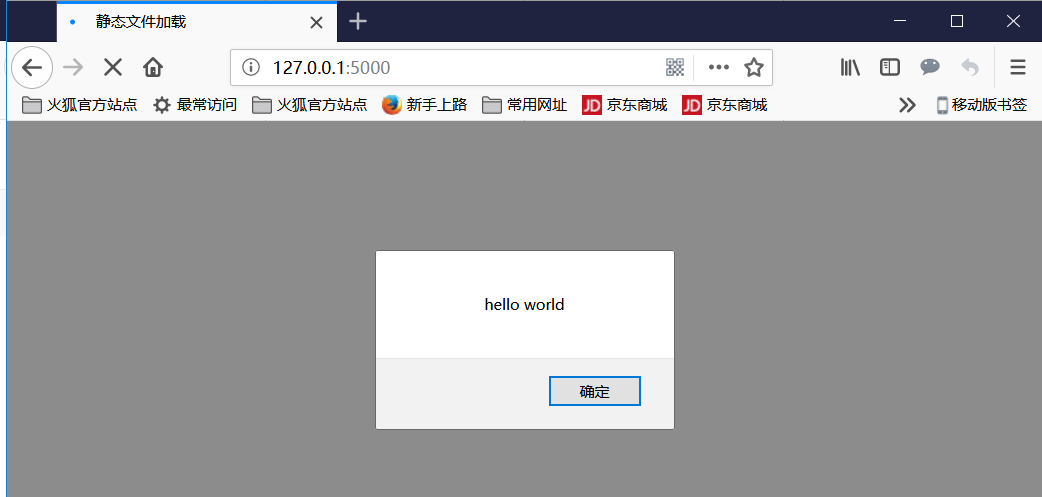
Copyalert(‘hello world‘)
jinja2的模板继承可以把一些公共的代码定义到一个基模板中,比如把导航栏、页脚等通用内容放在基模板中,以后所有的子模板直接继承基模板,在子模板被渲染时会自动包含继承基模板的内容,通过模板的继承可以避免在多个模板中编写重复的代码。

在基模板中定义一些公共的代码,子模板会继承这些公共的代码,但是子模板需要根据自己的需求去实现不同的代码,这个时候就需要在基模板中提供一些接口,以便子模板实现自己的业务需求。
1 基本写法
在基/父模板中定义接口(block)
{% block main %} {# main是自定义的变量名 #}

{% endblock %}
在子模板中继承父模板,并且重写接口(block)
{% extends ‘base.html‘ %} {# extends 后面跟的参数是导入的基模板相对于templates的路径 #}
{% block main %}

{% endblock %}
2 子模板中调用父模板代码block中的代码
基模板中
{% block main %}
<p>父模板中main中原有的内容</p>

{% endblock %}
子模板中:
{% block main %}
    {{ super() }}   {# 保留基模板中本块的代码 #}
    <p>子模板中重写main的内容 </p>
{% endblock %}
3 在子模板中调用其他block中的代码:
子模板中:
Copy{% block main %}
    {{ self.demo() }} {# self.其他block名字 #}
    <p>子模板中重写main的内容 </p>
{% endblock %}
4 子模板中的想定义自己的代码只能放到block中,否则无效
注意:这里面我们使用了bootstrap框架。
bootstrap3的中文官网:https://v3.bootcss.com/
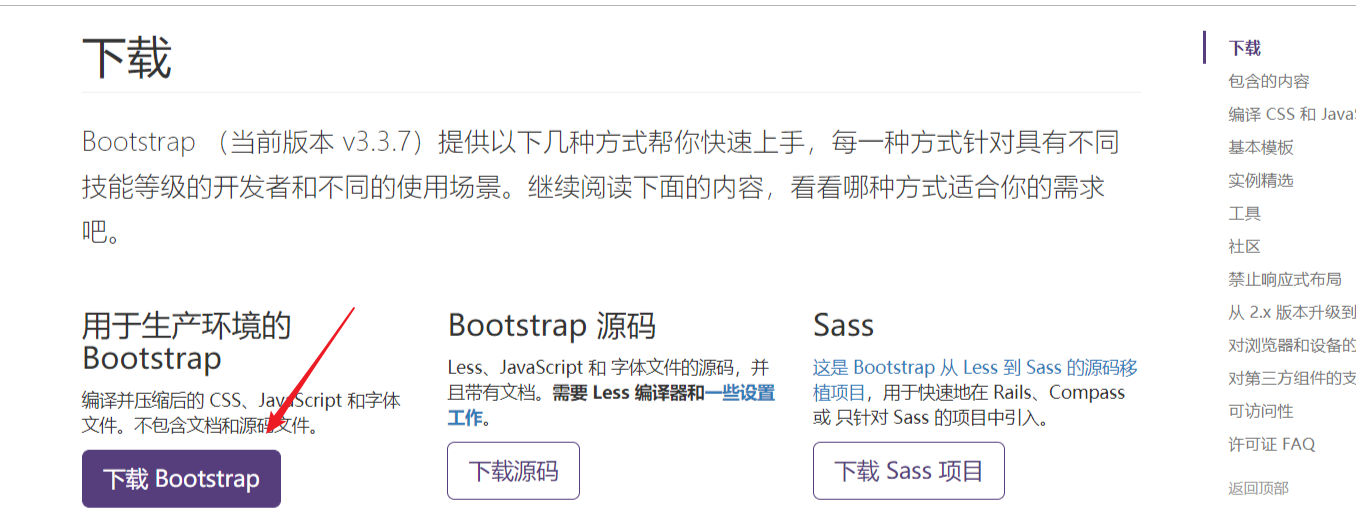
1 首先下载 用于生产环境的 Bootstrap
2 解压出来里面的css文件
项目目录
Copy│  app.py
│
├─static  # 文件夹
│  └─css
│          bootstrap-theme.css
│          bootstrap-theme.css.map
│          bootstrap-theme.min.css
│          bootstrap-theme.min.css.map
│          bootstrap.css
│          bootstrap.css.map
│          bootstrap.min.css
│          bootstrap.min.css.map
│
├─templates  # 文件夹
       base.html
       detail.html
css文件夹: 是从我们上面下载好的用于生产环境的 Bootstrap中解压出来的
base.html 注意:里面的form标签中的内容和nav标签中的内容均是bootstrap框架的代码截取,div标签是用于清除浮动
Copy<!DOCTYPE html>
<html lang="en">
<head>
<meta charset="UTF-8">
<title>父模板</title>
<link rel="stylesheet" href="{{ url_for(‘static‘,filename=‘css/bootstrap.css‘) }}">
</head>
<body>
<form class="navbar-form navbar-left" role="search">
<div class="form-group">
<input type="text" class="form-control" placeholder="Search">
</div>
<button type="submit" class="btn btn-default">Submit</button>
</form>
<div style=" visibility:hidden;display:block;font-size:0;clear:both;
height:50px"></div>
{% block main %}
<p>父模板中main中原有的内容</p>
{% endblock %}
<br>
<br>
<br>
{% block demo %}
<p>demo中原有的内容</p>
{% endblock %}
<div style=" visibility:hidden;display:block;font-size:0;clear:both;
height:0"></div>
<nav aria-label="Page navigation">
<ul class="pagination">
<li>
<a href="#" aria-label="Previous">
<span aria-hidden="true">«</span>
</a>
</li>
<li><a href="#">1</a></li>
<li><a href="#">2</a></li>
<li><a href="#">3</a></li>
<li><a href="#">4</a></li>
<li><a href="#">5</a></li>
<li>
<a href="#" aria-label="Next">
<span aria-hidden="true">»</span>
</a>
</li>
</ul>
</nav>
</body>
</html>
detail.html
Copy{% extends ‘base.html‘ %}
{% block demo %}
    <p>子模板中重写demo的内容</p>
{% endblock %}
{% block main %}
    {{ super() }}   {# 保留基模板中本block的代码 #}
    {{ self.demo() }} {# 调用demo block的代码 #}
    <p>子模板中重写main的内容 </p>
{% endblock %}
app.py 注意:app.config.update(TEMPLATES_AUTO_RELOAD=True)语句用于每次都重新加载模板文件
Copyfrom flask import Flask, render_template

app = Flask(__name__)
app.config.update(TEMPLATES_AUTO_RELOAD=True)

@app.route(‘/‘)
def hello_world():
    return render_template(‘base.html‘)

@app.route(‘/demo/‘)
def demo():
    return render_template(‘detail.html‘)


if __name__ == ‘__main__‘:
    app.run()
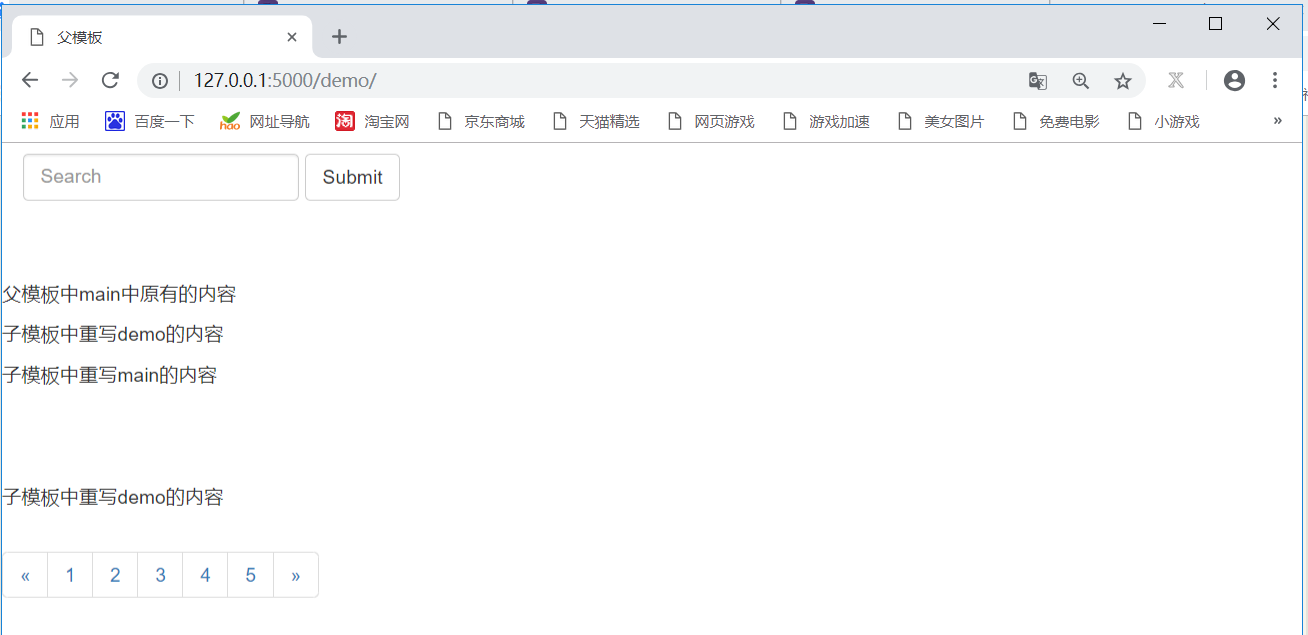
子模板运行效果
原文:https://www.cnblogs.com/liqiangwei/p/14407831.html