已经很久很久没有往下了,原因是自己发现自己的基础太差,很多基本的语法都是一知半解,这样肯定不行。所以回顾了一下ES6和Vue的一些基础知识,再继续分享我的心得感悟。
这个功能很好实现,不过在实际运用时有些小细节需要注意。
在手机上,我们可以很方便的旋转地图,在PC端上,“旋转地图”这个动作一样十分重要。Openlayers官方在DragRotate()规定了旋转地图的交互方式,还是先看api文档:
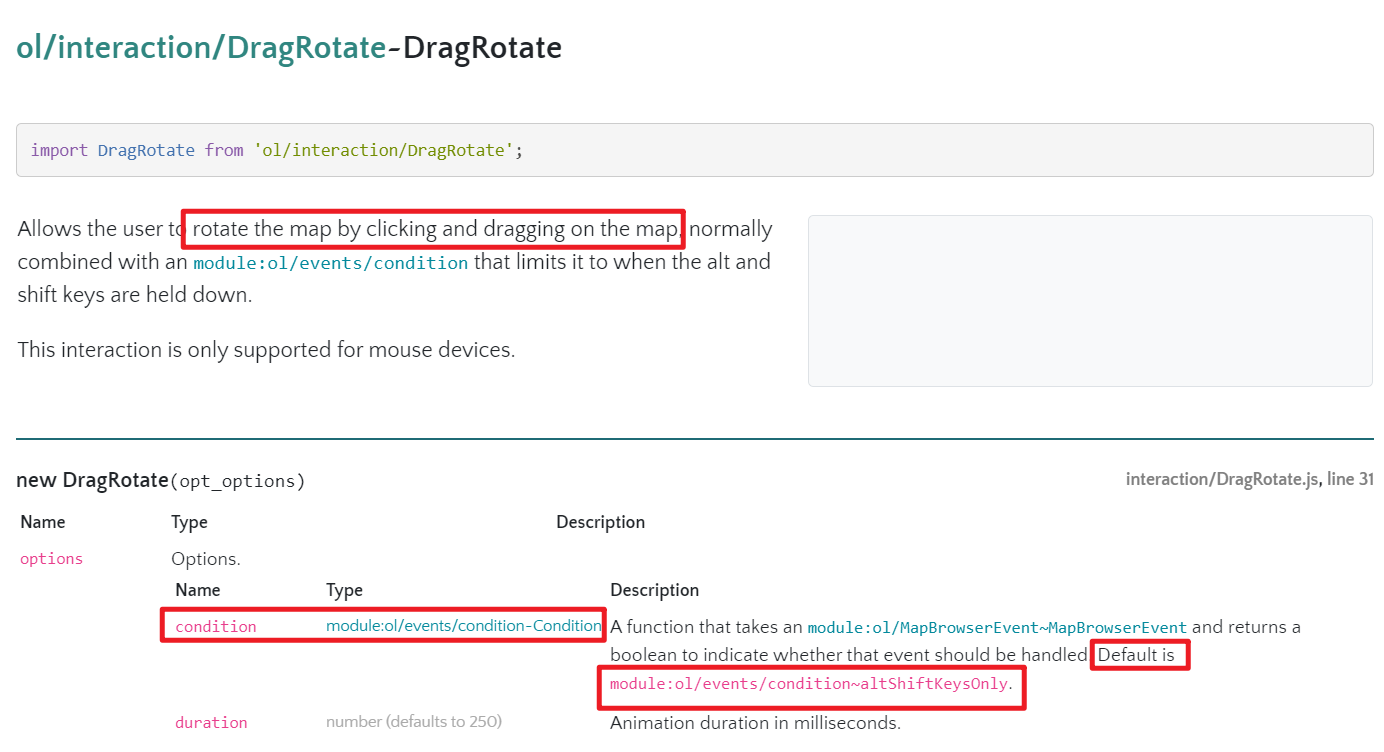
可以看到,ol官方默认给出的方式是通过alt+shift+drag旋转地图(同时按下)。

在导入时,我们需要注意下面的处理方式:
import {defaults, FullScreen, ScaleLine, ZoomSlider, MousePosition, OverviewMap} from ‘ol/control‘
import {DragRotate, defaults as defaultsInteraction} from ‘ol/interaction‘
这里的核心问题是 “js从不同来源导入同名函数该怎么办”,我个人是使用import...as...的方法进行避免。
然后正常在地图中加入即可。
///...省略
    mounted() {
      new Map({
        // ...省略
        interactions: defaultsInteraction().extend([
          new DragRotate(), // shift+alt+drag实现地图旋转
        ])
不过,国内的百度、高德等地图都是通过ctrl+drag进行地图的旋转的,而且还支持2D到3D的视图改变。我们如何规定使用ctrl+drag进行地图旋转呢?答案是通过event。
接着去搜索一下官网的api文档,可以发现在condition里有altKeyOnly和shiftKeyOnly最接近我们的预期,那么该如何去实现呢?

我们可以试着自己去写一个类似的“ctrlKeyOnly”,这就需要去看一下shiftKeyOnly到底是什么了:

接下来思路就很清晰了,照着它的写法去写即可。
// ...省略
export default {
    // ...省略
    mounted() {
      let ctrlCondition = function(mapBrowserEvent){
        return mapBrowserEvent.originalEvent.ctrlKey;
      };
    new Map({
      // ...省略
      interactions: defaultsInteraction().extend([
          new DragRotate({
            condition: ctrlCondition
          }), // ctrl+drag实现地图旋转
        ])
    })
 }
最后成功取得了理想的效果。
接下来,我想实现在Panel里实现最简单的图层切换功能。
这里会涉及到兄弟组件间的通信(我所写的MapContainer和Panel)。其实如果不考虑布局的话,我觉得把Panel设计为Map的子组件可能逻辑上更容易实现一些,不过既然提前设计好了,就去实现这个需求。兄弟组件间的通信一般可以通过两种方式:一是借助EventBus,另一种则是借助vuex。在中大型项目中通常是使用vuex,这里我使用则是更加直接的EventBus。
我直接贴出我的代码:
import Vue from ‘vue‘
export const EventBus = new Vue()
<template>
  <div>
    <p class="text">图层切换:</p>
    <table>
      <tr>
        <td><button @click="change_osm" class="btn">OSM底图</button></td>
        <td><button @click="change_arc_street" class="btn">Arcgis街道图</button></td>
        <td><button @click="change_amap_imagery" class="btn">高德影像图</button></td>
      </tr>
    </table>
  </div>
</template>

<script>
  import {EventBus} from ‘../../eventbus.js‘
  export default {
    name: "ChangeLayer",
    data(){
      return {
        switch_osm: false,
        switch_arc_street: false,
        switch_amap_imagery: false
      }
    },
    methods: {
      change_osm(){
        this.switch_osm = !this.switch_osm;
        EventBus.$emit(‘switch-osm‘, this.switch_osm)
      },
      change_arc_street(){
        this.switch_arc_street= !this.switch_arc_street;
        EventBus.$emit(‘switch-arc‘, this.switch_arc_street)
      },
      change_amap_imagery(){
        this.switch_amap_imagery= !this.switch_amap_imagery;
        EventBus.$emit(‘switch-amap‘, this.switch_amap_imagery)
      }
    },
  }
</script>

<style scoped>
  .btn{
    flex: 0 1 140px;
    /* flex布局设置 */
    background-color: #f6f6f6;
    color: black;
    padding: 8px 10px;
    text-align: center;
    text-decoration: none;
    margin-right: 2px;
    display: inline-block;
    font-size: 14px;
    margin: 4px 2px;
    cursor: pointer;
    border-radius: 8px;
    transition-duration: 0.4s;
  }
  .btn:hover {
    background-color: #4CAF50;
    color: white;
  }
  .btn:active {
    background-color:darkgreen
  }
  .btn:focus {
    outline: 0; /* 去除点击后的边框 */
  }
  .text {
    margin-block-start: 0.4em;
    margin-block-end: 0.2em;
    margin-inline-start: 0.5em;
  }
</style>
<template>
  <div>
    <div>
      <ChangeLayer></ChangeLayer>
    </div>
  </div>
</template>

<script>
  import ChangeLayer from ‘./widgets/ChangeLayer‘
  export default {
    name: ‘Panel‘,
    components: {
      ChangeLayer,
    },
  }
</script>

<style scoped>
</style>
<template>
  <div ref="map-root"
       style="height: 100%; width: 100%">
    <div ref="mouse-position"
         class="mouse-position-wrapper">
      <div class="custom-mouse-position"></div>
    </div>
  </div>
</template>

<script>
  import {EventBus} from ‘../eventbus.js‘
  import View from ‘ol/View‘
  import Map from ‘ol/Map‘
  import TileLayer from ‘ol/layer/Tile‘
  import XYZ from ‘ol/source/XYZ‘
  import OSM from ‘ol/source/OSM‘
  import {defaults, FullScreen, ScaleLine, ZoomSlider, MousePosition, OverviewMap} from ‘ol/control‘
  import {DragRotate, defaults as defaultsInteraction} from ‘ol/interaction‘
  import {createStringXY} from ‘ol/coordinate‘ // 导入通过export function导出的方法要加大括号
  import ‘ol/ol.css‘

  export default {
    name: ‘MapContainer‘,
    data() {
      return {
        show_osm: true,
        show_amap: false,
        show_arc: false,
        amapLayer: new TileLayer({
          source: new XYZ({
            url: "https://webst01.is.autonavi.com/appmaptile?style=6&x={x}&y={y}&z={z}"
          }),
          preload: Infinity,
          visible: false  // 默认隐藏该图层
        }),
        arcStreetLayer: new TileLayer({
          source: new XYZ({
            url: "https://map.geoq.cn/ArcGIS/rest/services/ChinaOnlineCommunity/MapServer/tile/{z}/{y}/{x}"
          }),
          preload: Infinity,
          visible: false   // 默认隐藏该图层
        }),
        osmLayer: new TileLayer({
          source: new OSM(),
          visible: true
        }),
      }
    },
    mounted() {
      let ctrlCondition = function(mapBrowserEvent){
        return mapBrowserEvent.originalEvent.ctrlKey;
      };

      EventBus.$on(‘switch-osm‘, (show_osm) => {
        this.show_osm = show_osm;
      }),
      EventBus.$on(‘switch-arc‘, (show_arc) => {
        this.show_arc = show_arc;
      }),
      EventBus.$on(‘switch-amap‘, (show_amap) => {
        this.show_amap = show_amap;
      });

      this.olMap = new Map({
        target: this.$refs[‘map-root‘],
        layers: [this.amapLayer, this.arcStreetLayer, this.osmLayer],
        view: new View({
          zoom: 0,
          center: [0, 0],
          constrainResolution: true  //确保OSM tile缩放到正确的级别
        }),
        controls: defaults().extend([
          new FullScreen(),
          new ZoomSlider(),
          new ScaleLine(),
          new OverviewMap({
            layers: [
              new TileLayer({
                source: new OSM(),
            })]
          }),
          new MousePosition({
            coordinateFormat: createStringXY(4), // 坐标格式
            projection: ‘EPSG:4326‘,  // 投影坐标系
            className: ‘custom-mouse-position‘,  // CSS类名
            target: this.$refs[‘mouse-position‘]  // 元素名
          })
        ]),
        interactions: defaultsInteraction().extend([
          new DragRotate({
            condition: ctrlCondition
          }), // ctrl+drag实现地图旋转
        ])
      })
    },
    watch: {
      show_osm: function(a,b,c) {
        a = this.amapLayer
        b = this.osmLayer
        c = this.arcStreetLayer
        b.setVisible(true)
        c.setVisible(false)
        a.setVisible(false)
      },
      show_amap: function(a,b,c) {
        a = this.amapLayer
        b = this.osmLayer
        c = this.arcStreetLayer
        a.setVisible(true)
        b.setVisible(false)
        c.setVisible(false)
      } ,
      show_arc: function(a,b,c) {
        a = this.amapLayer
        b = this.osmLayer
        c = this.arcStreetLayer
        c.setVisible(true)
        a.setVisible(false)
        b.setVisible(false)
      }
    },
    beforeDestroy(){
      EventBus.$off(‘switch-osm‘, ‘switch-arc‘,‘switch-amap‘)
    }
  }
</script>

<style scoped>
  .mouse-position-wrapper{
    width: 200px;
    color: black;
    position: relative;
    height: 0px;
    left: 86%;
    top: 94%;
    z-index: 999;
  }
</style>
简单说明我的思路:
首先,将“图层切换”这一需求单独放在ChangeLayer.vue文件里,并将其设为Panel的子组件。因为Panel和MapContainer是兄弟组件,不可以使用props和events进行通信,因此我使用了事件总线EventBus。
我的思路是使三个图层的地图都进行预加载,只控制它们的显示和隐藏。我觉得这样可能比频繁删除和增加新图层的性能要好一些。当每个按钮被点击时,会emit对应的信号给MapContainer,而后使EventBus在mounted()中接受信号。我设置了三个布尔值(show_osm、show_amap、show_arc),使用Openlayers的setVisible方法设置对应data里的图层是否可见。
最终效果如下:
我这里只实现了最简单的图层切换,在实际场景中,如果需要动态地载入新的图层,则肯定需要写多个函数进行包装。这章内容我还留了一个坑,就是OverViewMap()组件中的鸟瞰图并没有跟随图层的切换而切换。这一块内容我有太多太多可以优化的地方了,主要还是自己的基础太不扎实。
总结一下与Vue有关的知识:
1、把变量放入data里。在Vue中的this.属性名直接访问的是data中的数据。这一点绝不可以搞混。
2、new命令的作用是执行构造函数,返回一个实例对象。因此在data里使用
data(){
	return{
		amapLayer: new TileLayer({
		  source: null,
		  preload: Infinity,
		  visible: false
		}),
  }
}
是完全可行的。
3、关于在data中使用return返回数据:这是一个比较好的习惯。因为不使用return包裹的数据在项目的全局可见,可能会造成变量污染,而使用return包裹后数据中变量只在当前组件中生效,不会影响其他组件。
4、在页面刷新了之后,与之相关的EventBus会被移除,这在特定需求下可能会产生错误。此外,也需要处理好EventBus在项目中的关系,通常要在vue页面销毁时同时移除EventBus事件监听(我此例只是单页面)。
5、我在代码中使用的watch未必十分合适,因为Vue建议的是在“需要数据变化响应时执行异步操作或高性能消耗的操作”时才使用watch,我这种情况下并不需要。
代码地址:https://github.com/YonniYe/vue_openlayers_intergration/tree/3.0
原文:https://www.cnblogs.com/yonniye/p/14408816.html