上一篇我们提到了怎么在Desktop Extension中等待并处理UWP端发出的request。本篇将讨论UWP和Desktop Extension双向交互的场景,即存在从两端各自发出request,交由对方接受处理。
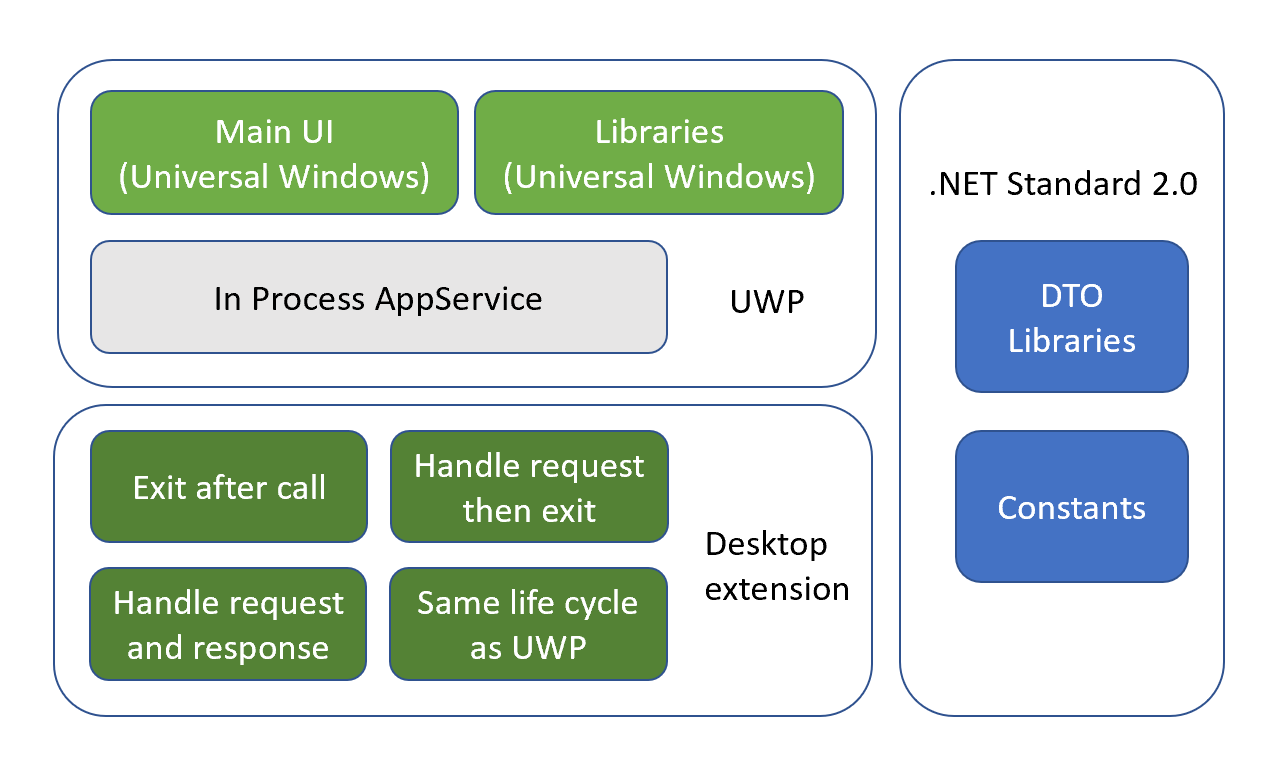
依然是回顾之前总结的四个场景分类:

这种存在多个request/response周期的场景,具有以下特征:
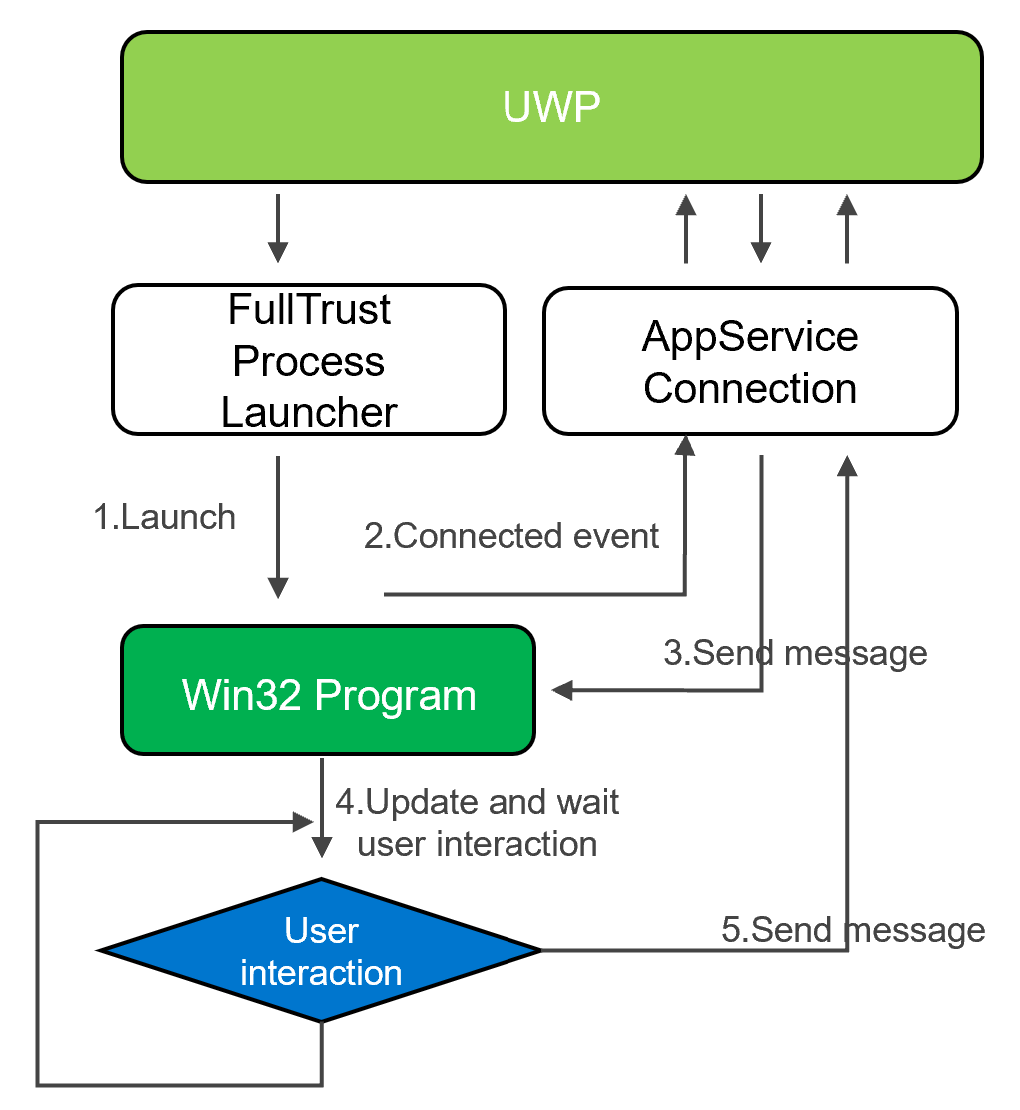
该场景示意图如下:

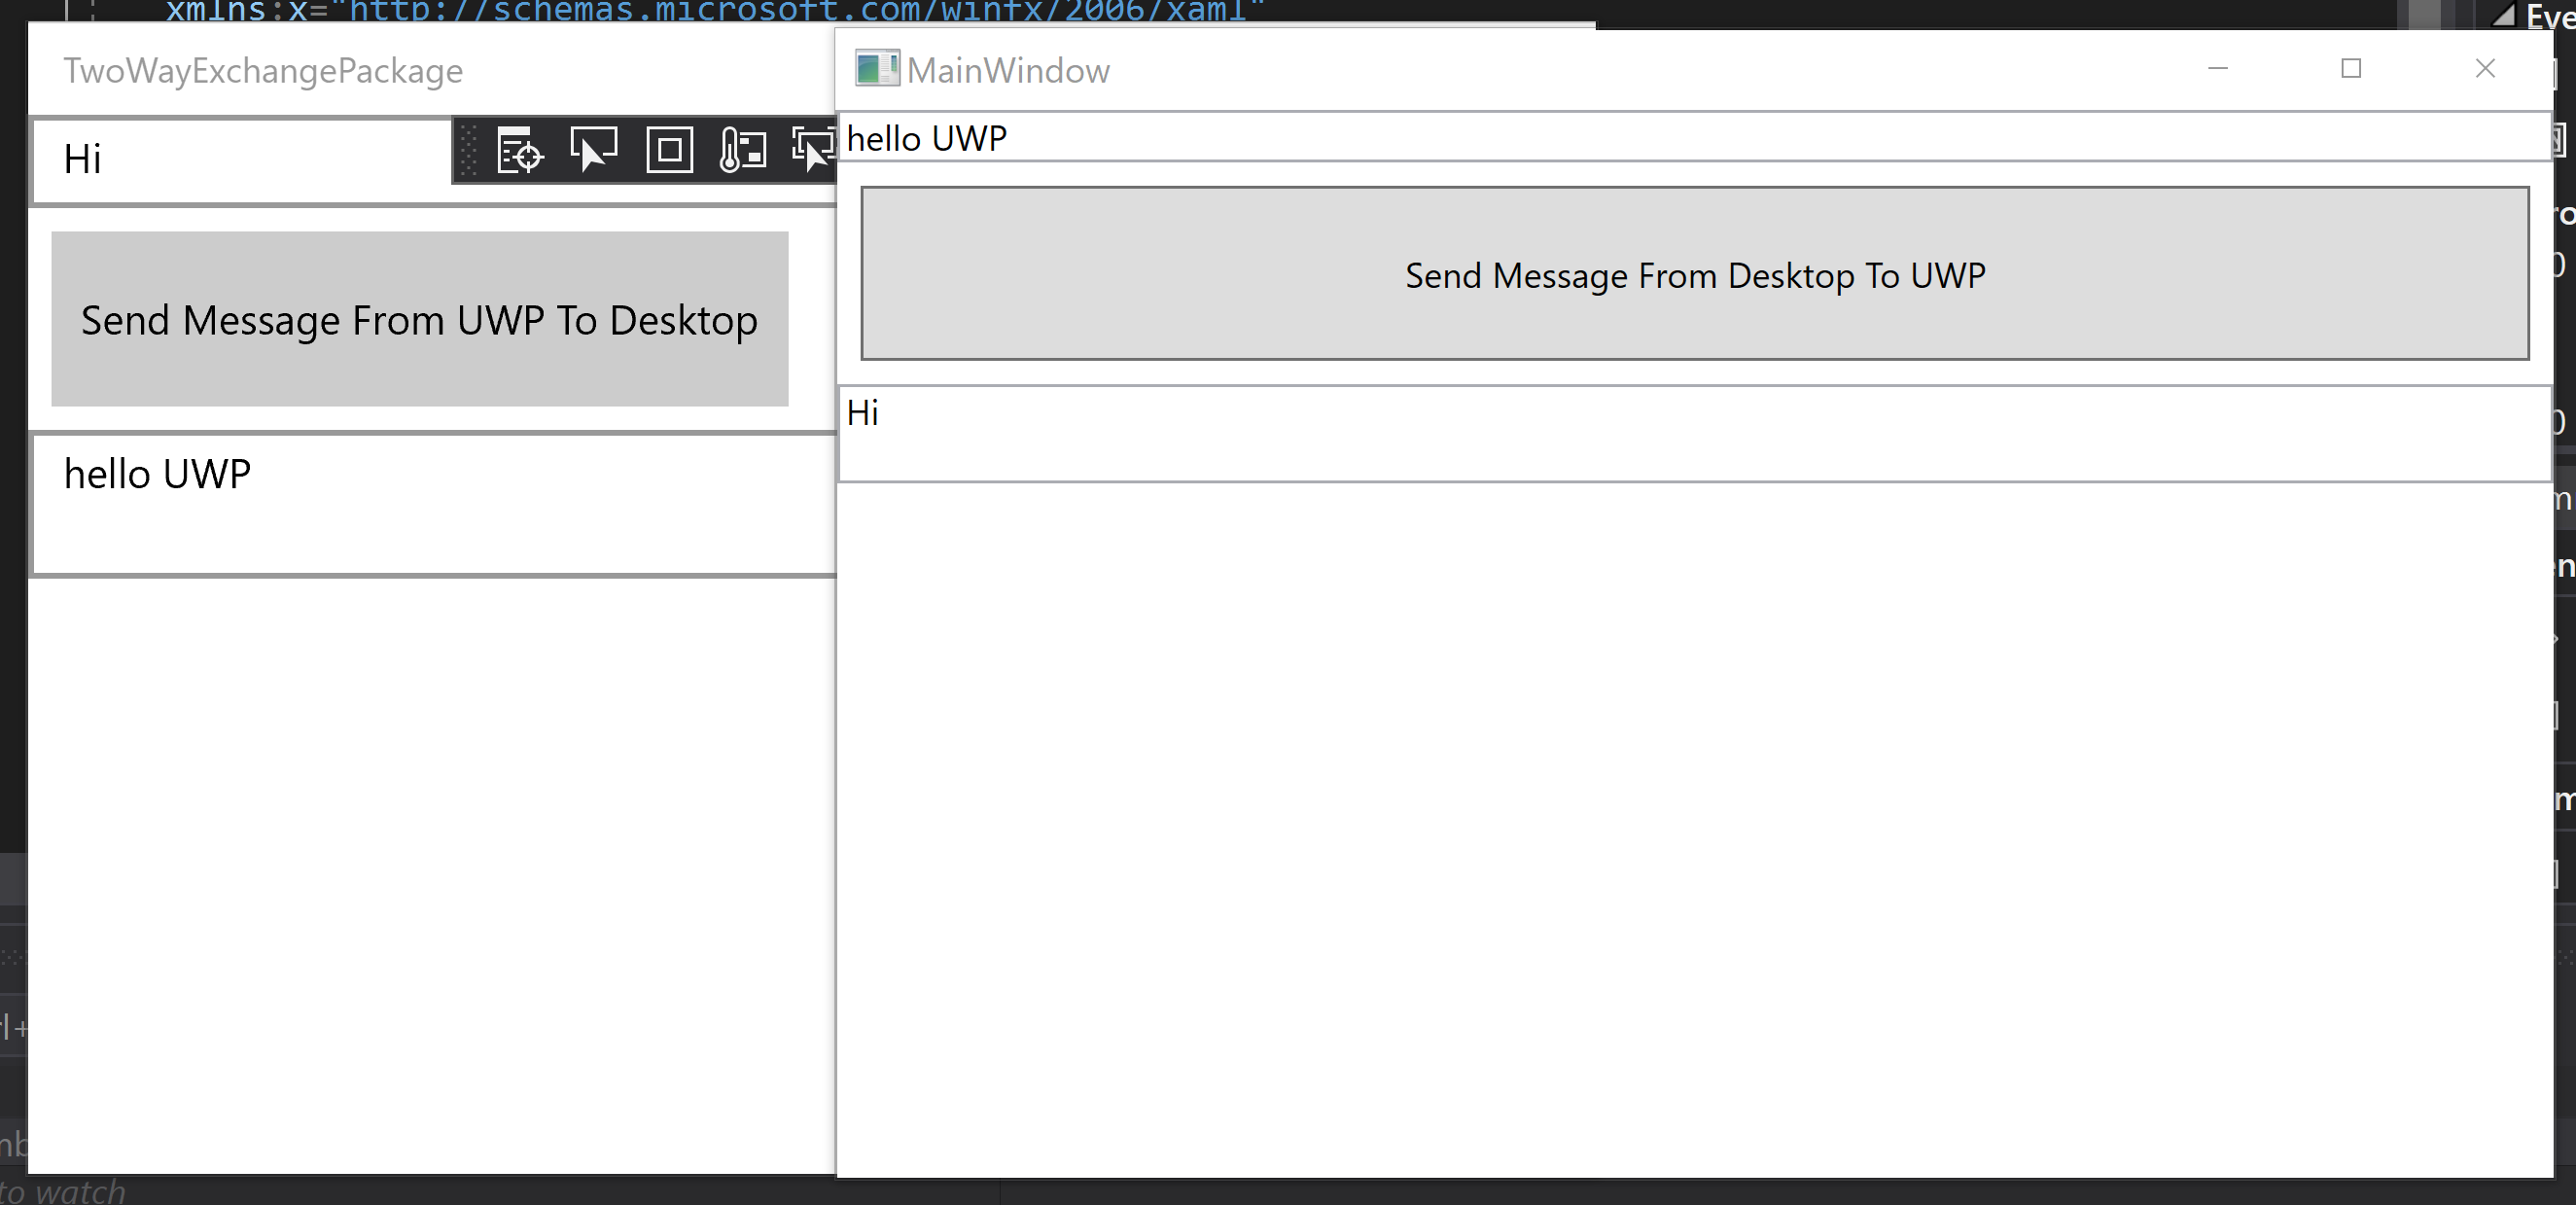
上图显示了最简化的双向交互流程,在Sample工程中,以互相发文字消息的UWP和WPF窗体举例。两个窗体始终保持在前台,也不存在AppServiceConnection被销毁的问题。
而实际的业务场景中,可能存在复杂的变化。即特征中提到的“Desktop Extension端满足条件时退出“这一点。

上图为Sample工程运行时的界面。如何使用Desktop Extension,及建立AppServiceConnection,之前的文章已解释过,不再提及。本篇仅对不同之处进行分析。
TwoWayExchange.FrontUWP是一个UWP工程,在MainPage.cs的构造函数中我们通过AppServiceHandler这个帮助类来注册Connected事件。
        public MainPage()
        {
            this.InitializeComponent();

            if (ApiInformation.IsApiContractPresent("Windows.ApplicationModel.FullTrustAppContract", 1, 0))
            {
                AppServiceHandler.Instance.Connected += Instance_Connected;
                FullTrustProcessLauncher.LaunchFullTrustProcessForCurrentAppAsync();
            }
        }
该事件会在App.xaml.cs中的OnBackgroundActived方法中被触发。这也是工程代码中,实际和AppServiceConnection建立关联的起点。
        protected override void OnBackgroundActivated(BackgroundActivatedEventArgs args)
        {
            base.OnBackgroundActivated(args);
            if (args.TaskInstance.TriggerDetails is AppServiceTriggerDetails details)
            {
                if (details.CallerPackageFamilyName == Package.Current.Id.FamilyName)
                {
                    var deferral = args.TaskInstance.GetDeferral();
                    args.TaskInstance.Canceled += (sender, e) => { deferral?.Complete(); };
                    AppServiceHandler.Instance.OnBackgroundActivated(details);
                }
            }
        }
在触发Connected事件后,我们在获得的AppServiceConnection对象上注册RequestReceived事件,同时保存AppServiceConnection对象以供SendMessage时使用。
        private void Instance_Connected(object sender, AppServiceConnectionConnectedEventArgs e)
        {
            AppServiceHandler.Instance.Connected -= Instance_Connected;
            Connection = e.Connection;
            Connection.RequestReceived += Connection_RequestReceived;
        }

        private async void Connection_RequestReceived(AppServiceConnection sender, AppServiceRequestReceivedEventArgs args)
        {
            var message = args.Request.Message;
            if (message.TryGetValue("Desktop", out object content))
            {
                await Dispatcher.RunAsync(Windows.UI.Core.CoreDispatcherPriority.Normal, () =>
                { this.textBoxReceive.Text += $"{content}\n"; });
            }
        }

        private async void Button_Click(object sender, RoutedEventArgs e)
        {
            var valueSet = new ValueSet();
            valueSet.Add("UWP", this.textBoxSend.Text);
            var response = await Connection.SendMessageAsync(valueSet);
        }
而在Desktop Extension的WPF工程中,几乎是对称的代码结构,不同之处无非AppServiceConnection源头是通过Desktop端的OpenAsync方法建立。
        public async Task InitializeAsync()
        {
            Connection = new AppServiceConnection();
            Connection.PackageFamilyName = Package.Current.Id.FamilyName;
            Connection.AppServiceName = "TwoWayExchangeAppService";
            AppServiceConnectionStatus status = await Connection.OpenAsync();
            if (status == AppServiceConnectionStatus.Success)
            {
                Connection.RequestReceived += Connection_RequestReceived;
            }
        }

        private void Connection_RequestReceived(AppServiceConnection sender, AppServiceRequestReceivedEventArgs args)
        {
            if (args.Request.Message.TryGetValue("UWP", out object content))
            {
                Dispatcher.Invoke(() => { this.textBoxReceive.Text += $"{content}\n"; });
            }
        }

        private async void Button_Click(object sender, RoutedEventArgs e)
        {
            var message = new ValueSet();
            message.Add("Desktop", this.textBoxSend.Text);
            await Connection.SendMessageAsync(message);
        }
至于打包用的Packaging工程,创建及注意事项,和前一篇完全一致,不再赘述。
本篇侧重于双向交互,在Desktop端注意Windows.mind和System.Runtime.WindowsRuntime两个引用的添加,否则是无法利用AppServiceConnection来通讯的。
虽然文中示例极为简单,似没有实用价值。而在实际开发中,多有遇到UWP端暂时无法实现的UI及功能,诸如不规则的,透明的,或需要锚定的窗体,Windows桌面右下角的Systray等。均可以通过文中的方式来实现交互。
Github:
https://github.com/manupstairs/UWPSamples/tree/master/UWPSamples/DataExchangeUWP/TwoWayExchange
2020年的UWP(5)——UWP和Desktop Extension的双向交互
原文:https://www.cnblogs.com/bruce1992/p/14421562.html