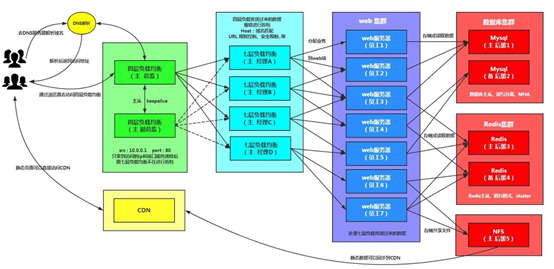
四层负载均衡是基于传输层协议包来封装的(如:TCP/IP),那我们前面使用到的七层是指的应用层,他的组装在四层的基础之上,无论四层还是七层都是指的OSI网络模型。
1、四层+七层来做负载均衡,四层可以保证七层的负载均衡的高可用性;如:nginx就无法保证自己的服务高可用,需要依赖LVS或者keepalive。
2、如:tcp协议的负载均衡,有些请求是TCP协议的(mysql、ssh),或者说这些请求只需要使用四层进行端口的转发就可以了,所以使用四层负载均衡。
[root@lb02 ~]# cat /etc/yum.repos.d/nginx.repo
[nginx-stable]
name=nginx stable repo
baseurl=http://nginx.org/packages/centos/7/$basearch/
gpgcheck=0
enabled=1
gpgkey=https://nginx.org/keys/nginx_signing.key
#在lb02上安装nginx
[root@lb02 yum.repos.d]# yum install -y nginx
#在lb02上同步lb01的所有nginx相关配置
[root@lb02 ~]# scp -r root@172.16.1.5:/etc/nginx /etc/
#启动nginx
[root@lb02 conf.d]# nginx -t
nginx: the configuration file /etc/nginx/nginx.conf syntax is ok
nginx: configuration file /etc/nginx/nginx.conf test is successful
[root@lb02 conf.d]# systemctl enable nginx
Created symlink from /etc/systemd/system/multi-user.target.wants/nginx.service to /usr/lib/systemd/system/nginx.service.
[root@lb02 conf.d]# nginx
[root@lb02 ~]# vim /etc/nginx/nginx.conf
user nginx;
worker_processes 1;
error_log /var/log/nginx/error.log warn;
pid /var/run/nginx.pid;
events {
worker_connections 1024;
}
events {
worker_connections 1024;
}
include /etc/nginx/conf.c/*.conf;
http {
include /etc/nginx/mime.types;
default_type application/octet-stream;
log_format main ‘$remote_addr - $remote_user [$time_local] "$r
equest" ‘
‘$status $body_bytes_sent "$http_referer" ‘
‘"$http_user_agent" "$http_x_forwarded_for"‘;
access_log /var/log/nginx/access.log main;
sendfile on;
#tcp_nopush on;
keepalive_timeout 65;
"/etc/nginx/nginx.conf" 33L, 677C written
[root@lb02 ~]# mkdir /etc/nginx/conf.c
[root@lb02 conf.c]# cat lb_domain.conf
stream {
upstream lb {
server 172.16.1.5:80 weight=5 max_fails=3 fail_timeout=30s;
server 172.16.1.6:80 weight=5 max_fails=3 fail_timeout=30s;
}
server {
listen 80;
proxy_connect_timeout 3s;
proxy_timeout 3s;
proxy_pass lb;
}
}
[root@web03 conf.c]# nginx -t
nginx: the configuration file /etc/nginx/nginx.conf syntax is ok
nginx: configuration file /etc/nginx/nginx.conf test is successful
[root@web03 conf.c]# nginx -s reload
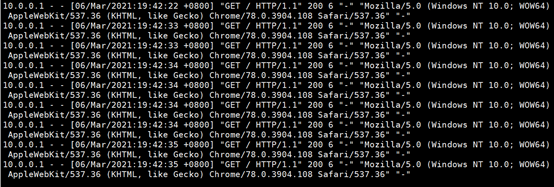
#配置本机hosts解析后浏览器访问并查看nginx日志

[root@lb02 ~]# vim /etc/nginx/conf.c/lb_domain.conf
stream {
log_format proxy ‘$remote_addr $remote_port - [$time_local] $status $protocol ‘
‘"$upstream_addr" "$upstream_bytes_sent" "$upstream_connect_time"‘ ;
access_log /var/log/nginx/proxy.log proxy;
upstream lb {
server 172.16.1.9:80 weight=5 max_fails=3 fail_timeout=30s;
server 172.16.1.10:80 weight=5 max_fails=3 fail_timeout=30s;
}
server {
listen 80;
proxy_connect_timeout 3s;
proxy_timeout 3s;
proxy_pass lb;
}
}
~
~
~
~
~
"/etc/nginx/conf.c/lb_domain.conf" 16L, 463C written
[root@lb02 ~]# nginx -t
nginx: the configuration file /etc/nginx/nginx.conf syntax is ok
nginx: configuration file /etc/nginx/nginx.conf test is successful
请求负载均衡 5555 ---> 172.16.1.7:22;
请求负载均衡 6666 ---> 172.16.1.51:3306;
[root@lb02 ~]# cat /etc/nginx/conf.c/lb_domain.conf
stream {
log_format proxy ‘$remote_addr $remote_port - [$time_local] $status $protocol ‘
‘"$upstream_addr" "$upstream_bytes_sent" "$upstream_connect_time"‘ ;
access_log /var/log/nginx/proxy.log proxy;
upstream ssh_7 {
server 10.0.0.207:22;
}
upstream mysql_51 {
server 10.0.0.251:3306;
}
server {
listen 5555;
proxy_connect_timeout 3s;
proxy_timeout 300s;
proxy_pass ssh_7;
}
server {
listen 6666;
proxy_connect_timeout 3s;
proxy_timeout 3s;
proxy_pass mysql_51;
}
}
原文:https://www.cnblogs.com/sunyuhang1/p/14492042.html