
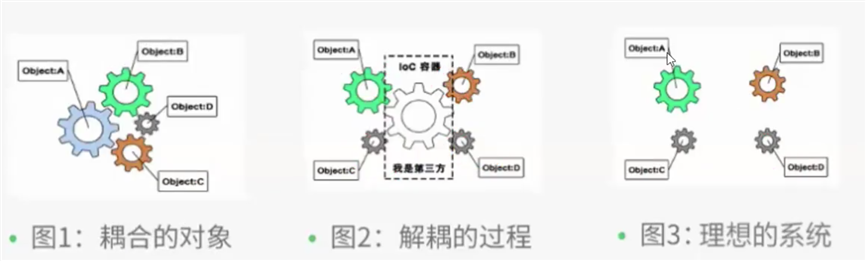
控制反转其实是一种设计思想,他将原本在程序员手中的控制权反转给了用户。将其程序自动创建对象的权利变成了程序被动接受用户传入的参数。
实例:
    public class Userserviceimpl implements Userservice{
    @Override
    public void getUser() {
        new Userdaoimpl().getname();
    }
}
public class Userserviceimpl implements Userservice{
    private Userdao userdao;

    public void setUserdao(Userdao userdao) {
        this.userdao = userdao;
    }
    @Override
    public void getUser() {
        userdao.getname();
    }
}
小结:
package com.lee.pojo;

public class Hello {
    private String Str;

    public void setStr(String str) {
        Str = str;
    }

    public String getStr() {
        return Str;
    }

    @Override
    public String toString() {
        return "Hello{" +
                "Str=‘" + Str + ‘\‘‘ +
                ‘}‘;
    }
}
<?xml version="1.0" encoding="UTF-8"?>
<beans xmlns="http://www.springframework.org/schema/beans"
       xmlns:xsi="http://www.w3.org/2001/XMLSchema-instance"
       xsi:schemaLocation="http://www.springframework.org/schema/beans
        https://www.springframework.org/schema/beans/spring-beans.xsd">
    <bean id="hello" class="com.lee.pojo.Hello">
        <property name="str" value="Spring"/>
    </bean>
</beans>
package com.lee;

import com.lee.pojo.Hello;
import org.junit.Test;
import org.springframework.context.support.ClassPathXmlApplicationContext;

public class MyTest {
    public static void main(String[] args) {
        //获取spring上下文对象
        ClassPathXmlApplicationContext context = new ClassPathXmlApplicationContext("beans.xml");
        //我们的对象现在都在spring中管理了,我们只需要从中取出来即可
        Hello hello = (Hello) context.getBean("hello");
        System.out.println(hello.toString());
    }
}
1.使用无参构造创建对象(默认)
2.使用有参构造创建对象
    <bean id="hello" class="com.lee.pojo.Hello">
        <!--下标赋值-->
        <constructor-arg index="0" value="老李"/>
    </bean>
        <bean id="hello" class="com.lee.pojo.Hello">
            <constructor-arg type="java.lang.String" value="老李"/>
        </bean>
    <bean id="hello" class="com.lee.pojo.Hello">
        <constructor-arg name="Str" value="老李"/>
    </bean>
<!--通过alias起别名-->
    <bean id="hello" class="com.lee.pojo.Hello">
        <constructor-arg name="Str" value="老李"/>
    </bean>
    <alias name="hello" alias="hello2"/>
<!--
1.name也可以起别名,而且能起多个
2.id:bean的唯一标识,相当于我们的对象名
3.class:对象所对应的全限定名
-->
```xml
    <bean id="hello" class="com.lee.pojo.Hello" name="hello3,hello4">
        <constructor-arg name="Str" value="老李"/>
    </bean>
    <import resource="beans1.xml"/>
    <import resource="beans2.xml"/>
    <import resource="beans3.xml"/>
依赖:bean对象的创建依赖于容器
注入:bean对象的所有属性由容器来注入
<?xml version="1.0" encoding="UTF-8"?>
<beans xmlns="http://www.springframework.org/schema/beans"
       xmlns:xsi="http://www.w3.org/2001/XMLSchema-instance"
       xsi:schemaLocation="http://www.springframework.org/schema/beans
        https://www.springframework.org/schema/beans/spring-beans.xsd">
    <bean id="address" class="com.lee.pojo.Address"/>
    <bean id="student" class="com.lee.pojo.Student">
        <!--1.普通值注入-->
        <property name="name" value="李好"/>
        <!--2.bean注入-->
        <property name="address" ref="address"/>
        <!--3.数组注入-->
        <property name="books">
            <array>
                <value>水浒传</value>
                <value>三国演义</value>
                <value>红楼梦</value>
                <value>西游记</value>
            </array>
        </property>
        <!--4.列表注入-->
        <property name="hobby">
            <list>
                <value>看书</value>
                <value>跳舞</value>
                <value>放屁</value>
            </list>
        </property>
        <!--5.map注入-->
        <property name="card">
            <map>
                <entry key="身份证" value="123456"/>
                <entry key="银行卡" value="654321"/>
            </map>
        </property>
        <!--6.Set注入-->
        <property name="game">
            <set>
                <value>LOL</value>
            </set>
        </property>
        <!--7.空值注入-->
        <property name="wife">
            <null/>
        </property>
        <!--8.properties-->
        <property name="info">
            <props>
                <prop key="学号">200822222</prop>
            </props>
        </property>
    </bean>
</beans>
实例:
<?xml version="1.0" encoding="UTF-8"?>
<beans xmlns="http://www.springframework.org/schema/beans"
       xmlns:xsi="http://www.w3.org/2001/XMLSchema-instance"
       xmlns:p="http://www.springframework.org/schema/p"
       xsi:schemaLocation="http://www.springframework.org/schema/beans
        https://www.springframework.org/schema/beans/spring-beans.xsd">

    <bean id="user" class="com.lee.pojo.User" p:name="老李" p:age="18"/>

</beans>

重点掌握前两个!!
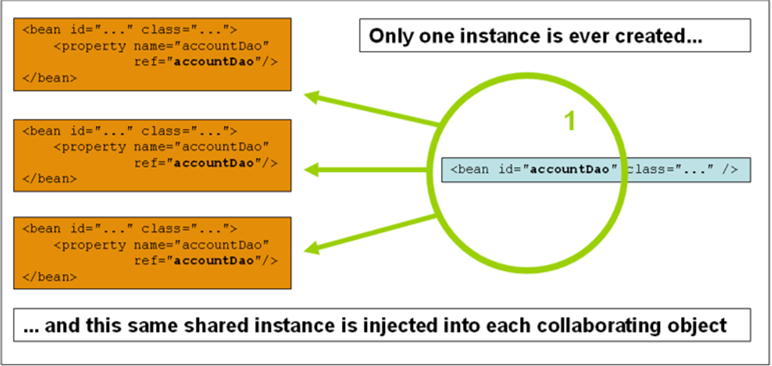
<bean id="accountService" class="com.something.DefaultAccountService" scope="singleton"/>
当您定义一个bean定义并且其作用域为单例时,Spring IoC容器将为该bean定义的对象创建一个实例。该单个实例存储在此类单例bean的高速缓存中,并且对该命名bean的所有后续请求和引用都返回该高速缓存的对象。通俗来说就是每一次请求容器返回的对象都是同一个对象。
2.原型模式
每次从容器中get都会产生一个新对象
<bean id="accountService" class="com.something.DefaultAccountService" scope="prototype"/>

ByName自动装配
    <bean id="cat" class="com.lee.pojo.Cat"/>
    <bean id="dog" class="com.lee.pojo.Dog"/>
    <bean id="people" class="com.lee.pojo.People" autowire="byName"> <!--byname:会自动在容器中查找和
                                                                        自己对象set方法后面的值d对应的bean id-->

        <property name="name" value="老李"/>
<!--手动装配-->
<!--        <property name="cat" ref="cat"/>-->
<!--        <property name="dog" ref="dog"/>-->
    </bean>
Bytype自动装配
    <bean id="cat" class="com.lee.pojo.Cat"/>
    <bean id="dog" class="com.lee.pojo.Dog"/>
    <bean id="people" class="com.lee.pojo.People" autowire="bytype"> <!--byname:会自动在容器中查找和
                                                                        自己对象属性类型对应的bean-->

        <property name="name" value="老李"/>
<!--手动装配-->
<!--        <property name="cat" ref="cat"/>-->
<!--        <property name="dog" ref="dog"/>-->
    </bean>
小结:
1.导入约束:context约束
<?xml version="1.0" encoding="UTF-8"?>
<beans xmlns="http://www.springframework.org/schema/beans"
       xmlns:xsi="http://www.w3.org/2001/XMLSchema-instance"
       xmlns:context="http://www.springframework.org/schema/context"
       xmlns:aop="http://www.springframework.org/schema/aop"
       xsi:schemaLocation="http://www.springframework.org/schema/beans
        https://www.springframework.org/schema/beans/spring-beans.xsd
        http://www.springframework.org/schema/context
        https://www.springframework.org/schema/beans/spring-context.xsd
        http://www.springframework.org/schema/aop
        https://www.springframework.org/schema/beans/spring-aop.xsd">

    <!--开启注解的支持-->
    <context:annotation-config/>
    <bean id="cat" class="com.lee.pojo.Cat"/>
    <bean id="dog" class="com.lee.pojo.Dog"/>
    <bean id="people" class="com.lee.pojo.People"/>
</beans>
2.配置注解支持:context:annotation-config/
3.小结
    private String name;
    @Autowired
    @Qualifier(value = "dog111")
    private Dog dog;

    @Autowired
    @Qualifier(value = "cat111")
    private Cat cat;
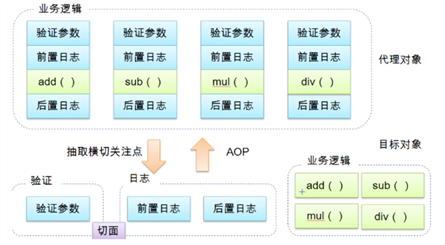
为什么要学代理模式? 因为这就是Spring AOP的底层

代理模式的分类:
角色分析
package com.lee.pojo;

public interface Rent {
    public void rent();
}
package com.lee.pojo;

public class Host implements Rent{
    @Override
    public void rent() {
        System.out.println("我的房屋要出租!");
    }
}
package com.lee.pojo;

public class Proxy implements Rent{

    private Host host;

    public Proxy(Host host) {
        this.host = host;
    }

    @Override
    public void rent() {
        host.rent();
        seehouse();
        fare();
    }
    public void seehouse(){
        System.out.println("看房!");
    }
    public void fare(){
        System.out.println("收取中介费!");
    }
}
package com.lee.pojo;

public class Client {
    public static void main(String[] args) {
        Host host = new Host();
        Proxy proxy = new Proxy(host);
        proxy.rent();
    }
}
分类
使用原生spring API接口(主要是spring API接口实现)
<dependency>
            <groupId>org.aspectj</groupId>
            <artifactId>aspectjweaver</artifactId>
            <version>1.9.4</version>
        </dependency>
<?xml version="1.0" encoding="UTF-8"?>
<beans xmlns="http://www.springframework.org/schema/beans"
       xmlns:xsi="http://www.w3.org/2001/XMLSchema-instance"
       xmlns:p="http://www.springframework.org/schema/p"
       xmlns:aop="http://www.springframework.org/schema/aop"
       xsi:schemaLocation="http://www.springframework.org/schema/beans
        https://www.springframework.org/schema/beans/spring-beans.xsd
        http://www.springframework.org/schema/aop
        https://www.springframework.org/schema/aop/spring-aop.xsd">

    <bean id="userservice" class="com.lee.Service.Userservice"/>
    <bean id="afterlog" class="com.lee.Log.Afterlog"/>
    <bean id="firstlog" class="com.lee.Log.Firstlog"/>

    <!--配置AOP-->
    <aop:config>
        <!--切入点-->
        <aop:pointcut id="pointcut" expression="execution(* com.lee.Service.Userservice.*(..))"/>
        <aop:advisor advice-ref="firstlog" pointcut-ref="pointcut"/>
        <aop:advisor advice-ref="afterlog" pointcut-ref="pointcut"/>


    </aop:config>
</beans>
3.firstlog.java
package com.lee.Log;

import org.springframework.aop.MethodBeforeAdvice;

import java.lang.reflect.Method;

public class Firstlog implements MethodBeforeAdvice {
    @Override
    public void before(Method method, Object[] objects, Object o) throws Throwable {
        System.out.println(o.getClass().getName()+"的"+method.getName()+"被执行了!");
    }
}
4.afterlog.java
package com.lee.Log;

import org.springframework.aop.AfterReturningAdvice;

import java.lang.reflect.Method;

public class Afterlog implements AfterReturningAdvice {
    @Override
    public void afterReturning(Object o, Method method, Object[] objects, Object o1) throws Throwable {
        System.out.println("执行了"+method.getName()+",结果为"+o);
    }
}
使用自定义类(主要是切面定义)
package com.lee.diy;

public class DiypointCut {
    public void before(){
        System.out.println("执行前!");
    }
    public void after(){
        System.out.println("执行后!!");
    }
}
<?xml version="1.0" encoding="UTF-8"?>
<beans xmlns="http://www.springframework.org/schema/beans"
       xmlns:xsi="http://www.w3.org/2001/XMLSchema-instance"
       xmlns:p="http://www.springframework.org/schema/p"
       xmlns:aop="http://www.springframework.org/schema/aop"
       xsi:schemaLocation="http://www.springframework.org/schema/beans
        https://www.springframework.org/schema/beans/spring-beans.xsd
        http://www.springframework.org/schema/aop
        https://www.springframework.org/schema/aop/spring-aop.xsd">

    <bean id="userservice" class="com.lee.Service.Userservice"/>
    <bean id="afterlog" class="com.lee.Log.Afterlog"/>
    <bean id="firstlog" class="com.lee.Log.Firstlog"/>
    <bean id="diy" class="com.lee.diy.DiypointCut"/>
    <!--配置AOP-->
    <aop:config>
        <!--切入点-->
<!--        <aop:pointcut id="pointcut" expression="execution(* com.lee.Service.Userservice.*(..))"/>-->
<!--        <aop:advisor advice-ref="firstlog" pointcut-ref="pointcut"/>-->
<!--        <aop:advisor advice-ref="afterlog" pointcut-ref="pointcut"/>-->

        <aop:aspect ref="diy">
            <aop:pointcut id="diyy" expression="execution(* com.lee.Service.Userservice.*(..))"/>
            <aop:before method="before" pointcut-ref="diyy"/>
            <aop:after method="after" pointcut-ref="diyy"/>
        </aop:aspect>


    </aop:config>
</beans>
原文:https://www.cnblogs.com/Jeson-Sun/p/14506456.html