1.首先创建项目和各个文件,如图所示:

2.配置相关数据库连接
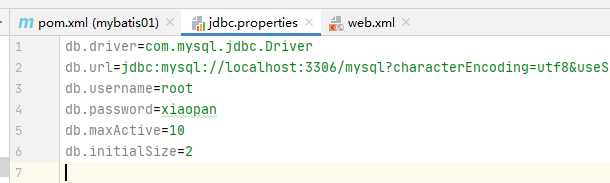
在jdbc.properties中加入
1 db.driver=com.mysql.jdbc.Driver
2 db.url=jdbc:mysql://localhost:3306/mysql?characterEncoding=utf8&useSSL=false&serverTimezone=Asia/Shanghai&rewriteBatchedStatements=true
3 db.username=root
4 db.password=xiaopan
5 db.maxActive=10
6 db.initialSize=2
注意,用户名和密码,还有数据库名换成你自己的。
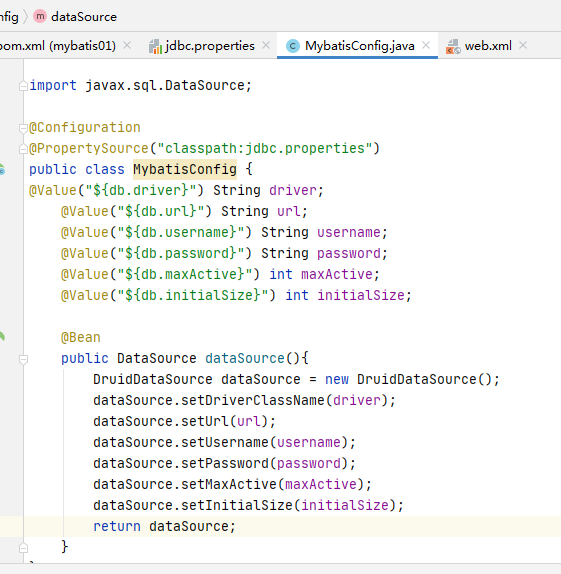
3.创建MybaticConfig数据库配置类。
package com.config;

import com.alibaba.druid.pool.DruidDataSource;
import org.springframework.beans.factory.annotation.Value;
import org.springframework.context.annotation.Bean;
import org.springframework.context.annotation.Configuration;
import org.springframework.context.annotation.PropertySource;

import javax.sql.DataSource;

@Configuration
@PropertySource("classpath:jdbc.properties")
public class MybatisConfig {
@Value("${db.driver}") String driver;
    @Value("${db.url}") String url;
    @Value("${db.username}") String username;
    @Value("${db.password}") String password;
    @Value("${db.maxActive}") int maxActive;
    @Value("${db.initialSize}") int initialSize;

    @Bean
    public DataSource dataSource(){
        DruidDataSource dataSource = new DruidDataSource();
        dataSource.setDriverClassName(driver);
        dataSource.setUrl(url);
        dataSource.setUsername(username);
        dataSource.setPassword(password);
        dataSource.setMaxActive(maxActive);
        dataSource.setInitialSize(initialSize);
        return dataSource;
    }
}
4.进行数据库连接测试
--创建一个测试类TestCase
--在测试类中写入以下代码
import com.config.MybatisConfig;
import org.junit.After;
import org.junit.Before;
import org.junit.Test;
import org.springframework.context.annotation.AnnotationConfigApplicationContext;

import javax.sql.DataSource;
import java.sql.Connection;
import java.sql.ResultSet;
import java.sql.Statement;

public class TestCase {
    AnnotationConfigApplicationContext ctx;
    @Before
    public void init(){
        ctx= new AnnotationConfigApplicationContext(MybatisConfig.class);
    }
    @After
    public void destroy(){
        ctx.close();
    }
    @Test
    public void testDataSource(){
        DataSource ds = ctx.getBean("dataSource",DataSource.class);
        String sql = "select ‘hello world‘";
        try(Connection conn = ds.getConnection()){
            Statement s = conn.createStatement();
            ResultSet rs = s.executeQuery(sql);
            while(rs.next()){
                System.out.println(rs.getString(1));
            }
        }catch (Exception e){
            e.printStackTrace();
        }
    }
}
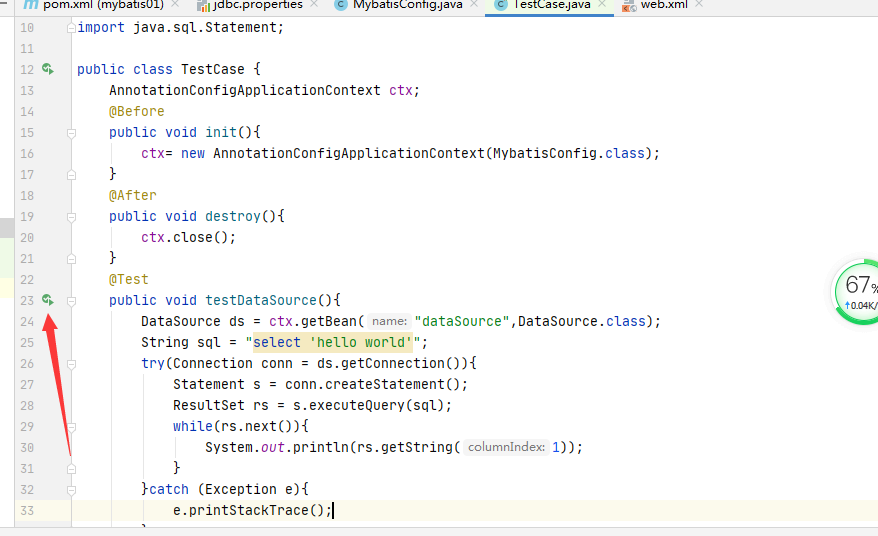
点击测试,出现对应的hello world在控制台中。
原文:https://www.cnblogs.com/bulter/p/14584952.html