本专题将讨论构建主题文件,添加主题logo,调整图片尺寸。
系统不会自动应用新建主题,需要在后台管理面板手动应用。具体操作请参考后台主题应用与配置。
以下是Magento新建主题的高级流程:
app/design/frontend/<your_vendor_name>/<your_theme_name>创建主题目录
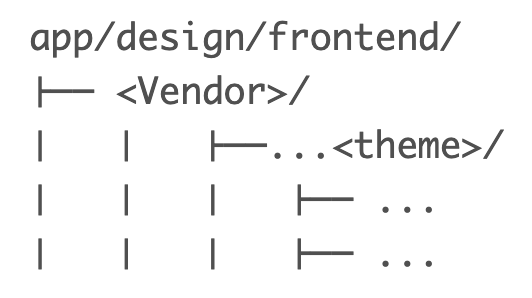
文件夹命名通常和主题代码保持一致,但这只是建议,也可以选择其他合法命名规则
在主题目录中必须创建一个theme.xml,该文件至少包含主题名称。另外,如果有必要也可以指定父主题的名称(基于现有主题新建主题)。
参考以下Demo进行配置:
<theme xmlns:xsi="http://www.w3.org/2001/XMLSchema-instance" xsi:noNamespaceSchemaLocation="urn:magento:framework:Config/etc/theme.xsd">
   <title>New theme</title> <!-- your theme‘s name -->
   <parent>Magento/blank</parent> <!-- the parent theme, in case your theme inherits from an existing theme -->
   <media>
      <preview_image>media/preview.jpg</preview_image> <!-- the path to your theme‘s preview image -->
   </media>
</theme>
添加app/design/frontend/<Vendor>/<theme>/media/preview.jpg>。如果没有preview.jpg需要删除<media>节点:
<theme xmlns:xsi="http://www.w3.org/2001/XMLSchema-instance" xsi:noNamespaceSchemaLocation="urn:magento:framework:Config/etc/theme.xsd">
      <title>New theme</title> <!-- your theme‘s name -->
      <parent>Magento/blank</parent> <!-- the parent theme, in case your theme inherits from an existing theme -->
</theme>
如果修改已注册完成的主题theme.xml中的信息,需要打开或刷新后台管理页面,将变更保存到数据库
Magento主题默认通过Composer进行分发。创建composer.json并注册为packaging服务。默认packaging服务器为:https://packagist.org/
composer.json中保存了主题依赖信息,其中保存了当前主题的依赖关系。如果父主题不是Magento/blank,需要在require节点添加对应的模块信息。例如:
{
    "name": "magento/theme-frontend-luma",
    "description": "N/A",
    "config": {
        "sort-packages": true
    },
    "require": {
        "php": "~7.2.0||~7.3.0",
        "magento/framework": "*",
        "magento/theme-frontend-blank": "*"
    },
    "type": "magento2-theme",
    "license": [
        "OSL-3.0",
        "AFL-3.0"
    ],
    "autoload": {
        "files": [
            "registration.php"
        ]
    }
}
更多详情查看集成composer
为了将主题注册到系统中,需要添加registration.php:
<?php
/**
 * Copyright ? Magento, Inc. All rights reserved.
 * See COPYING.txt for license details.
 */

use \Magento\Framework\Component\ComponentRegistrar;

ComponentRegistrar::register(ComponentRegistrar::THEME, ‘frontend/<Vendor>/<theme>‘, __DIR__);
其中<Vendor>是商户名称,<theme>为主题名称。更多详情参考Luma主题的registration.php
商品图片的尺寸等属性信息都是通过view.xml来配置。除非父主题中已经存在,否则新主题必须创建改文件。
如果商品图片尺寸和父主题不一致或主题没有继承现有主题,需按照以下流程创建:
在Magento安装目录创建目录和文件。
在主题目录创建etc目录
从父主题或Blank主题etc目录复制view.xml到新主题中。例如复制theme-frontend-blank/etc/view.xml到自定义主题etc目录
配置商品图片尺寸。例如设置产品列表页商品图案为正方形:
  <image id="category_page_grid" type="small_image">
      <width>250</width>
      <height>250</height>
  </image>
更多细节配置查看主题图片配置章节。
主题包含各种类型的静态文件:样式、字体、js、图案,每种类型被存储在各自的二级目录中: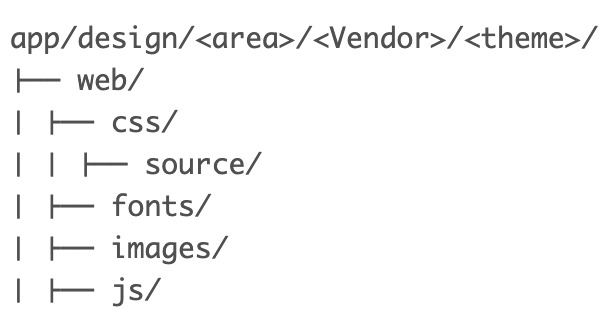
在<theme>/web/images中存储了全局主题相关的静态文件,例如Logo。主题也包含具体模块特定的文件,当然这些文件存储在各自对应的二级目录中。例如<theme>/<Namesapce_Module>/web/css。下面将详细讨论主题特定模块的文件。
注:如果在开发过程中修改这些模块,需要清除pub/static和var/view_preprocessed目录,然后刷新页面。否则,前端展示的仍是老文件
rm -r <magento_root>/pub/static/*/*
rm -r <magento_root>/var/view_propresssed/*
现在我们的目录结构就变成了这样:
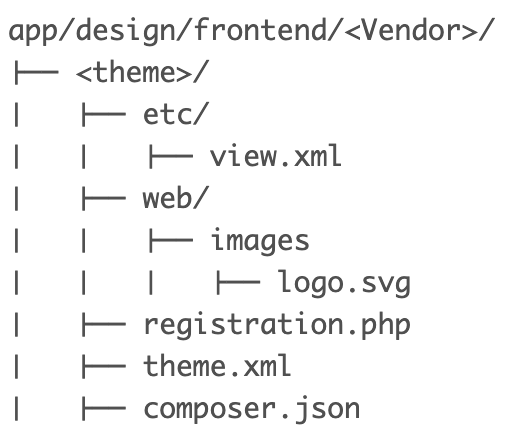
在Magento中,默认logo为logo.svg。<theme_dir>/<web>/images目录中的logo.svg将会自动注册为主题logo。一旦应用该主题,商户页面头部就会展示该logo。
在自定义主题中可以通过声明来重新定义logo的类型和名称。是否必须声明取决于是否继承了父主题及其Logo。一般有如下情况:
创建布局<theme_dir>/Magento_Theme/layout/default.xml继承声明主题Logo。例如如果logo文件为300*300px的my_logo.png,需要添加如下声明:
<page xmlns:xsi="http://www.w3.org/2001/XMLSchema-instance" xsi:noNamespaceSchemaLocation="urn:magento:framework:View/Layout/etc/page_configuration.xsd">
    <body>
        <referenceBlock name="logo">
            <arguments>
                <argument name="logo_file" xsi:type="string">images/my_logo.png</argument>
                <argument name="logo_width" xsi:type="number">300</argument>
                <argument name="logo_height" xsi:type="number">300</argument>
                <argument name="logo_alt" xsi:type="string">Logo name</argument>
            </arguments>
        </referenceBlock>
    </body>
</page>
Logo声明为可选项,更多主题布局参考布局章节。
如果清楚了缓存仍然无法看到主题,尝试通过bin/magento setup:static-content:deploy重新部署静态文件。如果Magento为非production模式需要添加-f强制执行。
添加主题文件后,打开或刷新后台管理页面,主题将自动注册到数据库中。如果主题被删除了,将自动使用默认主题,但并不会主动删除主题注册记录。
关于如何应用主题,参考后台配置应用主题
原文:https://www.cnblogs.com/2019PawN/p/14627015.html