开发工具:ide、数据库:mysql5.7、springboot版本:2.3.7
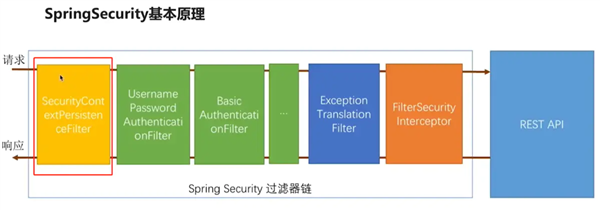
个人对Spring Security的执行过程大致理解(仅供参考)

使用Spring Security很简单,只要在pom.xml文件中,引入spring security的依赖就可以了
pom配置:
<dependency>
  <groupId>org.springframework.boot</groupId>
   <artifactId>spring-boot-starter-security</artifactId>
</dependency>
这个时候我们不在配置文件中做任何配置,随便写一个Controller
@RestController
public class TestController {
    @GetMapping("/hello")
    public String request() {
        return "hello";
    }
}
启动项目,我们会发现有这么一段日志

此时表示Security生效,默认对项目进行了保护,我们访问该Controller中的接口(http://localhost:8080/securitydemo/hello),会见到如下登录界面(此界面为security框架自带的默认登录界面,后期不用可以换成自定义登录界面)
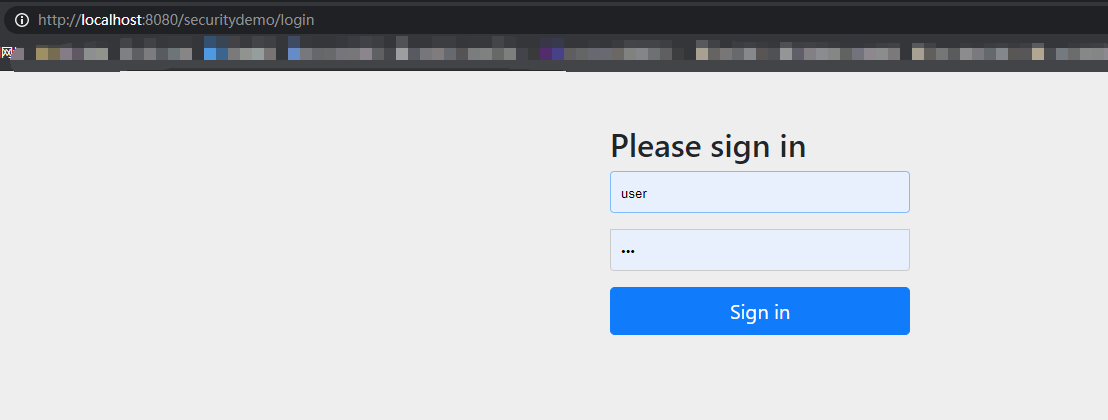
这里面的用户名和密码是什么呢?此时我们需要输入用户名:user,密码则为之前日志中的"19262f35-9ded-49c2-a8f6-5431536cc50c",输入之后,我们可以看到此时可以正常访问该接口
在老版本的Springboot中(比如说Springboot 1.x版本中),可以通过如下方式来关闭Spring Security的生效,但是现在Springboot 2中已经不再支持
security:
  basic:
    enabled: false
springboot2.x后可以在启动类中设置

1、配置基于内存的角色授权
1.1目录
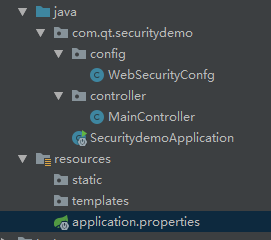
1.2 WebSecurityConfg配置类
Spring Security的核心配置类是 WebSecurityConfigurerAdapter抽象类,这是权限管理启动的入口,这里我们自定义一个实现类去它。
/**
 * @Author qt
 * @Date 2021/3/25
 * @Description SpringSecurity安全框架配置
 */
@Configuration
@EnableWebSecurity//开启Spring Security的功能
//prePostEnabled属性决定Spring Security在接口前注解是否可用@PreAuthorize,@PostAuthorize等注解,设置为true,会拦截加了这些注解的接口
@EnableGlobalMethodSecurity(prePostEnabled=true)
public class WebSecurityConfg extends WebSecurityConfigurerAdapter {
    @Override
    protected void configure(AuthenticationManagerBuilder auth) throws Exception {
        /**
        * 基于内存的方式,创建两个用户admin/123456,user/123456
        * */
        auth.inMemoryAuthentication()
                .withUser("admin")//用户名
                .password(passwordEncoder().encode("123456"))//密码
                .roles("ADMIN");//角色
        auth.inMemoryAuthentication()
                .withUser("user")//用户名
                .password(passwordEncoder().encode("123456"))//密码
                .roles("USER");//角色
    }

    /**
     * 指定加密方式
     */
    @Bean
    public PasswordEncoder passwordEncoder(){
        // 使用BCrypt加密密码
        return new BCryptPasswordEncoder();
    }
}
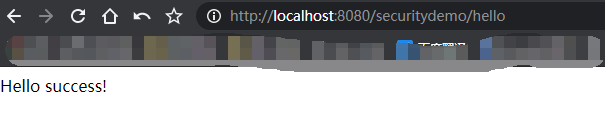
1.3 MainController控制器接口
/**
 * @Author qt
 * @Date 2021/3/25
 * @Description 主控制器
 */
@RestController
public class MainController {

    @GetMapping("/hello")
    public String printStr(){
        System.out.println("hello success");
        return "Hello success!";
    }

}
这样重新运行后我们就可以通过admin/123456、user/123456两个用户登录了。
2、
demo演示地址:http://www.qnto.top/springfashionsys/login
demo只对数据分析页面做了权限设置,只有admin才可访问。
参考链接:
https://blog.csdn.net/qq_40298902/article/details/106433192
https://www.e-learn.cn/topic/3143567
https://blog.csdn.net/qq_20108595/article/details/89647419
http://www.spring4all.com/article/428
https://blog.csdn.net/tanleijin/article/details/100698486
https://blog.csdn.net/zhaoxichen_10/article/details/88713799
https://blog.csdn.net/hanxiaotongtong/article/details/103095906
https://www.jb51.net/article/140429.htm
https://www.jianshu.com/p/29d10ad22531
https://blog.csdn.net/weixin_39588542/article/details/110507502
https://blog.csdn.net/sinat_33151213/article/details/89931819
总结:实践是检验真理的唯一标准,亲测可用。
原文:https://www.cnblogs.com/qiantao/p/14605154.html