一、自定义View
1.自定义View的类型
1.1.组合控件。
1.2.扩展系统View控件功能。例如TextView,继承它并扩展它的功能。
1.3.继承View。新建一个新的控件。
1.4.继承ViewGroup系统控件。继承LinearLayout等系统控件,并扩展它的功能。
1.5.继承ViewViewGroup。新建一个新的ViewGroup控件。
2、View绘制流程
View的绘制基本与measure()、layout()、draw()这三个函数完成,也就是说绘制分三步,measure->layout->draw
2.1、measure()。它的作用是测量View的宽高。相关方法有measure()、setMeasuredDimension()、onMeasure()
2.2、layout()。计算当前View以及子View的位置。相关方法有:layout()、onLayout()、setFrame()
2.3、draw()。视图的绘制工作。draw(),onDraw()
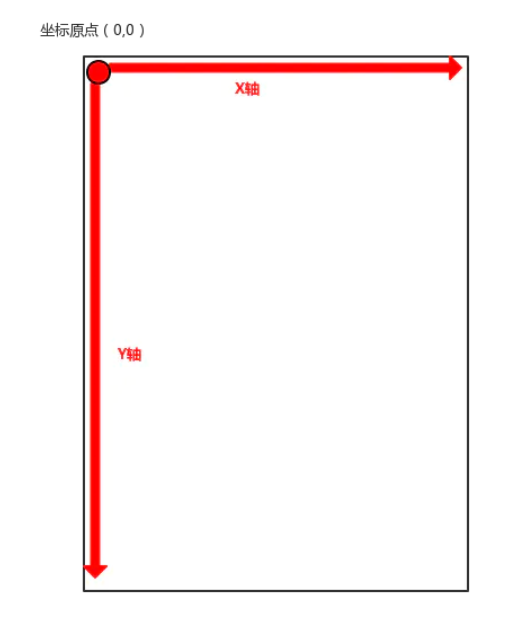
3、坐标系
Android坐标系:以手机屏幕为坐标系,把屏幕左上角作为原点,这个原点向右是X轴的正轴,向下是Y轴正轴,如下图所示:

View坐标系:它是以View内部作为一个坐标系
由上图可算出View的 高度:
width = getRight() - getLeft();
height = getBottom() - getTop();
View的源码当中提供了getWidth()和getHeight()方法用来获取View的宽度,其内部方法和上文所示是相同的,我们可以直接调用获取View得宽高。
获取View自身的坐标
通过如下方法可以获取View到其父控件的距离:
2.1.getTop():获取View到其父布局顶边的距离。
2.2.getLeft():获取View到其父布局左边的距离。
2.3.getBottom():获取View到其父布局顶边的距离。
2.4.getRight():获取View到父布局左边的距离。
4、构造函数
无论是我们继承系统View还是直接继承View,都需要对构造函数进行重写,构造函数有多个,至少要重写其中一个才行。如我们新建TestView。
5、自定义属性
Android系统的控件以Android开头的都是系统自带的属性。为了方便配置自定义View的属性,我们也可以自定义属性值。
Android自定义属性可分为以下几步:
(1).自定义一个View
(2).编写values/attrs.xml,其中编写styleable和item等标签元素
(3).在布局文件中View使用自定义的属性(注意namespace)
新建一个resource文件,名字为values/attrs.xml,其内容如下所示:
<?xml version="1.0" encoding="utf-8"?>
<resources>
    //自定义控件View
    <declare-styleable name="test">
        <attr name="text" format="string"/>
        <attr name="testAttr" format="integer"/>
    </declare-styleable>
</resources>

自定义View类
public class MyTextView extends View {
    public MyTextView(Context context, @Nullable AttributeSet attrs) {
        super(context, attrs);
        TypedArray ta = context.obtainStyledAttributes(attrs, R.styleable.test);
        String text = ta.getString(R.styleable.test_text);
        int arr = ta.getInteger(R.styleable.test_testAttr,-1);
        System.out.println(text+","+arr);
        ta.recycle();
    }
}

在布局文件的使用
<com.jatpack.camerax01.ui.widget.MyTextView
    android:layout_width="100dp"
    android:layout_height="100dp"
    app:text="测试"
    app:testAttr="520"
    app:layout_constraintLeft_toLeftOf="parent"
    app:layout_constraintRight_toRightOf="parent"
    app:layout_constraintBottom_toTopOf="@+id/confirm_btn"
    />

6.属性值的类型format
(1)、reference:参考某一资源ID
(2)、color颜色值
(3)、string
(4)、integer
(5)、boolean
(6)、dimension尺寸值
(7)、float浮点型
(8)、fraction百分数
(9)、enum枚举值。如下图所示
<attr name="orientation">
    <enum name="horizontal" value="0"/>
    <enum name="vertical" value="1"/>
</attr>
(10)、flag位或运算
<attr name="gravity">
    <flag name="top" value="0x01"/>
    <flag name="bottom" value="0x02"/>
    <flag name="left" value="0x04"/>
    <flag name="right" value="0x08"/>
    <flag name="center_vertical" value="0x16"/>
</attr>
(11)、混合类型:属性定义时可以指定多种类型值

二、View绘制流程
View的绘制基本有measure()、layout()、draw()这三个函数完成
2.1、Measure()
MeasureSpec是View的内部类,它封装了一个View的尺寸,在onMeasure()当中会根据这个MeasureSpec的值来确定View的宽高。

MeasureSpec的值保存在一个int值当中。一个int值有32位,前两位表示模式mode后30位表示大小size。
即MeasureSpec当中一共存在三种mode:UNSPECIFIED、EXACTLY、AT_MOST
对于View来说,MeasureSpec的mode和Size有如下意义
(1)、EXACTLY:精确模式,View需要一个精确值,这个值即为MeasureSpe当中的Size。对应match_parent
(2)、AT_MOST:最大模式,View的尺寸有一个最大值,View不可以超过MeasureSpec当中的Size值。对应wrap_content
(3)、UNSPECIFIED:无限制,View对尺寸没有任何限制,View设置为多大就应当为多大
2.2、Layout()
layout()过程,对应View来说用来计算View的位置参数,对应ViewGroup来说,除了要测量自身位置,还需要测量子View的位置。
layout()方法是整个Layout()流程的入口,看一下这部分源码,进入View.layout有以下核心代码
if ((mPrivateFlags3 & PFLAG3_MEASURE_NEEDED_BEFORE_LAYOUT) != 0) {
    onMeasure(mOldWidthMeasureSpec, mOldHeightMeasureSpec);
    mPrivateFlags3 &= ~PFLAG3_MEASURE_NEEDED_BEFORE_LAYOUT;
}

int oldL = mLeft;
int oldT = mTop;
int oldB = mBottom;
int oldR = mRight;

//这里通过setFrame或setOpticalFrame方法确定View在父容器当中的位置
boolean changed = isLayoutModeOptical(mParent) ?
        setOpticalFrame(l, t, r, b) : setFrame(l, t, r, b);

//调用onLayout方法。onLayout方法是一个空实现,不同的布局会有不同的实现
if (changed || (mPrivateFlags & PFLAG_LAYOUT_REQUIRED) == PFLAG_LAYOUT_REQUIRED) {
    onLayout(changed, l, t, r, b);

    if (shouldDrawRoundScrollbar()) {
        if(mRoundScrollbarRenderer == null) {
            mRoundScrollbarRenderer = new RoundScrollbarRenderer(this);
        }
    } else {
        mRoundScrollbarRenderer = null;
    }

    mPrivateFlags &= ~PFLAG_LAYOUT_REQUIRED;

    ListenerInfo li = mListenerInfo;
    if (li != null && li.mOnLayoutChangeListeners != null) {
        ArrayList<OnLayoutChangeListener> listenersCopy =
                (ArrayList<OnLayoutChangeListener>)li.mOnLayoutChangeListeners.clone();
        int numListeners = listenersCopy.size();
        for (int i = 0; i < numListeners; ++i) {
            listenersCopy.get(i).onLayoutChange(this, l, t, r, b, oldL, oldT, oldR, oldB);
        }
    }
}
2.3、Draw()
draw流程也就是View的绘制,整个流程的入口在View的draw()方法中,整个过程分为7个步骤,源码的注释如下
/*
 * Draw traversal performs several drawing steps which must be executed
 * in the appropriate order:
 *
 *      1. Draw the background
 *      2. If necessary, save the canvas‘ layers to prepare for fading
 *      3. Draw view‘s content
 *      4. Draw children
 *      5. If necessary, draw the fading edges and restore layers
 *      6. Draw decorations (scrollbars for instance)
 *      7. If necessary, draw the default focus highlight
 */
(1)绘制背景
final Drawable background = mBackground;
if (background == null) {
    return;
}
setBackgroundBounds();
(2)如有必要,保存当前画布,以便后面的绘制

(3)绘制内容
(4)绘制子View
(5)如有必要,绘制边缘等其他图层
(6)绘制装饰(例如滚动条)
(7)如有必要,绘制默认重点
// skip step 2 & 5 if possible (common case)
final int viewFlags = mViewFlags;
boolean horizontalEdges = (viewFlags & FADING_EDGE_HORIZONTAL) != 0;
boolean verticalEdges = (viewFlags & FADING_EDGE_VERTICAL) != 0;
if (!verticalEdges && !horizontalEdges) {
    // Step 3, draw the content
    onDraw(canvas);

    // Step 4, draw the children
    dispatchDraw(canvas);

    drawAutofilledHighlight(canvas);

    // Overlay is part of the content and draws beneath Foreground
    if (mOverlay != null && !mOverlay.isEmpty()) {
        mOverlay.getOverlayView().dispatchDraw(canvas);
    }

    // Step 6, draw decorations (foreground, scrollbars)
    onDrawForeground(canvas);

    // Step 7, draw the default focus highlight
    drawDefaultFocusHighlight(canvas);
。。。。。

3、自定义组合控件
自定义组合控件就是将多个控件组合成为一个新的控件,主要解决多次重复使用同一类型的布局。如我们顶部的HeaderView以及dailog等,我们都可以
把他们组合成一个新的控件。

我们通过一个自定义HeaderView实例来了解自定义组合控件的用法。
其全部代码如下
<declare-styleable name="HeaderBar">
    <attr name="title_text_color" format="color"/>
    <attr name="title_text" format="string"/>
    <attr name="show_views">
        <flag name="left_text" value="0x01"/>
        <flag name="left_img" value="0x02"/>
        <flag name="right_text" value="0x04"/>
        <flag name="right_img" value="0x08"/>
        <flag name="center_text" value="0x10"/>
        <flag name="center_ing" value="0x20"/>
    </attr>
</declare-styleable>
<com.jatpack.camerax01.ui.widget.YFHeaderView
    android:id="@+id/nav_top"
    android:layout_width="match_parent"
    android:layout_height="48dp"
    app:layout_constraintTop_toTopOf="parent"
    app:layout_constraintLeft_toLeftOf="parent"
    app:layout_constraintRight_toRightOf="parent"
    app:title_text="拍照"
    app:show_views="center_text|left_img|right_img"/>
<?xml version="1.0" encoding="utf-8"?>
<RelativeLayout xmlns:android="http://schemas.android.com/apk/res/android"
    android:layout_width="match_parent"
    android:layout_height="48dp"
    android:id="@+id/header_root_layout"
    android:background="#827192">

    <ImageView
        android:id="@+id/header_left_img"
        android:layout_width="48dp"
        android:layout_height="48dp"
        android:layout_alignParentLeft="true"
        android:paddingLeft="12dp"
        android:paddingRight="12dp"
        android:scaleType="fitCenter"
        android:src="@drawable/back"/>

    <TextView
        android:id="@+id/header_center_text"
        android:layout_width="wrap_content"
        android:layout_height="wrap_content"
        android:layout_centerInParent="true"
        android:lines="1"
        android:maxLines="11"
        android:ellipsize="end"
        android:text="title"
        android:textStyle="bold"
        android:textColor="#ffffff"/>

    <ImageView
        android:id="@+id/header_right_img"
        android:layout_width="24dp"
        android:layout_height="24dp"
        android:layout_margin="12dp"
        android:layout_alignParentRight="true"
        android:src="@drawable/add"
        android:scaleType="fitCenter"/>

</RelativeLayout>
import android.content.Context;
import android.content.res.TypedArray;
import android.graphics.Color;
import android.text.TextUtils;
import android.util.AttributeSet;
import android.view.LayoutInflater;
import android.view.View;
import android.widget.ImageView;
import android.widget.RelativeLayout;
import android.widget.TextView;

import com.jatpack.camerax01.R;

public class YFHeaderView extends RelativeLayout {
    public YFHeaderView(Context context) {
        super(context);
        initView(context);
    }

    public YFHeaderView(Context context, AttributeSet attrs) {
        super(context, attrs);
        initView(context);
        initAttrs(context,attrs);
    }

    public YFHeaderView(Context context, AttributeSet attrs, int defStyleAttr) {
        super(context, attrs, defStyleAttr);
        initView(context);
        initAttrs(context,attrs);
    }

    public YFHeaderView(Context context, AttributeSet attrs, int defStyleAttr, int defStyleRes) {
        super(context, attrs, defStyleAttr, defStyleRes);
        initView(context);
        initAttrs(context,attrs);
    }

    RelativeLayout layoutRoot;
    ImageView imgLeft;
    ImageView imgRight;
    TextView textCenter;

    /**
     * 初始化UI,可根据业务需求设置默认值
     * @param context
     */
    private void initView(Context context){
        LayoutInflater.from(context).inflate(R.layout.headerview,this,true);
        imgLeft = findViewById(R.id.header_left_img);
        imgRight = findViewById(R.id.header_right_img);
        textCenter = findViewById(R.id.header_center_text);
        layoutRoot = findViewById(R.id.header_root_layout);
        //layoutRoot.setBackgroundColor(Color.BLACK);
        textCenter.setTextColor(Color.WHITE);
    }

    private void initAttrs(Context context,AttributeSet attrs){
        TypedArray mTypedArray = context.obtainStyledAttributes(attrs,R.styleable.HeaderBar);
        String title = mTypedArray.getString(R.styleable.HeaderBar_title_text);
        if(!TextUtils.isEmpty(title)){
            textCenter.setText(title);
        }
        int showView = mTypedArray.getInt(R.styleable.HeaderBar_show_views,0x26);
        int color = mTypedArray.getColor(R.styleable.HeaderBar_title_text_color, 100);
        if(color != 100) {
            textCenter.setTextColor(color);
        }
        mTypedArray.recycle();
        showView(showView);
    }

    private void showView(int showView) {
        //将showView转换为二进制数,根据不同位置上的值设置对应View的显示或者隐藏。
        Long data = Long.valueOf(Integer.toBinaryString(showView));
        String element = String.format("%06d", data);
        for (int i = 0; i < element.length(); i++) {
            if(i == 0) ;
            if(i == 1) textCenter.setVisibility(element.substring(i,i+1).equals("1")? View.VISIBLE:View.GONE);
            if(i == 2) imgRight.setVisibility(element.substring(i,i+1).equals("1")? View.VISIBLE:View.GONE);
            if(i == 3) ;
            if(i == 4) imgLeft.setVisibility(element.substring(i,i+1).equals("1")? View.VISIBLE:View.GONE);
            if(i == 5) ;
        }

    }

    public void setTitle(String title){
        if(title!=null&&title.trim().length()>0){
            textCenter.setText(title);
        }
    }

    public void setLeftListener(OnClickListener onClickListener){
        imgLeft.setOnClickListener(onClickListener);
    }

    public void setRightListener(OnClickListener onClickListener){
        imgRight.setOnClickListener(onClickListener);
    }

}


4.继承系统控件
继承系统的控件可以分为继承View子类
原文:https://www.cnblogs.com/riyueqian/p/14649384.html