1. TextView
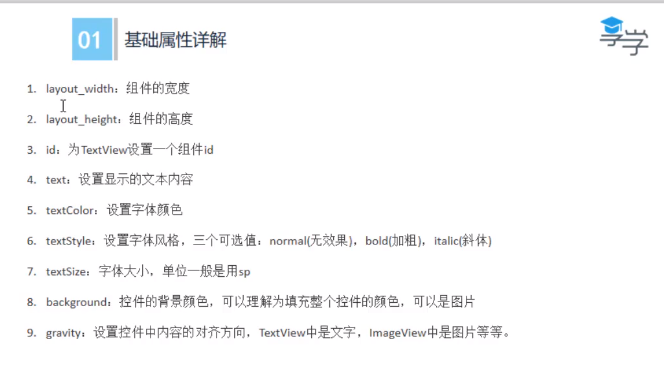
<TextView
android:id="@+id/tv_one"//控件的唯一标识
android:text="@string/one"
android:textStyle="bold"
android:textColor="@color/colorAccent"//不能直接给coolor赋值 #FF000000 而是链接到 res/value/colors.xml 目录下的资源统一管理
android:textSize="20sp"
android:background="@color/colorPrimary"
android:gravity="center"
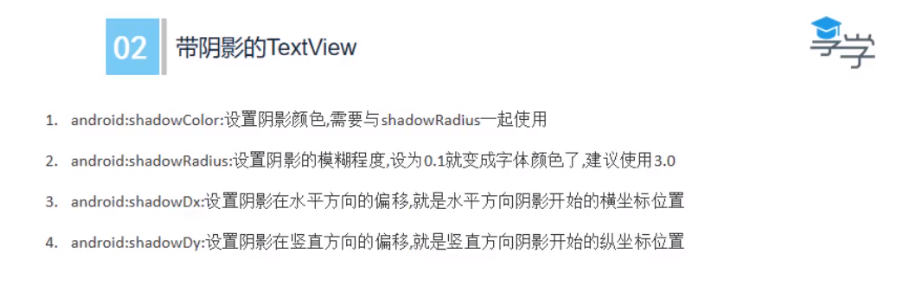
android:shadowColor="@color/colorPrimaryDark"
android:shadowDx="10.0"
android:shadowDy="10.0"
android:shadowRadius="3.0"
android:layout_width="200dp"
android:layout_height="200dp"></TextView>
<TextView
android:id="@+id/tv_one"
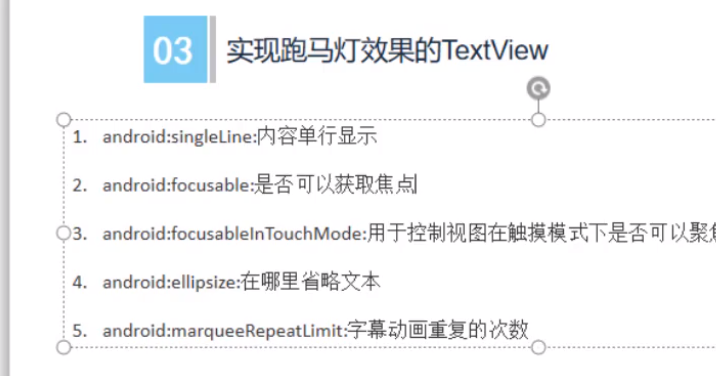
android:singleLine="true"
android:ellipsize="marquee"
android:marqueeRepeatLimit="marquee_forever"
android:focusable="true"
android:focusableInTouchMode="true"
android:layout_width="200dp"
android:layout_height="200dp"
android:background="@color/colorPrimary"
android:gravity="center"
android:shadowColor="@color/colorPrimaryDark"
android:shadowDx="10.0"
android:shadowDy="10.0"
android:shadowRadius="3.0"
android:text="@string/one"
android:textColor="@color/colorAccent"
android:textSize="20sp"
android:textStyle="bold">
<requestFocus/> 获取焦点
</TextView>
2. Button
<Button
	android:layout_width="200dp"
	android:layout_height="100dp"
	android:background="@drawable/btu_selector"
	android:backgroundTint="@color/btn_color_selector"
	android:foreground="@color/colorAccent"
	android:text="我是按钮" />
foreground 前景色 设置了 会掩盖字体
background 设置了背景选择器
<item android:drawable="@drawable/ic_account_balance_black_24dp" android:state_pressed="true"/>
    <item android:drawable="@drawable/ic_accessibility_black_24dp" />
按下 显示 ic_account_balance_black_24dp 图片
backgroundTint 设置了颜色选择器
<item android:color="#ffff0000" android:state_pressed="true"/>
<item android:color="#ff00ff00" />
按下显示 #ffff0000(红)
1.2.1 Button事件处理
View btn_one = findViewById(R.id.btn_one);
        //点击事件
       btn_one.setOnClickListener(new View.OnClickListener() {
           @Override
           public void onClick(View v) {
               Log.e(TAG, "onClick: ");
           }
       });

       //长按事件
       btn_one.setOnLongClickListener(new View.OnLongClickListener() {
           @Override
           public boolean onLongClick(View v) {
               Log.e(TAG, "onLongClick: " );
               return false;
           }
       });

       //触摸事件
       btn_one.setOnTouchListener(new View.OnTouchListener() {
           @Override
           public boolean onTouch(View v, MotionEvent event) {
               Log.e(TAG, "onTouch: " +event.getAction());
               return false;
           }
       });
3. EditText
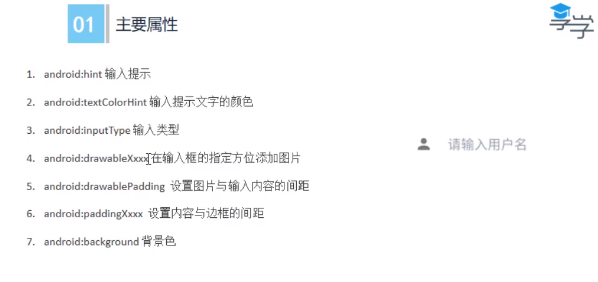
<EditText
    android:id="@+id/user"
    android:hint="请输入用户名(电话)"
    android:drawableLeft="@drawable/ic_person_black_24dp"
    android:drawablePadding="20dp"
    android:paddingLeft="10dp"
    android:background="@color/colorPrimaryDark"
    android:textColorHint="#95a1aa"  //灰色
    android:inputType="phone"
    android:layout_width="200dp"
    android:layout_height="100dp"/>
<EditText
    android:id="@+id/psw"
    android:hint="请输入密码"
    android:drawableLeft="@drawable/ic_person_black_24dp"
    android:drawablePadding="20dp"
    android:paddingLeft="10dp"
    android:background="@color/colorPrimaryDark"
    android:textColorHint="#95a1aa"
    android:inputType="textPassword"
    android:layout_width="200dp"
    android:layout_height="100dp"/>
<Button
    android:id="@+id/btn_user"
    android:text="登录"
    android:layout_width="wrap_content"
    android:layout_height="wrap_content"/>
<Button
    android:id="@+id/btn_reg"
    android:text="注册"
    android:layout_width="wrap_content"
    android:layout_height="wrap_content"/>
获取输入的用户名
public class MyEditText extends AppCompatActivity {

    private EditText user;

    @Override
    protected void onCreate(Bundle savedInstanceState) {
        super.onCreate(savedInstanceState);
        setContentView(R.layout.activity_my_edit_text);

        Button btn_user = findViewById(R.id.btn_user);//点击登录按钮,得到用户名
        user = findViewById(R.id.user);//用户名的对象

        btn_psw.setOnClickListener(new View.OnClickListener() {
            @Override
            public void onClick(View v) {
                String text = user.getText().toString();
                Log.e("leo", "用户名 "+text);//打印用户名字
            }
        });
    }
}


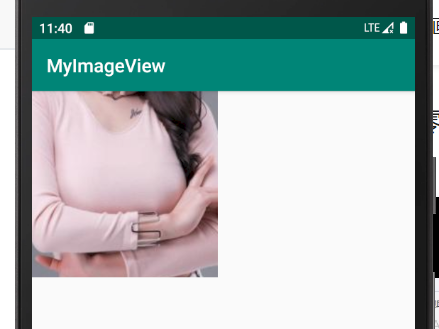
4. ImageView
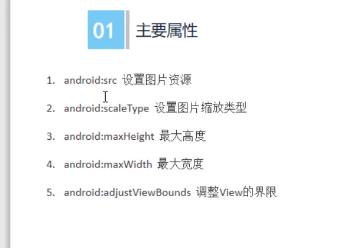
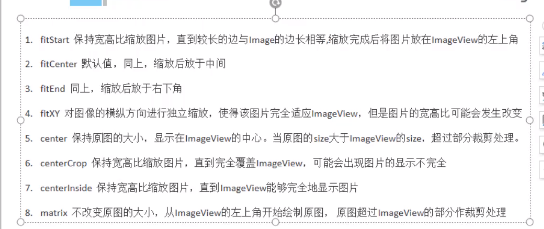
scaleType 尺寸类型 属性
1.<ImageView
    android:layout_width="200dp"
    android:layout_height="200dp"
    android:scaleType="center"
    android:src="@drawable/meinv"
     />


2.<ImageView
    android:layout_width="wrap_content"
    android:layout_height="wrap_content"
    android:scaleType="center"
    android:src="@drawable/meinv" />

3.<ImageView
	android:src="@drawable/meinv"
    android:layout_width="wrap_content"
    android:layout_height="wrap_content"
    android:maxHeight="200dp"
    android:maxWidth="200dp"
    android:adjustViewBounds="true" />

5. ProgressBar
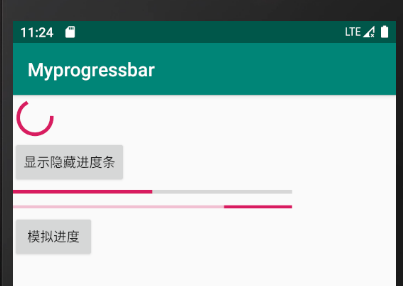
默认进度条
<ProgressBar
        android:id="@+id/pb"
        android:layout_width="wrap_content"
        android:layout_height="wrap_content"/>
按钮控制显示进度条和隐藏进度条
<Button
        android:onClick="leoClick"
        android:text="显示隐藏进度条"
        android:layout_width="wrap_content"
        android:layout_height="wrap_content"/>

 public void leoClick(View view) {
        if(progressBar.getVisibility() == View.GONE){
            progressBar.setVisibility(View.VISIBLE);
        }else {
            progressBar.setVisibility(View.GONE);
        }

    }
按钮控制进度条的精度增加
<ProgressBar
        android:id="@+id/pb2"
        style="?android:attr/progressBarStyleHorizontal"
        android:max="100"
        android:layout_width="300dp"
        android:layout_height="wrap_content"/>


public void loder(View view) {
        int progress = progressBar2.getProgress();
        progress += 10;
        progressBar2.setProgress(progress);
    }
水平进度条不显示精度
style="?android:attr/progressBarStyleHorizontal"
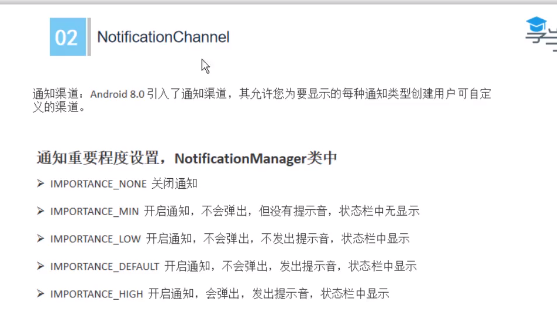
6. Notification 与 NotificationManager 通知
要想实现通知必须创建两个对象,一个是Notification 和 NotificationManger 对象
1. 得到NotificationManger对象。
private NotificationManager manager;
//实现notificationManager
        manager = (NotificationManager)getSystemService(NOTIFICATION_SERVICE);
2. 设置通知类型
NotificationChannel channel = new NotificationChannel("leo", "测试通知", NotificationManager.IMPORTANCE_HIGH);//开启通知,会弹出,发出提示音,状态栏显示
manager.createNotificationChannel(channel);
3. 得到Notification对象
使用NotificationCompat类的Builder构造器来创建Notification对象,可以保证程序在所有的版本上都能正常工作。
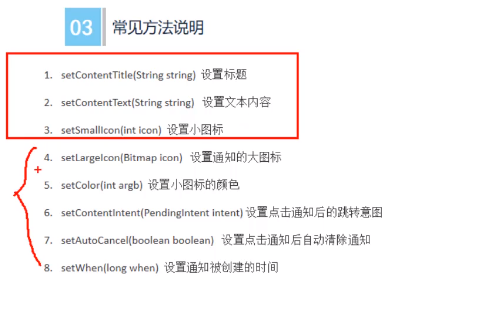
Android5.0系统开始,对于通知栏图片的设计进行了修改,现在Google要求,所有应用程序的通知栏图标,应该只使用alpha图层(黑白),来进行绘制,而不应该包括RGB图层
private Notification notification;
// leo渠道id,必须和渠道匹配
notification = new NotificationCompat.Builder(context:this,channelld:"leo")
//前三个必须设置
    			.setContentTitle("官方通知")
                .setContentText("世界那么大")
                .setSmallIcon(R.drawable.ic_person_black_24dp)//alpha图层
             .setLargeIcon(BitmapFactory.decodeResource(getResources(),R.drawable.notification))
                .setColor(Color.parseColor("#ffff0000"))  //颜色
                .setContentIntent(pendingIntent)//跳转Activity,跳转示意图
                .setAutoCancel(true)//点击通知后自动被清除
                .build();
4. 设置跳转的Activity
Intent intent = new Intent(this, NotificationActivity.class);
PendingIntent pendingIntent = PendingIntent.getActivity(this,0, intent,0);
===============Activity======================
    public class NotificationActivity extends Activity {

    @Override
    protected void onCreate(@Nullable Bundle savedInstanceState) {
        super.onCreate(savedInstanceState);
        Log.e("leo","on creat :进入NotificationActivity");
    }
}
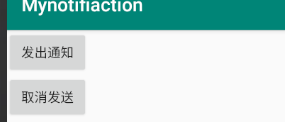
5. 设置按钮
? 5.1 发出通知按钮
<Button
        android:layout_width="wrap_content"
        android:layout_height="wrap_content"
        android:onClick="sendNotification"
        android:text="发出通知"/>

       ================Java=====================
       public void sendNotification(View view) {
        manager.notify(1,notification);
    }
5.2 取消通知按钮
<Button
        android:layout_width="wrap_content"
        android:layout_height="wrap_content"
        android:onClick="cacelNotification"
        android:text="取消发送"/>
=======================Java============================
public void cacelNotification(View view) {
        manager.cancel(1);
    }

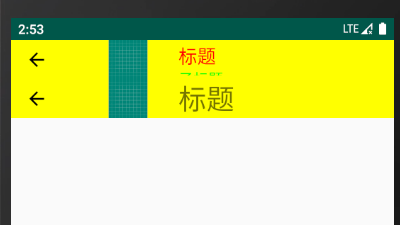
7. Toolbar
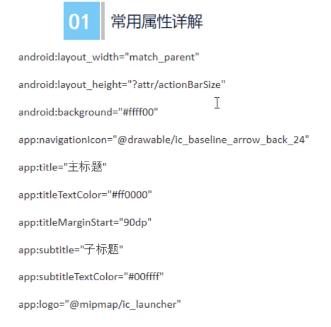
设置的是 androidx的 Toolbar
<androidx.appcompat.widget.Toolbar
    android:id="@+id/toolbar"
    android:layout_width="match_parent"
    android:layout_height="42dp"
    android:background="#ffff00"
    app:logo="@drawable/ic_launcher_background"
    app:navigationIcon="@drawable/ic_arrow_back_black_24dp"// 返回
    app:subtitle="子标题"
    app:subtitleTextColor="#00ff00"
    app:title="标题"
    app:titleMarginStart="10dp"
    app:titleTextColor="#ff0000" />
点击事件:
 Toolbar toolbar = findViewById(R.id.toolbar);

         toolbar.setNavigationOnClickListener(new View.OnClickListener() {
             @Override
             public void onClick(View v) {
                 Log.e("leo","onClick:toolbar被点击了");
             }
         });
    }
设置文本在中间
<androidx.appcompat.widget.Toolbar
    android:id="@+id/toolbar2"
    android:layout_width="match_parent"
    android:layout_height="42dp"
    android:background="#ffff00"
    app:logo="@drawable/ic_launcher_background"
    app:navigationIcon="@drawable/ic_arrow_back_black_24dp">

    <TextView
        android:layout_width="wrap_content"
        android:layout_height="wrap_content"
        android:layout_gravity = "center"
        android:textSize="30dp"
        android:text="标题"/>

</androidx.appcompat.widget.Toolbar>
8. AlertDialog
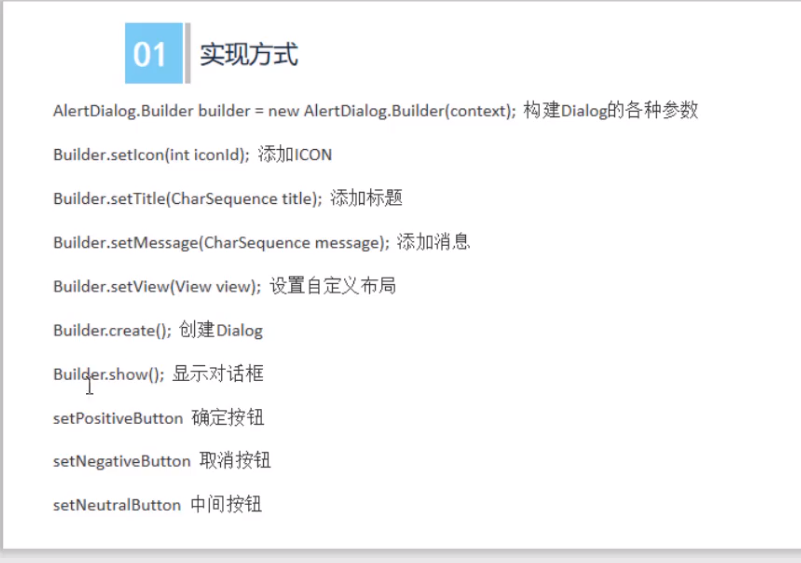
1. 设置View 并设计Button点击事件
<LinearLayout
    android:layout_height="match_parent"
    android:layout_width="match_parent"
    android:orientation="vertical"
    xmlns:android="http://schemas.android.com/apk/res/android" >

    <Button
        android:text="显示对话框"
        android:onClick="leoClick"
        android:layout_width="wrap_content"
        android:layout_height="wrap_content"/>

</LinearLayout>
2.在点击事件里面 创建AlertDialog.builder对象 并设置属性
注意:
set....方法返回的是builder 顺序随便
.create().show();//返回为 AlertDialog 必须放在最后.setView 方法
新建dialogview
<ImageView
        android:src="@mipmap/ic_launcher"
        android:layout_width="wrap_content"
        android:layout_height="wrap_content"/>
    <TextView
        android:text="哈哈哈,天气不错"
        android:layout_width="wrap_content"
        android:layout_height="wrap_content"/>
传入 view
View diagview = getLayoutInflater().inflate(R.layout.dialog_view, null);
.setView(diagview)
 public void leoClick(View view) {

        View diagview = getLayoutInflater().inflate(R.layout.dialog_view, null);

        AlertDialog.Builder builder = new AlertDialog.Builder(this);
        builder.setIcon(R.mipmap.ic_launcher)
                .setTitle("我是对话框")
                .setMessage("今天的天气怎摸样?")//返回值为builder
                .setView(diagview)
                .setPositiveButton("确定按钮", new DialogInterface.OnClickListener() {
                    @Override
                    public void onClick(DialogInterface dialog, int which) {
                        Log.e("leo","点击了确定");
                    }
                })
                .setNegativeButton("取消按钮", new DialogInterface.OnClickListener() {
                    @Override
                    public void onClick(DialogInterface dialog, int which) {
                        Log.e("leo","点击了取消");
                    }
                })
                .setNeutralButton("中间按钮", new DialogInterface.OnClickListener() {
                    @Override
                    public void onClick(DialogInterface dialog, int which) {
                        Log.e("leo","点击了中间");
                    }
                })

                .create()//返回为 AlertDialog
                .show();
    }
9. Popwindow
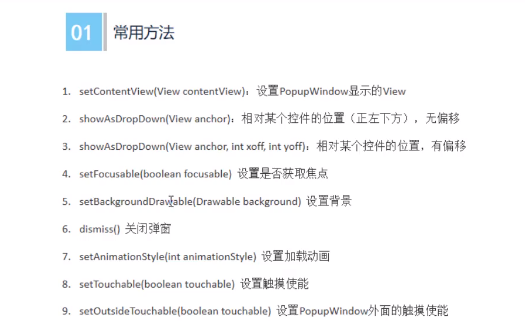
1. 设置 一个按钮点击事件,弹出PopupWindow
<Button
        android:text="弹出PopupWindow"
        android:onClick="LeoClick"
        android:layout_width="wrap_content"
        android:layout_height="wrap_content"/>
2. 设置PopupWindow()
PopupWindow popupWindow = new PopupWindow(popupView, ViewGroup.LayoutParams.WRAP_CONTENT,ViewGroup.LayoutParams.WRAP_CONTENT,true);
		 popupWindow.setBackgroundDrawable(getResources().getDrawable(R.drawable.meinv));

popupWindow.showAsDropDown(view,view.getWidth(),view.getHeight());
3. 给弹出的view设置按钮
设置弹出的view
<Button
    android:id="@+id/btn1"
    android:layout_width="wrap_content"
    android:layout_height="wrap_content"
    android:padding="5dp"
    android:text="上海"
    android:textSize="18sp"/>
<Button
    android:id="@+id/btn2"
    android:layout_width="wrap_content"
    android:layout_height="wrap_content"
    android:padding="5dp"
    android:text="北京"
    android:textSize="18sp"/>
得到view 对象 并得到按钮 对象
View popupView = getLayoutInflater().inflate(R.layout.popup_window,null);

Button btn1 = popupView.findViewById(R.id.btn1);
Button btn2 = popupView.findViewById(R.id.btn2);
设置按钮监听事件
dismiss()关闭popupwindow窗口
btn1.setOnClickListener(new View.OnClickListener() {
    @Override
    public void onClick(View v) {
        Log.e("leo","你在上海吗?");
        popupWindow.dismiss();
    }
});
btn2.setOnClickListener(new View.OnClickListener() {
    @Override
    public void onClick(View v) {
        Log.e("leo","你在北京吗?");
        popupWindow.dismiss();

    }
});

原文:https://www.cnblogs.com/AronJudge/p/14557986.html