可以先看这篇文章spring+mybatis整合
maven项目配置文件中在之前的基础上还需要加入springMVC相关依赖
可以去maven仓库https://mvnrepository.com/去找你需要的包
spring-mvc.xml
在配置文件中我设置了两种视图解析器(jsp,html)具体需要可以自行更改
<?xml version="1.0" encoding="UTF-8"?>
<beans xmlns="http://www.springframework.org/schema/beans"
       xmlns:xsi="http://www.w3.org/2001/XMLSchema-instance"
       xmlns:context="http://www.springframework.org/schema/context"
       xmlns:mvc="http://www.springframework.org/schema/mvc"
       xsi:schemaLocation="http://www.springframework.org/schema/beans
        http://www.springframework.org/schema/beans/spring-beans.xsd
        http://www.springframework.org/schema/mvc
        http://www.springframework.org/schema/mvc/spring-mvc-4.0.xsd
        http://www.springframework.org/schema/context
        http://www.springframework.org/schema/context/spring-context.xsd">

    <!--        自动扫描包,让指定包下注解生效,由ioc容器管理-->
    <context:component-scan base-package="com.controller"/>
    <!--    让springmvc不处理静态资源-->
    <mvc:default-servlet-handler/>

    <!-- 引入静态资源 -->
    <mvc:annotation-driven />
    <mvc:resources mapping="/css/**" location="/static/css/**" />
    <mvc:resources mapping="/img/**" location="/static/img/**" />
    <mvc:resources mapping="/js/**" location="/static/js/**" />

    <!--    jsp视图解析器-->
    <bean class="org.springframework.web.servlet.view.InternalResourceViewResolver" id="internalResourceViewResolver">
        <!--        前缀-->
        <property name="prefix" value="/WEB-INF/jsp/"></property>
        <!--        后缀-->
        <property name="suffix" value=".jsp"></property>
    </bean>

    <!--    html视图解析器-->
    <!-- freemarker config -->
    <bean id="freemarkerConfig" class="org.springframework.web.servlet.view.freemarker.FreeMarkerConfigurer">
        <property name="templateLoaderPath" value="/WEB-INF/html/"/>
<!--        防止中文乱码-->
        <property name="freemarkerSettings">
            <props>
                <prop key="template_update_delay">0</prop>
                <prop key="default_encoding">UTF-8</prop>
                <prop key="number_format">0.##########</prop>
                <prop key="datetime_format">yyyy-MM-dd HH:mm:ss</prop>
                <prop key="classic_compatible">true</prop>
                <prop key="template_exception_handler">ignore</prop>
            </props>
        </property>
    </bean>

    <bean id="htmlviewResolver"
          class="org.springframework.web.servlet.view.freemarker.FreeMarkerViewResolver">
        <property name="suffix" value=".html" />
        <property name="order" value="0"></property>
        <property name="contentType" value="text/html;charset=UTF-8"></property>
    </bean>

</beans>
web.xml
<?xml version="1.0" encoding="UTF-8"?>
<web-app xmlns="http://xmlns.jcp.org/xml/ns/javaee"
         xmlns:xsi="http://www.w3.org/2001/XMLSchema-instance"
         xsi:schemaLocation="http://xmlns.jcp.org/xml/ns/javaee http://xmlns.jcp.org/xml/ns/javaee/web-app_4_0.xsd"
         version="4.0">

    <!--    springmvc的核心 前端控制器,请求分发器-->
    <servlet>
        <servlet-name>springmvc</servlet-name>
        <servlet-class>org.springframework.web.servlet.DispatcherServlet</servlet-class>
        <!--        绑定spring配置文件-->
        <init-param>
            <param-name>contextConfigLocation</param-name>
            <param-value>classpath:spring.xml</param-value>
        </init-param>
        <!--        启动级别1-->
        <load-on-startup>1</load-on-startup>
    </servlet>

    <servlet-mapping>
        <servlet-name>springmvc</servlet-name>
        <url-pattern>/</url-pattern>
    </servlet-mapping>

    <!--    过滤器 解决乱码问题-->
    <filter>
        <filter-name>encoding</filter-name>
        <filter-class>org.springframework.web.filter.CharacterEncodingFilter</filter-class>
        <init-param>
            <param-name>encoding</param-name>
            <param-value>utf-8</param-value>
        </init-param>
    </filter>

    <filter-mapping>
        <filter-name>encoding</filter-name>
        <url-pattern>/*</url-pattern>
    </filter-mapping>

<!--    静态资源引用-->
<!--    <servlet-mapping>-->
<!--        <servlet-name>default</servlet-name>-->
<!--        <url-pattern>*.js</url-pattern>-->
<!--        <url-pattern>*.png</url-pattern>-->
<!--        <url-pattern>*.css</url-pattern>-->
<!--    </servlet-mapping>-->
</web-app>
css,js,img等静态资源的引用可以使用两种方法
<!-- 第一种在spring-mvc.xml中添加 -->
<!-- 引入静态资源 -->
<mvc:annotation-driven />
<mvc:resources mapping="/css/**" location="/static/css/**" />
<mvc:resources mapping="/img/**" location="/static/img/**" />
<mvc:resources mapping="/js/**" location="/static/js/**" />
?
<!-- 第二中种在web.xml中添加 -->
<servlet-mapping>
        <servlet-name>default</servlet-name>
        <url-pattern>*.js</url-pattern>
        <url-pattern>*.png</url-pattern>
        <url-pattern>*.css</url-pattern>
</servlet-mapping>
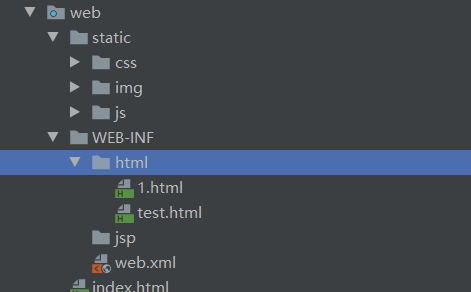
这是web下面的目录结构图
controller层
controller层接收前端参数一般使用json对象传递,在这里演示的是直接传递
LoginController 类
package com.controller;

import com.pojo.Root;
import com.service.RootServiceImpl;
import org.springframework.beans.factory.annotation.Autowired;
import org.springframework.beans.factory.annotation.Qualifier;
import org.springframework.stereotype.Controller;
import org.springframework.web.bind.annotation.RequestMapping;
import org.springframework.web.bind.annotation.RequestMethod;


@Controller
public class LoginController {

    //注入service层实现类
    @Autowired
    @Qualifier("rootServiceImpl")
    private RootServiceImpl rootService;

    //前端请求接口方法 如果添加了@ResponseBody注解则不会走视图解析器而是直接返回字符串
    @RequestMapping(value = "/login",method = RequestMethod.POST,produces = "application/json;charset=UTF-8")
    public String login(String username,String password){
        Root r1 = new Root(username, password);
        Root r2 = rootService.select(new Root("root", "123456"));
        if (r1.equals(r2)){
            return "1";
        }
       //转发到test.html页面或者test.jsp
       return "test";
    }
}
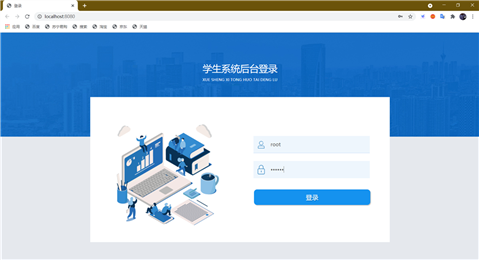
index.html 使用form标签发送请求
<!DOCTYPE html>
<html>

<head>
<meta charset="utf-8" />
<title>登录</title>
<link rel="stylesheet" type="text/css" href="/static/css/index.css" />
</head>

<body>

<img class="bgone" src="/static/img/1.jpg" />
<img class="pic" src="/static/img/a.png" />

<div class="table">
   <form method="post" action="/login">
      <div class="wel">学生系统后台登录</div>
      <div class="wel1">XUE SHENG XI TONG HUO TAI DENG LU</div>
      <div class="user">
         <div id="yonghu" style=""><img src="/static/img/yhm.png" /></div>
         <input type="text" name="username" placeholder="用户名" />
      </div>
      <div class="password">
         <div id="yonghu"><img src="/static/img/mm.png" /></div>
         <input type="password" name="password" placeholder="密码"/>
      </div>
      <input class="btn" type="submit" name="登录" value="登录"/>
   </form>
</div>

</body>
</html>
原文:https://www.cnblogs.com/SunnyBigBoy/p/14730744.html