1、导入相关jar包及配置
<!-- junit -->
<dependency>
   <groupId>junit</groupId>
   <artifactId>junit</artifactId>
   <version>4.12</version>
</dependency>

<!-- mybatis -->
<dependency>
    <groupId>org.mybatis</groupId>
    <artifactId>mybatis</artifactId>
    <version>3.5.6</version>
</dependency>

<!-- mysql驱动 -->
<dependency>
    <groupId>mysql</groupId>
    <artifactId>mysql-connector-java</artifactId>
    <version>8.0.23</version>
</dependency>

<!-- spring相关 -->
<dependency>
    <groupId>org.springframework</groupId>
    <artifactId>spring-webmvc</artifactId>
    <version>5.3.5</version>
</dependency>
<dependency>
    <groupId>org.springframework</groupId>
    <artifactId>spring-jdbc</artifactId>
    <version>5.3.5</version>
</dependency>

<!-- aspectj AOP -->
<dependency>
    <groupId>org.aspectj</groupId>
    <artifactId>aspectjweaver</artifactId>
    <version>1.9.6</version>
</dependency>

<!-- mybatis-spring整合包 -->
<dependency>
    <groupId>org.mybatis</groupId>
    <artifactId>mybatis-spring</artifactId>
    <version>2.0.6</version>
</dependency>

<!-- 配置Maven静态资源过滤问题 -->
<build>
   <resources>
       <resource>
           <directory>src/main/java</directory>
           <includes>
               <include>**/*.properties</include>
               <include>**/*.xml</include>
           </includes>
           <filtering>true</filtering>
       </resource>
   </resources>
</build>
2、编写配置文件
3、测试
1、编写实体类
public class User {
    private Integer id;
    private String name;
    private String pwd;

    public Integer getId() {
        return id;
    }

    public void setId(Integer id) {
        this.id = id;
    }

    public String getName() {
        return name;
    }

    public void setName(String name) {
        this.name = name;
    }

    public String getPwd() {
        return pwd;
    }

    public void setPwd(String pwd) {
        this.pwd = pwd;
    }

    @Override
    public String toString() {
        return "User{" +
                "id=" + id +
                ", name=‘" + name + ‘\‘‘ +
                ", pwd=‘" + pwd + ‘\‘‘ +
                ‘}‘;
    }
}
2、编写mapper接口
public interface UserMapper {

    List<User> userList();
}
3、编写相应映射文件
<?xml version="1.0" encoding="UTF-8" ?>
<!DOCTYPE mapper
        PUBLIC "-//mybatis.org//DTD Mapper 3.0//EN"
        "http://mybatis.org/dtd/mybatis-3-mapper.dtd">
<mapper namespace="org.com.mapper.UserMapper">
    <select id="userList" resultType="user">
        select * from user
    </select>
</mapper>
4、编写mybatis核心配置文件及数据库properties文件
driver = com.mysql.cj.jdbc.Driver
url = jdbc:mysql://localhost:3306/mybatis?useSSL=true&useUnicode=true&characterEncoding=utf8
username = root
password = 123456
<?xml version="1.0" encoding="UTF-8" ?>
<!DOCTYPE configuration
        PUBLIC "-//mybatis.org//DTD Config 3.0//EN"
        "http://mybatis.org/dtd/mybatis-3-config.dtd">

<configuration>
    <!-- 引入配置文件   -->
    <properties resource="db.properties"/>


    <settings>
        <!-- 内置日志 -->
        <setting name="logImpl" value="STDOUT_LOGGING"/>
    </settings>

    <!--  设置别名  -->
    <typeAliases>
       <package name="org.com.pojo"/>
    </typeAliases>


    <environments default="development">
        <environment id="development">
            <transactionManager type="JDBC"/>
            <dataSource type="POOLED">
                <property name="driver" value="${driver}"/>
                <property name="url" value="${url}"/>
                <property name="username" value="${username}"/>
                <property name="password" value="${password}"/>
            </dataSource>
        </environment>
    </environments>
    <mappers>

        <mapper resource="org/com/mapper/UserMapper.xml"/>
    </mappers>


</configuration>
5、测试
@Test
public void tes1() throws Exception{
    String resource = "mybatis-config.xml";
    InputStream resourceAsStream = Resources.getResourceAsStream(resource);
    SqlSessionFactory sqlSessionFactory = new SqlSessionFactoryBuilder().build(resourceAsStream);
    SqlSession sqlSession = sqlSessionFactory.openSession();
    UserMapper mapper = sqlSession.getMapper(UserMapper.class);
    List<User> userList = mapper.userList();
    for (User user : userList) {
        System.out.println(user);
    }
    sqlSession.close();

}
什么是MyBatis-Spring?
MyBatis-Spring 会帮助你将 MyBatis 代码无缝地整合到 Spring 中。
它将允许 MyBatis 参与到 Spring 的事务管理之中,创建映射器 mapper 和 SqlSession 并注入到 bean 中,以及将 Mybatis 的异常转换为 Spring 的 DataAccessException。
最终,可以做到应用代码不依赖于 MyBatis,Spring 或 MyBatis-Spring。
知识基础
在开始使用 MyBatis-Spring 之前,你需要先熟悉 Spring 和 MyBatis 这两个框架和有关它们的术语。这很重要
MyBatis-Spring 需要以下版本:

1、如果如果使用 Maven 作为构建工具,仅需要在 pom.xml 中加入以下代码即可
<dependency>
    <groupId>org.mybatis</groupId>
    <artifactId>mybatis-spring</artifactId>
    <version>2.0.6</version>
</dependency>
2、创建一个Spring配置文件
<?xml version="1.0" encoding="UTF-8"?>
<beans xmlns="http://www.springframework.org/schema/beans"
       xmlns:xsi="http://www.w3.org/2001/XMLSchema-instance"
        xmlns:context="http://www.springframework.org/schema/context"
        xsi:schemaLocation="http://www.springframework.org/schema/beans
        https://www.springframework.org/schema/beans/spring-beans.xsd
        http://www.springframework.org/schema/context
        https://www.springframework.org/schema/context/spring-context.xsd
        ">
</beans>
3、配置数据库
<!--
    读取数据库配置文件
    system-properties-mode="NEVER" :防止${xxx}读取环境变量
-->
<context:property-placeholder location="classpath:db.properties" system-properties-mode="NEVER"/>

<bean id="dataSource" class="org.springframework.jdbc.datasource.DriverManagerDataSource">
    <property name="driverClassName" value="${driver}"/>
    <property name="url" value="${url}"/>
    <property name="username" value="${username}"/>
    <property name="password" value="${password}"/>
</bean>
4、要和 Spring 一起使用 MyBatis,需要在 Spring 应用上下文中定义至少两样东西:一个 SqlSessionFactory 和至少一个数据映射器类。
在 MyBatis-Spring 中,可使用 SqlSessionFactoryBean来创建 SqlSessionFactory。 要配置这个工厂 bean,只需要把下面代码放在 Spring 的 XML 配置文件中:
<bean id="sqlSessionFactory" class="org.mybatis.spring.SqlSessionFactoryBean">
  <property name="dataSource" ref="dataSource" />
</bean>
注意:SqlSessionFactory 需要一个 DataSource(数据源)。这可以是任意的 DataSource,只需要和配置其它 Spring 数据库连接一样配置它就可以了。
3、通过 MapperFactoryBean 将接口加入到 Spring 中:
<bean id="userMapper" class="org.mybatis.spring.mapper.MapperFactoryBean">
        <property name="mapperInterface" value="org.com.mapper.UserMapper" />
        <property name="sqlSessionFactory" ref="sqlSessionFactory" />
    </bean>
4、测试
@Test
public void tes2() {
    ApplicationContext context = new ClassPathXmlApplicationContext("spring-dao.xml");
    UserMapper userMapper = context.getBean("userMapper", UserMapper.class);
    List<User> userList = userMapper.userList();
    for (User user : userList) {
        System.out.println(user);
    }

}
在基础的 MyBatis 用法中,是通过 SqlSessionFactoryBuilder 来创建 SqlSessionFactory 的。而在 MyBatis-Spring 中,则使用 SqlSessionFactoryBean 来创建。
设置:
<bean id="sqlSessionFactory" class="org.mybatis.spring.SqlSessionFactoryBean">
  <property name="dataSource" ref="dataSource" />
</bean>
需要注意的是 SqlSessionFactoryBean 实现了 Spring 的 FactoryBean 接口。
这意味着由 Spring 最终创建的 bean 并不是 SqlSessionFactoryBean 本身,而是工厂类(SqlSessionFactoryBean)的 getObject() 方法的返回结果。
这种情况下,Spring 将会在应用启动时为你创建 SqlSessionFactory,并使用 sqlSessionFactory 这个名字存储起来。
通常,在 MyBatis-Spring 中,你不需要直接使用 SqlSessionFactoryBean 或对应的 SqlSessionFactory。 相反,session 的工厂 bean 将会被注入到 MapperFactoryBean 或其它继承于 SqlSessionDaoSupport 的 DAO(Data Access Object,数据访问对象)中。
SqlSessionFactory创建Mybatis默认的SqlSession会出现一些问题:
SqlSession 使用与 Spring 事务管理器使用的相同 DataSource,并且有进行中的事务,代码将会抛出异常。DefaultSqlSession 是线程不安全的。如果在 bean 中注入了它,将会发生错误。DefaultSqlSession 创建的映射器也不是线程安全的。如果你将它们注入到 bean 中,将会发生错误。SqlSession。属性:
SqlSessionFactory 有一个唯一的必要属性:用于 JDBC 的 DataSource。这可以是任意的 DataSource 对象,它的配置方法和其它 Spring 数据库连接是一样的。configLocation,它用来指定 MyBatis 的 XML 配置文件路径。它在需要修改 MyBatis 的基础配置非常有用。通常,基础配置指的是 <settings> 或 <typeAliases> 元素。<environments>),数据源(<DataSource>)和 MyBatis 的事务管理器(<transactionManager>)都会被忽略。 SqlSessionFactoryBean 会创建它自有的 MyBatis 环境配置(Environment),并按要求设置自定义环境的值。<mappers> 部分中指定 XML 文件的类路径;mapperLocations 属性。mapperLocations 属性接受多个资源位置。这个属性可以用来指定 MyBatis 的映射器 XML 配置文件的位置。属性的值是一个 Ant 风格的字符串,可以指定加载一个目录中的所有文件,或者从一个目录开始递归搜索所有目录提示 自 1.3.0 版本开始,新增的 configuration 属性能够在没有对应的 MyBatis XML 配置文件的情况下,直接设置 Configuration 实例。例如:
<bean id="sqlSessionFactory" class="org.mybatis.spring.SqlSessionFactoryBean">
  <property name="dataSource" ref="dataSource" />
  <property name="configuration">
    <bean class="org.apache.ibatis.session.Configuration">
      <property name="mapUnderscoreToCamelCase" value="true"/>
    </bean>
  </property>
</bean>
在 MyBatis 中,你可以使用 SqlSessionFactory 来创建 SqlSession。 一旦你获得一个 session 之后,你可以使用它来执行映射了的语句,提交或回滚连接,最后,当不再需要它的时候,你可以关闭 session。 使用 MyBatis-Spring 之后,你不再需要直接使用 SqlSessionFactory 了,因为你的 bean 可以被注入一个线程安全的 SqlSession,它能基于 Spring 的事务配置来自动提交、回滚、关闭 session。
SqlSessionTemplate:
SqlSessionTemplate 是 MyBatis-Spring 的核心。作为 SqlSession 的一个实现,这意味着可以使用它无缝代替你代码中已经在使用的 SqlSession。
SqlSessionTemplate 是线程安全的,可以被多个 DAO 或映射器所共享使用。
由于模板可以参与到 Spring 的事务管理中,并且由于其是线程安全的,可以供多个映射器类使用,你应该总是用 SqlSessionTemplate 来替换 MyBatis 默认的 DefaultSqlSession 实现。在同一应用程序中的不同类之间混杂使用可能会引起数据一致性的问题。
可以使用 SqlSessionFactory 作为构造方法的参数来创建 SqlSessionTemplate 对象。
  <bean id="sqlSession" class="org.mybatis.spring.SqlSessionTemplate">
    <constructor-arg index="0" ref="sqlSessionFactory" />
  </bean>
SqlSessionTemplate 还有一个接收 ExecutorType 参数的构造方法。这允许你使用如下 Spring 配置来批量创建对象
现在,这个 bean 就可以直接注入到你的 DAO bean 中了。你需要在你的 bean 中添加一个 SqlSession 属性,就像下面这样:
  public class UserDaoImpl implements UserDao {

      private SqlSession sqlSession;

      public void setSqlSession(SqlSession sqlSession) {
          this.sqlSession = sqlSession;
      }

      public User getUser(String userId) {
          return sqlSession.getMapper...;
      }
  }
按下面这样,注入 SqlSessionTemplate:
  <bean id="userDao" class="org.mybatis.spring.sample.dao.UserDaoImpl">
   <property name="sqlSession" ref="sqlSession" />
  </bean>
1、创建一个spring-dao.xml配置文件
<?xml version="1.0" encoding="UTF-8"?>
<beans xmlns="http://www.springframework.org/schema/beans"
       xmlns:xsi="http://www.w3.org/2001/XMLSchema-instance"
       xmlns:context="http://www.springframework.org/schema/context"
       xsi:schemaLocation="http://www.springframework.org/schema/beans
       https://www.springframework.org/schema/beans/spring-beans.xsd
       http://www.springframework.org/schema/context
       https://www.springframework.org/schema/context/spring-context.xsd
        ">

</beans>
2、配置数据源替换mybaits的数据源
<!--
    读取数据库配置文件
    system-properties-mode="NEVER" :防止${xxx}读取环境变量
 -->
<context:property-placeholder location="classpath:db.properties" system-properties-mode="NEVER"/>

<!-- 配置数据源:数据源有非常多,可以使用第三方的,也可使使用Spring的,我这里使用的是Spring提供的JDBC:org.springframework.jdbc.datasource
-->
<bean id="dataSource" class="org.springframework.jdbc.datasource.DriverManagerDataSource">
    <property name="driverClassName" value="${driver}"/>
    <property name="url" value="${url}"/>
    <property name="username" value="${username}"/>
    <property name="password" value="${password}"/>
</bean>
3、配置SqlSessionFactory,关联MyBatis
<bean id="sqlSessionFactory" class="org.mybatis.spring.SqlSessionFactoryBean">
    <property name="dataSource" ref="dataSource" />
    <!-- 关联Mybatis -->
    <property name="configLocation" value="classpath:mybatis-config.xml"/>
    <!-- 注册mapper接口 -->
    <property name="mapperLocations" value="classpath:org/com/mapper/*.xml"/>
</bean>
4、注册sqlSessionTemplate,关联sqlSessionFactory
<bean id="sqlSession" class="org.mybatis.spring.SqlSessionTemplate">
    <!-- 只能用构造器注入,因为它没有set方法 -->
    <constructor-arg index="0" ref="sqlSessionFactory"/>
</bean>
5、增加Dao接口的实现类;私有化sqlSessionTemplate
public class UserMapperImpl implements UserMapper {
    private SqlSessionTemplate sqlSession;

    public void setSqlSession(SqlSessionTemplate sqlSession) {
        this.sqlSession = sqlSession;
    }

    @Override
    public List<User> userList() {
        UserMapper userMapper = sqlSession.getMapper(UserMapper.class);
        return userMapper.userList();
    }

    @Override
    public User selectUserById(int id) {
        return null;
    }
}
6、注册bean实现
<bean id="userMapperImpl" class="org.com.mapper.impl.UserMapperImpl">
    <property name="sqlSession" ref="sqlSession"/>
</bean>
7、测试
@Test
public void tes4() {
    ApplicationContext context = new ClassPathXmlApplicationContext("spring-dao.xml");
    UserMapperImpl userMapperImpl = context.getBean("userMapperImpl", UserMapperImpl.class);
    List<User> userList = userMapperImpl.userList();
    for (User user : userList) {
        System.out.println(user);
    }
}
结果成功输出!现在我们的Mybatis配置文件的状态!发现都可以被Spring整合!
<?xml version="1.0" encoding="UTF-8" ?>
<!DOCTYPE configuration
        PUBLIC "-//mybatis.org//DTD Config 3.0//EN"
        "http://mybatis.org/dtd/mybatis-3-config.dtd">

<configuration>

    <settings>
        <!-- 内置日志 -->
        <setting name="logImpl" value="STDOUT_LOGGING"/>
    </settings>

    <!--  设置别名  -->
    <typeAliases>
       <package name="org.com.pojo"/>
    </typeAliases>

</configuration>
mybatis-spring1.2.3版以上的才有这个 .
官方文档截图 :
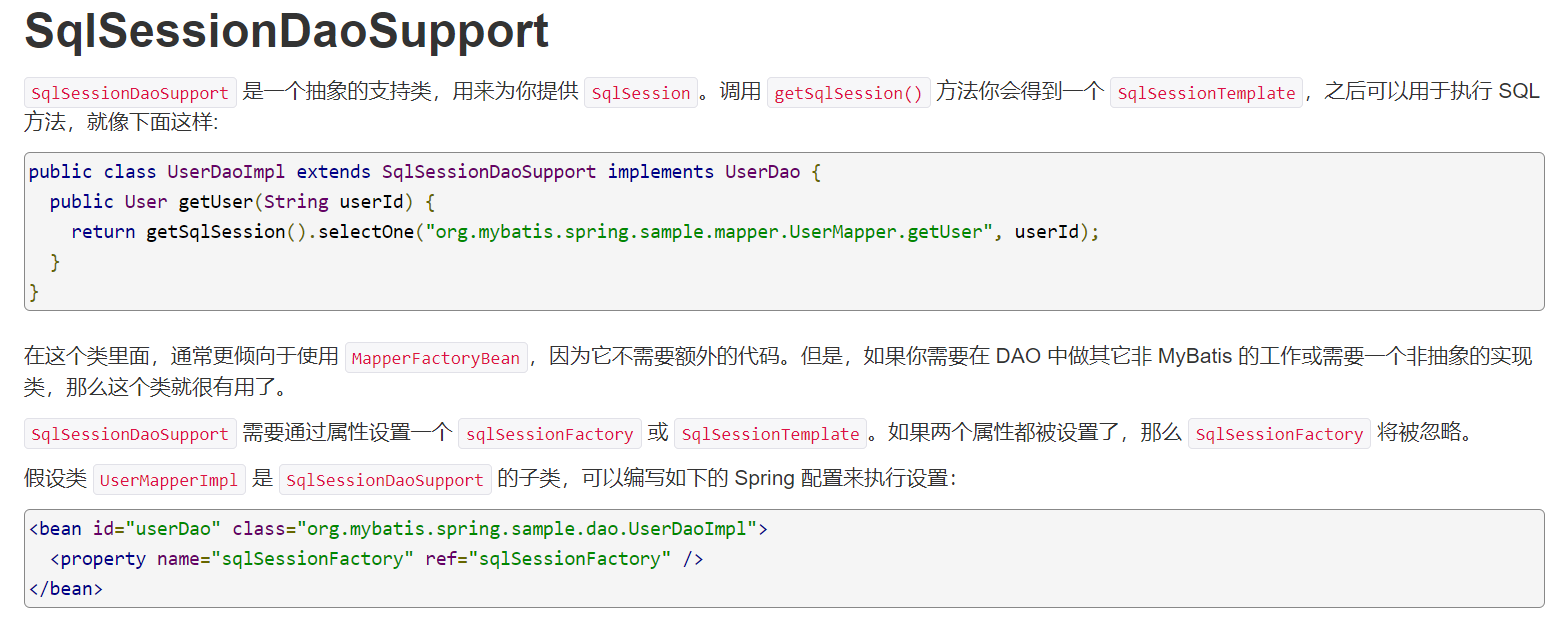
dao继承Support类 , 直接利用 getSqlSession() 获得 , 然后直接注入SqlSessionFactory . 比起方式1 , 不需要管理SqlSessionTemplate , 而且对事务的支持更加友好 . 可跟踪源码查看
测试步骤:
1、将我们上面写的UserMapperImpl修改一下
public class UserMapperImpl extends SqlSessionDaoSupport implements UserMapper {

    @Override
    public List<User> userList() {
        UserMapper mapper = getSqlSession().getMapper(UserMapper.class);
        return mapper.userList();
    }

}
2、修改bean的配置
<bean id="userMapperImpl" class="org.com.mapper.impl.UserMapperImpl">
    <property name="sqlSessionFactory" ref="sqlSessionFactory" />
</bean>
3、测试
@Test
public void tes4() {
    ApplicationContext context = new ClassPathXmlApplicationContext("spring-dao.xml");
    UserMapperImpl userMapperImpl = context.getBean("userMapperImpl", UserMapperImpl.class);
    List<User> userList = userMapperImpl.userList();
    for (User user : userList) {
        System.out.println(user);
    }
}
总结 : 整合到spring以后可以完全不要mybatis的配置文件,除了这些方式可以实现整合之外,我们还可以使用注解来实现,这个等我们后面学习SpringBoot的时候还会测试整合!

原文:https://www.cnblogs.com/javaconner/p/14765298.html