kubectl 和 kubectladm的区别这篇文章实践部分主要根据
https://blog.piaoruiqing.com/2019/09/17/kubernetes-1-installation/
该博客实践写,记录下安装的过程.
我们需要知道以下几点:
把 kubelet 直接运行在宿主机上,然后使用容器部署其他的 Kubernetes 组件。假如我们已经安装好了 docker
我们的目标如下 :
k8s-master
k8s-worker
修改hostname
[root@k8s-master ~]$ vim /etc/hostname # 修改hostname
[root@k8s-master ~]$ vim /etc/hosts # 将本机IP指向hostname
[root@k8s-master ~]$ reboot -h      # 重启(可以做完全部前期准备后再重启)
修改后, 两台虚拟机的配置如下:
# in k8s-master
[root@k8s-master ~]$ cat /etc/hostname
k8s-master
[root@k8s-master ~]$ cat /etc/hosts | grep k8s
10.33.30.92 k8s-master
10.33.30.91 k8s-worker

# in k8s-worker
[root@k8s-worker ~]$ cat /etc/hostname
k8s-worker
[root@k8s-worker ~]$ cat /etc/hosts | grep k8s
10.33.30.92 k8s-master
10.33.30.91 k8s-worker
[root@k8s-master ~]$ ifconfig -a    # 查看MAC
[root@k8s-master ~]$ cat /sys/class/dmi/id/product_uuid # 查看product_uuid
注: 如果你的centos7没有ifconfig命令, 可以执行yum install net-tools进行安装.
由于是本地内网测试环境, 笔者图方便, 直接关闭了防火墙. 若安全要求较高, 可以参考官方文档放行必要端口.
[root@k8s-master ~]$ systemctl stop firewalld   # 关闭服务
[root@k8s-master ~]$ systemctl disable firewalld    # 禁用服务
添加源,由于国内网络原因, 官方文档中的地址不可用, 本文替换为阿里云镜像地址, 执行以下代码即可:
cat <<EOF > /etc/yum.repos.d/kubernetes.repo
[kubernetes]
name=Kubernetes
baseurl=http://mirrors.aliyun.com/kubernetes/yum/repos/kubernetes-el7-x86_64
enabled=1
gpgcheck=1
repo_gpgcheck=1
gpgkey=http://mirrors.aliyun.com/kubernetes/yum/doc/yum-key.gpg http://mirrors.aliyun.com/kubernetes/yum/doc/rpm-package-key.gpg
exclude=kube*
EOF
安装
[root@k8s-master ~]$ yum install -y kubelet kubeadm kubectl --disableexcludes=kubernetes
[root@k8s-master ~]$ systemctl enable kubelet && systemctl start kubelet
修改网络配置
cat <<EOF >  /etc/sysctl.d/k8s.conf
net.bridge.bridge-nf-call-ip6tables = 1
net.bridge.bridge-nf-call-iptables = 1
EOF
sysctl --system
注意: 至此, 以上的全部操作, 在Worker机器上也需要执行. 注意hostname等不要相同.
生成初始化文件
[root@k8s-master ~]$ kubeadm config print init-defaults > kubeadm-init.yaml
该文件有两处需要修改:
apiVersion: kubeadm.k8s.io/v1beta2
bootstrapTokens:
- groups:
  - system:bootstrappers:kubeadm:default-node-token
  token: abcdef.0123456789abcdef
  ttl: 24h0m0s
  usages:
  - signing
  - authentication
kind: InitConfiguration
localAPIEndpoint:
  advertiseAddress: 10.33.30.92
  bindPort: 6443
nodeRegistration:
  criSocket: /var/run/dockershim.sock
  name: k8s-master
  taints:
  - effect: NoSchedule
    key: node-role.kubernetes.io/master
---
apiServer:
  timeoutForControlPlane: 4m0s
apiVersion: kubeadm.k8s.io/v1beta2
certificatesDir: /etc/kubernetes/pki
clusterName: kubernetes
controllerManager: {}
dns:
  type: CoreDNS
etcd:
  local:
    dataDir: /var/lib/etcd
imageRepository: registry.cn-hangzhou.aliyuncs.com/google_containers
kind: ClusterConfiguration
kubernetesVersion: v1.15.0
networking:
  dnsDomain: cluster.local
  serviceSubnet: 10.96.0.0/12
scheduler: {}
下载镜像
[root@k8s-master ~]$ kubeadm config images pull --config kubeadm-init.yaml
执行初始化
[root@k8s-master ~]$ kubeadm init --config kubeadm-init.yaml
等待执行完毕后, 会输出如下内容:
.....
(这里的英文会提示你安装成功,后面是提示你还需要完成的步骤)

To start using your cluster, you need to run the following as a regular user:

  mkdir -p $HOME/.kube
  sudo cp -i /etc/kubernetes/admin.conf $HOME/.kube/config
  sudo chown $(id -u):$(id -g) $HOME/.kube/config

Alternatively, if you are the root user, you can run:

  export KUBECONFIG=/etc/kubernetes/admin.conf

You should now deploy a pod network to the cluster.
Run "kubectl apply -f [podnetwork].yaml" with one of the options listed at:
  https://kubernetes.io/docs/concepts/cluster-administration/addons/

Then you can join any number of worker nodes by running the following on each as root:

kubeadm join 192.168.0.200:6443 --token abcdef.0123456789abcdef     --discovery-token-ca-cert-hash sha256:ef2e73dcd1844dcfe019faf7da3756952b308160adca4cb514a8e77f12bd768c
[root@k8s-master ~]#
通过上面这段话我们知道为了让 worker 加入我们,还需要完成以下步骤 :
  mkdir -p $HOME/.kube
  sudo cp -i /etc/kubernetes/admin.conf $HOME/.kube/config
  sudo chown $(id -u):$(id -g) $HOME/.kube/config
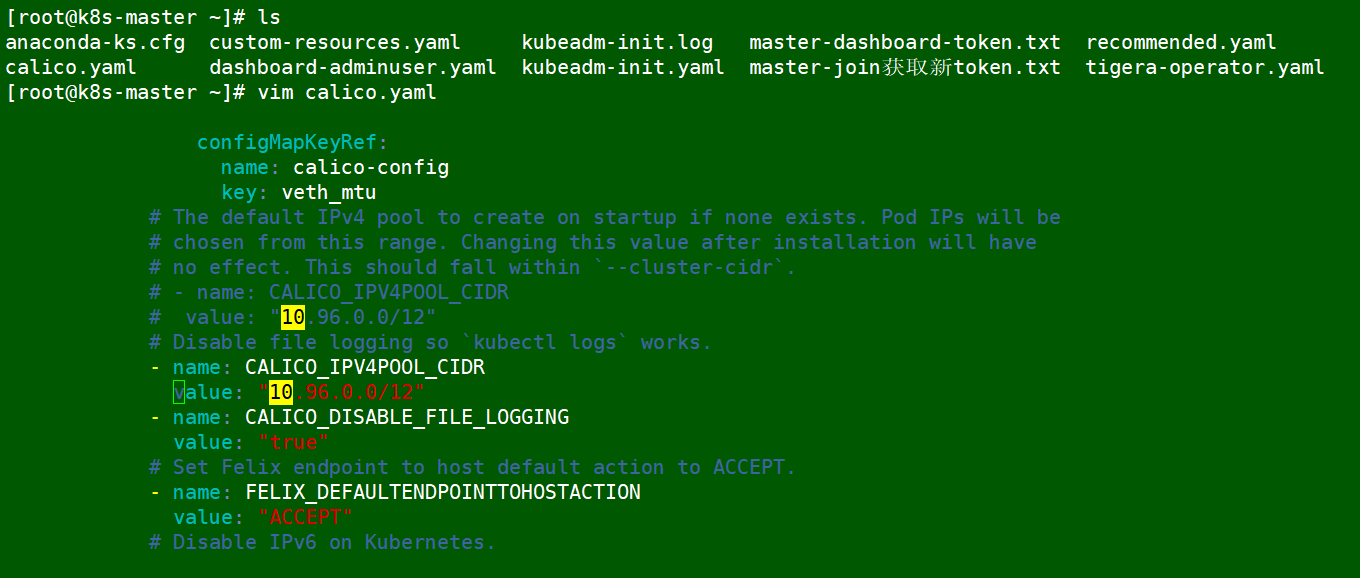
2.安装了一个 pod network , 这里我们选择 calico
3.这时候 worker node 就可以加入到集群里
[root@k8s-master ~]$ wget https://docs.projectcalico.org/v3.18/manifests/calico.yaml
[root@k8s-master ~]$ cat kubeadm-init.yaml | grep serviceSubnet:
serviceSubnet: 10.96.0.0/12

然后执行
kubectl apply -f calico.yaml
重复执行 `前期准备-修改hostname` ~ `安装Kubernetes-修改网络配置`的全部操作, 初始化一个Worker机器.
然后执行命令 :
kubeadm join 192.168.0.200:6443 --token abcdef.0123456789abcdef --discovery-token-ca-cert-hash sha256:ef2e73dcd1844dcfe019faf7da3756952b308160adca4cb514a8e77f12bd768c
然后执行
kubectl get node
就可以看到两台机器都 Ready 了
优秀博客 :
原文:https://www.cnblogs.com/Benjious/p/14773409.html