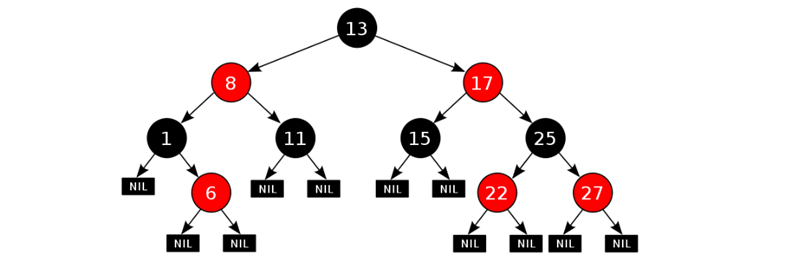
红黑树的特点
平衡二叉B树
每一个节点可以是红或者黑
红黑树不是高度平衡的,它的平衡是通过"自己的红黑规则"进行实现的
红黑树的红黑规则有哪些
根节点必须是黑色
如果一个节点没有子节点或者父节点,则该节点相应的指针属性值为Nil,这些Nil视为叶节点,每个叶节点(Nil)是黑色的
如果某一个节点是红色,那么它的子节点必须是黑色(不能出现两个红色节点相连 的情况)
对每一个节点,从该节点到其所有后代叶节点的简单路径上,均包含相同数目的黑色节点
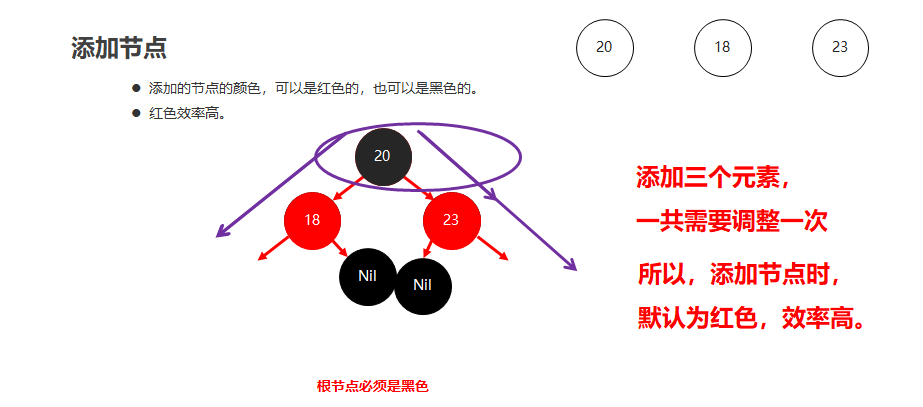
红黑树添加节点的默认颜色
添加节点时,默认为红色,效率高
红黑树添加节点后如何保持红黑规则
根节点位置
直接变为黑色
非根节点位置
父节点为黑色
不需要任何操作,默认红色即可
父节点为红色
叔叔节点为红色
将"父节点"设为黑色,将"叔叔节点"设为黑色
将"祖父节点"设为红色
如果"祖父节点"为根节点,则将根节点再次变成黑色
叔叔节点为黑色
将"父节点"设为黑色
将"祖父节点"设为红色
以"祖父节点"为支点进行旋转
案例需求
用TreeSet集合存储多个学生信息(姓名,语文成绩,数学成绩,英语成绩),并遍历该集合
要求: 按照总分从高到低出现
代码实现
学生类
 1 public class Student implements Comparable<Student> {
 2     private String name;
 3     private int chinese;
 4     private int math;
 5     private int english;
 6 ?
 7     public Student() {
 8     }
 9 ?
10     public Student(String name, int chinese, int math, int english) {
11         this.name = name;
12         this.chinese = chinese;
13         this.math = math;
14         this.english = english;
15     }
16 ?
17     public String getName() {
18         return name;
19     }
20 ?
21     public void setName(String name) {
22         this.name = name;
23     }
24 ?
25     public int getChinese() {
26         return chinese;
27     }
28 ?
29     public void setChinese(int chinese) {
30         this.chinese = chinese;
31     }
32 ?
33     public int getMath() {
34         return math;
35     }
36 ?
37     public void setMath(int math) {
38         this.math = math;
39     }
40 ?
41     public int getEnglish() {
42         return english;
43     }
44 ?
45     public void setEnglish(int english) {
46         this.english = english;
47     }
48 ?
49     public int getSum() {
50         return this.chinese + this.math + this.english;
51     }
52 ?
53     @Override
54     public int compareTo(Student o) {
55         // 主要条件: 按照总分进行排序
56         int result = o.getSum() - this.getSum();
57         // 次要条件: 如果总分一样,就按照语文成绩排序
58         result = result == 0 ? o.getChinese() - this.getChinese() : result;
59         // 如果语文成绩也一样,就按照数学成绩排序
60         result = result == 0 ? o.getMath() - this.getMath() : result;
61         // 如果总分一样,各科成绩也都一样,就按照姓名排序
62         result = result == 0 ? o.getName().compareTo(this.getName()) : result;
63         return result;
64     }
65 }
测试类
 1 public class TreeSetDemo {
 2     public static void main(String[] args) {
 3         //创建TreeSet集合对象,通过比较器排序进行排序
 4         TreeSet<Student> ts = new TreeSet<Student>();
 5         //创建学生对象
 6         Student s1 = new Student("jack", 98, 100, 95);
 7         Student s2 = new Student("rose", 95, 95, 95);
 8         Student s3 = new Student("sam", 100, 93, 98);
 9         //把学生对象添加到集合
10         ts.add(s1);
11         ts.add(s2);
12         ts.add(s3);
13 ?
14         //遍历集合
15         for (Student s : ts) {
16             System.out.println(s.getName() + "," + s.getChinese() + "," + s.getMath() + "," + s.getEnglish() + "," + s.getSum());
17         }
18     }
19 }
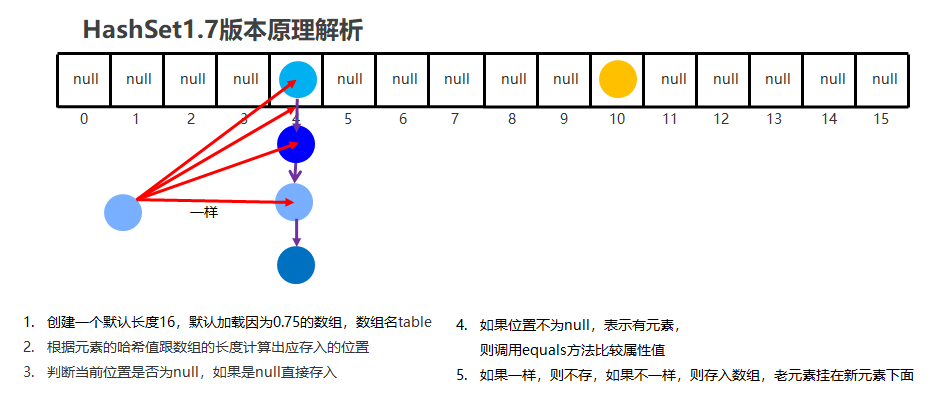
底层数据结构是哈希表
存取无序
不可以存储重复元素
没有索引,不能使用普通for循环遍历
存储字符串并遍历
 1 public class HashSetDemo {
 2     public static void main(String[] args) {
 3         //创建集合对象
 4         HashSet<String> set = new HashSet<String>();
 5 ?
 6         //添加元素
 7         set.add("hello");
 8         set.add("world");
 9         set.add("java");
10         //不包含重复元素的集合
11         set.add("world");
12 ?
13         //遍历
14         for(String s : set) {
15             System.out.println(s);
16         }
17     }
18 }
哈希值简介
是JDK根据对象的地址或者字符串或者数字算出来的int类型的数值
如何获取哈希值
Object类中的public int hashCode():返回对象的哈希码值
哈希值的特点
同一个对象多次调用hashCode()方法返回的哈希值是相同的
默认情况下,不同对象的哈希值是不同的。而重写hashCode()方法,可以实现让不同对象的哈希值相同
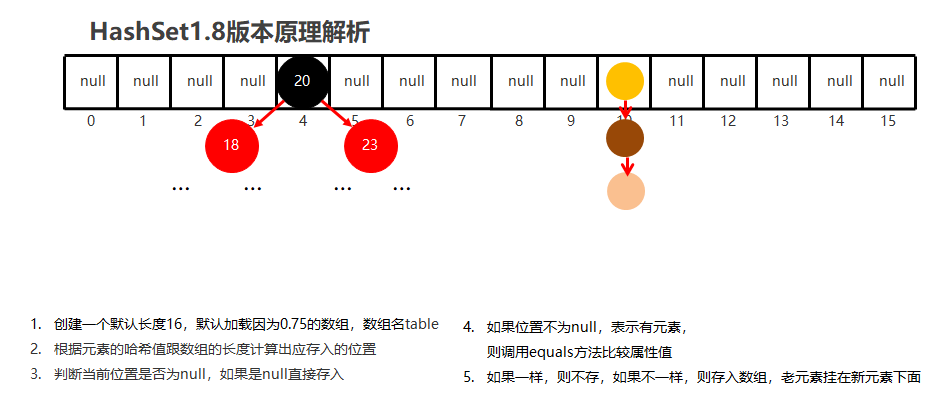
JDK1.8以前
数组 + 链表
JDK1.8以后
节点个数少于等于8个
数组 + 链表
节点个数多于8个
数组 + 红黑树
案例需求
创建一个存储学生对象的集合,存储多个学生对象,使用程序实现在控制台遍历该集合
要求:学生对象的成员变量值相同,我们就认为是同一个对象
代码实现
学生类
 1 public class Student {
 2     private String name;
 3     private int age;
 4 ?
 5     public Student() {
 6     }
 7 ?
 8     public Student(String name, int age) {
 9         this.name = name;
10         this.age = age;
11     }
12 ?
13     public String getName() {
14         return name;
15     }
16 ?
17     public void setName(String name) {
18         this.name = name;
19     }
20 ?
21     public int getAge() {
22         return age;
23     }
24 ?
25     public void setAge(int age) {
26         this.age = age;
27     }
28 ?
29     @Override
30     public boolean equals(Object o) {
31         if (this == o) return true;
32         if (o == null || getClass() != o.getClass()) return false;
33 ?
34         Student student = (Student) o;
35 ?
36         if (age != student.age) return false;
37         return name != null ? name.equals(student.name) : student.name == null;
38     }
39 ?
40     @Override
41     public int hashCode() {
42         int result = name != null ? name.hashCode() : 0;
43         result = 31 * result + age;
44         return result;
45     }
46 }
测试类
 1 public class HashSetDemo02 {
 2     public static void main(String[] args) {
 3         //创建HashSet集合对象
 4         HashSet<Student> hs = new HashSet<Student>();
 5 ?
 6         //创建学生对象
 7         Student s1 = new Student("林青霞", 30);
 8         Student s2 = new Student("张曼玉", 35);
 9         Student s3 = new Student("王祖贤", 33);
10 ?
11         Student s4 = new Student("王祖贤", 33);
12 ?
13         //把学生添加到集合
14         hs.add(s1);
15         hs.add(s2);
16         hs.add(s3);
17         hs.add(s4);
18 ?
19         //遍历集合(增强for)
20         for (Student s : hs) {
21             System.out.println(s.getName() + "," + s.getAge());
22         }
23     }
24 }
总结
HashSet集合存储自定义类型元素,要想实现元素的唯一,要求必须重写hashCode方法和equals方法
Map集合概述
interface Map<K,V> K:键的类型;V:值的类型
Map集合的特点
双列集合,一个键对应一个值
键不可以重复,值可以重复
Map集合的基本使用
 1 public class MapDemo01 {
 2     public static void main(String[] args) {
 3         //创建集合对象
 4         Map<String,String> map = new HashMap<String,String>();
 5 ?
 6         //V put(K key, V value) 将指定的值与该映射中的指定键相关联
 7         map.put("itheima001","林青霞");
 8         map.put("itheima002","张曼玉");
 9         map.put("itheima003","王祖贤");
10         map.put("itheima003","柳岩");
11 ?
12         //输出集合对象
13         System.out.println(map);
14     }
15 }
方法介绍
| 方法名 | 说明 |
|---|---|
| V put(K key,V value) | 添加元素 |
| V remove(Object key) | 根据键删除键值对元素 |
| void clear() | 移除所有的键值对元素 |
| boolean containsKey(Object key) | 判断集合是否包含指定的键 |
| boolean containsValue(Object value) | 判断集合是否包含指定的值 |
| boolean isEmpty() | 判断集合是否为空 |
| int size() | 集合的长度,也就是集合中键值对的个数 |
示例代码
 1 public class MapDemo02 {
 2     public static void main(String[] args) {
 3         //创建集合对象
 4         Map<String,String> map = new HashMap<String,String>();
 5 ?
 6         //V put(K key,V value):添加元素
 7         map.put("张无忌","赵敏");
 8         map.put("郭靖","黄蓉");
 9         map.put("杨过","小龙女");
10 ?
11         //V remove(Object key):根据键删除键值对元素
12 //        System.out.println(map.remove("郭靖"));
13 //        System.out.println(map.remove("郭襄"));
14 ?
15         //void clear():移除所有的键值对元素
16 //        map.clear();
17 ?
18         //boolean containsKey(Object key):判断集合是否包含指定的键
19 //        System.out.println(map.containsKey("郭靖"));
20 //        System.out.println(map.containsKey("郭襄"));
21 ?
22         //boolean isEmpty():判断集合是否为空
23 //        System.out.println(map.isEmpty());
24 ?
25         //int size():集合的长度,也就是集合中键值对的个数
26         System.out.println(map.size());
27 ?
28         //输出集合对象
29         System.out.println(map);
30     }
31 }
方法介绍
| 方法名 | 说明 |
|---|---|
| V get(Object key) | 根据键获取值 |
| Set<K> keySet() | 获取所有键的集合 |
| Collection<V> values() | 获取所有值的集合 |
| Set<Map.Entry<K,V>> entrySet() | 获取所有键值对对象的集合 |
示例代码
 1 public class MapDemo03 {
 2     public static void main(String[] args) {
 3         //创建集合对象
 4         Map<String, String> map = new HashMap<String, String>();
 5
 6         //添加元素
 7         map.put("张无忌", "赵敏");
 8         map.put("郭靖", "黄蓉");
 9         map.put("杨过", "小龙女");
10
11         //V get(Object key):根据键获取值
12 //        System.out.println(map.get("张无忌"));
13 //        System.out.println(map.get("张三丰"));
14
15         //Set<K> keySet():获取所有键的集合
16 //        Set<String> keySet = map.keySet();
17 //        for(String key : keySet) {
18 //            System.out.println(key);
19 //        }
20
21         //Collection<V> values():获取所有值的集合
22         Collection<String> values = map.values();
23         for(String value : values) {
24             System.out.println(value);
25         }
26     }
27 }
遍历思路
我们刚才存储的元素都是成对出现的,所以我们把Map看成是一个夫妻对的集合
把所有的丈夫给集中起来
遍历丈夫的集合,获取到每一个丈夫
根据丈夫去找对应的妻子
步骤分析
获取所有键的集合。用keySet()方法实现
遍历键的集合,获取到每一个键。用增强for实现
根据键去找值。用get(Object key)方法实现
代码实现
 1 public class MapDemo01 {
 2     public static void main(String[] args) {
 3         //创建集合对象
 4         Map<String, String> map = new HashMap<String, String>();
 5
 6         //添加元素
 7         map.put("张无忌", "赵敏");
 8         map.put("郭靖", "黄蓉");
 9         map.put("杨过", "小龙女");
10
11         //获取所有键的集合。用keySet()方法实现
12         Set<String> keySet = map.keySet();
13         //遍历键的集合,获取到每一个键。用增强for实现
14         for (String key : keySet) {
15             //根据键去找值。用get(Object key)方法实现
16             String value = map.get(key);
17             System.out.println(key + "," + value);
18         }
19     }
20 }
遍历思路
我们刚才存储的元素都是成对出现的,所以我们把Map看成是一个夫妻对的集合
获取所有结婚证的集合
遍历结婚证的集合,得到每一个结婚证
根据结婚证获取丈夫和妻子
步骤分析
获取所有键值对对象的集合
Set<Map.Entry<K,V>> entrySet():获取所有键值对对象的集合
遍历键值对对象的集合,得到每一个键值对对象
用增强for实现,得到每一个Map.Entry
根据键值对对象获取键和值
用getKey()得到键
用getValue()得到值
代码实现
 1 public class MapDemo02 {
 2     public static void main(String[] args) {
 3         //创建集合对象
 4         Map<String, String> map = new HashMap<String, String>();
 5
 6         //添加元素
 7         map.put("张无忌", "赵敏");
 8         map.put("郭靖", "黄蓉");
 9         map.put("杨过", "小龙女");
10
11         //获取所有键值对对象的集合
12         Set<Map.Entry<String, String>> entrySet = map.entrySet();
13         //遍历键值对对象的集合,得到每一个键值对对象
14         for (Map.Entry<String, String> me : entrySet) {
15             //根据键值对对象获取键和值
16             String key = me.getKey();
17             String value = me.getValue();
18             System.out.println(key + "," + value);
19         }
20     }
21 }
HashMap底层是哈希表结构的
依赖hashCode方法和equals方法保证键的唯一
如果键要存储的是自定义对象,需要重写hashCode和equals方法
案例需求
创建一个HashMap集合,键是学生对象(Student),值是居住地 (String)。存储多个元素,并遍历。
要求保证键的唯一性:如果学生对象的成员变量值相同,我们就认为是同一个对象
代码实现
学生类
 1 public class Student {
 2     private String name;
 3     private int age;
 4
 5     public Student() {
 6     }
 7
 8     public Student(String name, int age) {
 9         this.name = name;
10         this.age = age;
11     }
12
13     public String getName() {
14         return name;
15     }
16
17     public void setName(String name) {
18         this.name = name;
19     }
20
21     public int getAge() {
22         return age;
23     }
24
25     public void setAge(int age) {
26         this.age = age;
27     }
28
29     @Override
30     public boolean equals(Object o) {
31         if (this == o) return true;
32         if (o == null || getClass() != o.getClass()) return false;
33
34         Student student = (Student) o;
35
36         if (age != student.age) return false;
37         return name != null ? name.equals(student.name) : student.name == null;
38     }
39
40     @Override
41     public int hashCode() {
42         int result = name != null ? name.hashCode() : 0;
43         result = 31 * result + age;
44         return result;
45     }
46 }
测试类
 1 public class HashMapDemo {
 2     public static void main(String[] args) {
 3         //创建HashMap集合对象
 4         HashMap<Student, String> hm = new HashMap<Student, String>();
 5
 6         //创建学生对象
 7         Student s1 = new Student("林青霞", 30);
 8         Student s2 = new Student("张曼玉", 35);
 9         Student s3 = new Student("王祖贤", 33);
10         Student s4 = new Student("王祖贤", 33);
11
12         //把学生添加到集合
13         hm.put(s1, "西安");
14         hm.put(s2, "武汉");
15         hm.put(s3, "郑州");
16         hm.put(s4, "北京");
17
18         //遍历集合
19         Set<Student> keySet = hm.keySet();
20         for (Student key : keySet) {
21             String value = hm.get(key);
22             System.out.println(key.getName() + "," + key.getAge() + "," + value);
23         }
24     }
25 }
TreeMap底层是红黑树结构
依赖自然排序或者比较器排序,对键进行排序
如果键存储的是自定义对象,需要实现Comparable接口或者在创建TreeMap对象时候给出比较器排序规则
案例需求
创建一个TreeMap集合,键是学生对象(Student),值是籍贯(String),学生属性姓名和年龄,按照年龄进行排序并遍历
要求按照学生的年龄进行排序,如果年龄相同则按照姓名进行排序
代码实现
学生类
 1 public class Student implements Comparable<Student>{
 2     private String name;
 3     private int age;
 4
 5     public Student() {
 6     }
 7
 8     public Student(String name, int age) {
 9         this.name = name;
10         this.age = age;
11     }
12
13     public String getName() {
14         return name;
15     }
16
17     public void setName(String name) {
18         this.name = name;
19     }
20
21     public int getAge() {
22         return age;
23     }
24
25     public void setAge(int age) {
26         this.age = age;
27     }
28
29     @Override
30     public String toString() {
31         return "Student{" +
32                 "name=‘" + name + ‘\‘‘ +
33                 ", age=" + age +
34                 ‘}‘;
35     }
36
37     @Override
38     public int compareTo(Student o) {
39         //按照年龄进行排序
40         int result = o.getAge() - this.getAge();
41         //次要条件,按照姓名排序。
42         result = result == 0 ? o.getName().compareTo(this.getName()) : result;
43         return result;
44     }
45 }
测试类
 1 public class Test1 {
 2     public static void main(String[] args) {
 3           // 创建TreeMap集合对象
 4         TreeMap<Student,String> tm = new TreeMap<>();
 5
 6         // 创建学生对象
 7         Student s1 = new Student("xiaohei",23);
 8         Student s2 = new Student("dapang",22);
 9         Student s3 = new Student("xiaomei",22);
10
11         // 将学生对象添加到TreeMap集合中
12         tm.put(s1,"江苏");
13         tm.put(s2,"北京");
14         tm.put(s3,"天津");
15
16         // 遍历TreeMap集合,打印每个学生的信息
17         tm.forEach(
18                 (Student key, String value)->{
19                     System.out.println(key + "---" + value);
20                 }
21         );
22     }
23 }
原文:https://www.cnblogs.com/xujun168/p/14791484.html