注:在github上看不方便,就搬到这里了,随时随地参考
原地址:https://github.com/hoffstadt/DearPyGui_06/wiki
Dear PyGui is a simple to use (but powerful) Python GUI framework. Dear PyGui provides a wrapping of Dear ImGui that simulates a traditional retained mode GUI, as opposed to Dear ImGui‘s immediate mode paradigm.
Under the hood, Dear PyGui uses the immediate mode paradigm allowing for extremely dynamic interfaces. Similar to PyQt, Dear PyGui does not use native widgets but instead draws the widgets using your computer‘s graphics card (using Directx11, Metal, and Vulkan rendering APIs).
In the same manner Dear ImGui provides a simple way to create tools for game developers, Dear PyGui provides a simple way for python developers to create quick and powerful GUIs for scripts.
When compared with other Python GUI libraries Dear PyGui is unique with:
Ensure you have at least Python 3.6 (64 bit) installed.
pip install dearpygui
A variety of examples demonstrating usage can be found in the Examples folder on github. Documentation can be found here and also from within the library by using the show_documentation() command.
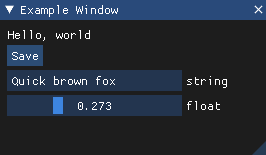
Using Dear PyGui is a simple as creating a python script like the one below
The main script must always conclude with start_dearpygui().
Code:
from dearpygui.core import *
from dearpygui.simple import *

def save_callback(sender, data):
    print("Save Clicked")

with window("Example Window"):
    add_text("Hello, world")
    add_button("Save", callback=save_callback)
    add_input_text("string", default_value="Quick brown fox")
    add_slider_float("float", default_value=0.273, max_value=1)

start_dearpygui()
Result:
DPG items can be broken down into :
Every item must have a unique name. By default the name will become the label (if applicable). In the event that you would like to change the widget‘s label you may
Some item names are auto generated for items without required name arguments in the function. (i.e. same_line). However, these have an optional name keyword which can be filled out if you need to reference the item at a later time.
from dearpygui.core import *
from dearpygui.simple import *

with window("Tutorial"):
    add_button("Apply")
    add_same_line(spacing=10)
    add_button("Apply##1")
    add_same_line(spacing=10, name="sameline1")
    add_button("Apply2", label="Apply")
    add_spacing(count=5, name="spacing1")
    add_button("Apply##3")

start_dearpygui()
Result: img
Container items are used to hold other items and are implemented by either
When container items are "added", they are pushed onto the parent stack. Any item added after will belong to the parent on the top of the stack. When a container item is "ended" they are popped off the parent stack.
from dearpygui.core import *
from dearpygui.simple import *

add_window("Tutorial")
add_text("This is some text on window 2")
end()

start_dearpygui()
dearpygui.simple‘s context managers automate calling the end function and allows for code folding and shows a hierarchy in the code itself.
from dearpygui.core import *
from dearpygui.simple import *

with window("Tutorial"):
    add_text("This is some text on window 2")

start_dearpygui()
Result:
DPG items can be broken down into :
New widget are created by calling the various add_xxxx commands or using context managers for container widgets. These commands all return a unique identifier than can be used to refer to the widget at a later time. Below is a simple example for creating a window with a few simple widgets:
import dearpygui.core as dpg
import dearpygui.contexts as cxt
import dearpygui.simple as smpl

with cxt.window(label="Tutorial"):

    dpg.add_button(label="Apply")
    dpg.add_same_line(spacing=10)
    dpg.add_button(label="Apply")
    dpg.add_same_line(spacing=10)
    dpg.add_button(label="Apply")
    dpg.add_spacing(count=5)

    # printing the widgets unique id
    id=dpg.add_button(label="Press me")
    print(id)

smpl.start_dearpygui()
Result:

Container items are used to hold other items and are implemented using the corresponding container‘s context manager.
When container items are "added", they are pushed onto the container stack. Any item added after will belong to the container on the top of the stack.
import dearpygui.core as dpg
import dearpygui.contexts as cxt
import dearpygui.simple as smpl

with cxt.window(label="Tutorial"):
    dpg.add_text("This is some text on window 2")

smpl.start_dearpygui()
Result:

Go here.
Every input widget has a value which can be set using the default_value keyword when being created or at runtime by the command set_value.
To access the value of a widget we can use the command get_value.
import dearpygui.core as dpg
import dearpygui.contexts as cxt
import dearpygui.simple as smpl

with cxt.window("Tutorial"):

    dpg.add_checkbox("Radio Button", default_value=False)
    print("First value of the Radio Button is: ", dpg.get_value("Radio Button"))

    dpg.set_value("Radio Button", True)
    print("Value after setting the Radio Button is: ", dpg.get_value("Radio Button"))

smpl.start_dearpygui()
Result:

Go here.
Most widgets have a callback which is submitted to a queue of callbacks when the widget is interacted with.
Callbacks are used to give functionality to widgets. Callbacks can either be assigned to the widget upon creation or after creation using set_item_callback as shown in the code below.
Callbacks in Dear PyGui typically take in a sender and data argument.
The sender argument is used by Dear PyGui to inform the callback which widget triggered the callback by sending the id.
The data argument is used by various standard callbacks to send additional data by specifying the callback callback_data.
import dearpygui.core as dpg
import dearpygui.contexts as cxt
import dearpygui.simple as smpl

def button_callback(sender, data):
    print(f"sender is: {sender}")
    print(f"data is: {data}")

with cxt.window(label="Tutorial"):

    dpg.add_input_text(label="Input Text", default_value="Hello World!")
    dpg.add_button(label="Apply", callback=button_callback, callback_data="Some Data")

smpl.start_dearpygui()
In order to send data to the data keyword of your callback, you need to use the callback_data keyword when you create the widget. This can be any python object.
import dearpygui.core as dpg
import dearpygui.contexts as cxt
import dearpygui.simple as smpl

def callback(sender, data):
    print(sender, "\t", data)

with cxt.window(label="Tutorial"):

    widget = dpg.add_input_text(label="Input")
    dpg.add_button(label="Press me 1", callback=callback, callback_data=5) # simply sends value through
    dpg.add_button(label="Press me 2", callback=callback, callback_data=lambda: dpg.get_value(widget)) # calls the lambda and sends result through

smpl.start_dearpygui()
One of the many powerful built in developer tools is the Logger. This can be accessed through the command show_logger(). The logger has 6 log levels:
See example below:
from dearpygui.core import *
from dearpygui.simple import *

show_logger()

set_log_level(mvTRACE)
log("trace message")
log_debug("debug message")
log_info("info message")
log_warning("warning message")
log_error("error message")

start_dearpygui()
Under Construction
Dear PyGui has a low level drawing API that is well suited for primitive drawing, custom widgets or even dynamic drawings.
Drawing commands can be issued to a drawing widget, window, or the viewport.
A drawing widget is created by calling add_drawing then items can be added by calling their respective draw commands. The origin for the drawing is in the top left and the y axis points down.
from dearpygui.core import *
from dearpygui.simple import *

with window("Tutorial"):
    add_drawing("Drawing_1", width=300, height=300)

draw_line("Drawing_1", [10, 10], [100, 100], [255, 0, 0, 255], 1)
draw_text("Drawing_1", [0, 0], "Origin", color=[250, 250, 250, 255], size=15)
draw_arrow("Drawing_1", [50, 70], [100, 65], [0, 200, 255], 1, 10)

start_dearpygui()
Results:

Images
Drawings can display images of types PNG, JPEG, or BMP. Images are drawn using draw_image
Using the keywords pmin and pmax we can define the upper left and lower right area of the rectangle that the image will be draw onto the canvas. The image will scale to fit the specified area.
With keywords uv_min and uv_max we can define a scalar number of what area on the image should be drawn to the canvas. The default of uv_min = [0,0] and uv_max = [1,1] will display the entire image while uv_min = [0,0] uv_max = [0.5,0.5] will only show the first quarter of the drawing.
To be able to demonstrate these features you must update the directory to that of an image on your computer, such as SpriteMapExample.png.
from dearpygui.core import *
from dearpygui.simple import *

# please update the image directory argument with a path to an image on your computer for this example
with window("Tutorial"):
    add_drawing("Drawing_1", width=700, height=700)

draw_image("Drawing_1", ‘SpriteMapExample.png‘, [0, 400], pmax=[200, 600], uv_min=[0, 0], uv_max=[1, 1], tag="image")
draw_image("Drawing_1", ‘SpriteMapExample.png‘, [400, 300], pmax=[600, 500], uv_min=[0, 0], uv_max=[0.5, 0.5])
draw_image("Drawing_1", ‘SpriteMapExample.png‘, [0, 0], pmax=[300, 300], uv_min=[0, 0], uv_max=[2.5, 2.5])

start_dearpygui()
Results:

Under construction
The primary window fills the viewport and resizes with it. It will also always remain in the background of other windows. A window can be set as the primary window by using the primary_window keyword of start_dearpygui or using the set_primary_window command.
from dearpygui.core import *
from dearpygui.simple import *

with window("Tutorial"):
    add_checkbox("Radio Button", default_value=False)
    print("First value of the Radio Button is: ", get_value("Radio Button"))
    set_value("Radio Button", True)
    print("Value after setting the Radio Button is: ", get_value("Radio Button"))

start_dearpygui(primary_window="Tutorial")
Under construction
Dear PyGui constains several useful developer tools which can help debug Dear PyGui applications. They can be seen below:
from dearpygui.core import *
from dearpygui.simple import *

show_documentation()
show_debug()
show_about()
show_metrics()
show_logger()

start_dearpygui()
Under construction
Simple plots take in a list and plot y-axis data against the number of items in the list. These can be line graphs or histograms and are demonstrated below:
from dearpygui.core import *
from dearpygui.simple import *

with window("Tutorial", width=500, height=500):
    add_simple_plot("Simpleplot1", value=[0.3, 0.9, 0.5, 0.3], height=300)
    add_simple_plot("Simpleplot2", value=[0.3, 0.9, 2.5, 8.9], overlay="Overlaying", height=180, histogram=True)

start_dearpygui()
You can change the simple plot‘s data using set_value like so:
from dearpygui.core import *
from dearpygui.simple import *
from math import sin

def on_render(sender, data):
    frame_count = get_data("frame_count")
    frame_count += 1
    add_data("frame_count", frame_count)
    plot_data = get_value("plot_data")
    if len(plot_data) > 100:
        plot_data.pop(0)
    plot_data.append(sin(frame_count/30))
    set_value("plot_data", plot_data)

with window("Tutorial", width=500, height=500):
    add_simple_plot("Simple Plot", source="plot_data", minscale=-1.0, maxscale=1.0, height=300)
    add_data("frame_count", 0)
    set_render_callback(on_render)

start_dearpygui()
Results:

Plots can be created using add_plot command. Once a plot is created, different types of "series" can be added.
Tips
Basic Usage
from dearpygui.core import *
from dearpygui.simple import *
from math import cos, sin

def plot_callback(sender, data):

    data1x = []
    data1y = []
    for i in range(0, 100):
        data1x.append(3.14 * i / 180)
        data1y.append(cos(3 * 3.14 * i / 180))

    data2x = []
    data2y = []
    for i in range(0, 100):
        data2x.append(3.14 * i / 180)
        data2y.append(sin(2 * 3.14 * i / 180))

    add_line_series("Plot", "Cos", data1x, data1y, weight=2, color=[0, 0, 255, 100])
    add_shade_series("Plot", "Cos", data1x, data1y, weight=2, fill=[255, 0, 0, 100])
    add_scatter_series("Plot", "Sin", data2x, data2y, outline=[0, 255, 0, 100])

with window("Tutorial"):
    add_button("Plot data", callback=plot_callback)
    add_plot("Plot", height=-1)

start_dearpygui()
Results:

You can update the series on a plot by either adding a series using the same name or by clearing the plot. This is shown below:
from dearpygui.core import *
from dearpygui.simple import *
from math import cos

def plot_callback(sender, data):
    # keeping track of frames
    frame_count = get_data("frame_count")
    frame_count += 1
    add_data("frame_count", frame_count)

    # updating plot data
    plot_datax = get_data("plot_datax")
    plot_datay = get_data("plot_datay")
    if len(plot_datax) > 2000:
        frame_count = 0
        plot_datax.clear()
        plot_datay.clear()
    plot_datax.append(3.14 * frame_count / 180)
    plot_datay.append(cos(3 * 3.14 * frame_count / 180))
    add_data("plot_datax", plot_datax)
    add_data("plot_datay", plot_datay)

    # plotting new data
    add_line_series("Plot", "Cos", plot_datax, plot_datay, weight=2)

with window("Tutorial", width=500, height=500):
    add_plot("Plot", height=-1)
    add_data("plot_datax", [])
    add_data("plot_datay", [])
    add_data("frame_count", 0)
    set_render_callback(plot_callback)

start_dearpygui()
Gallery


Dear PyGui has a simple table API that is well suited for static and dynamic tables.
The table widget is started by calling add_table().
To edit the table widget we can use the methods add_row() add_column() which will append the row/column to the last slot in the table.
Alternatively, we can insert rows/columns using insert_row insert_column. Columns and Rows are inserted according to their index argument. If the specified index already exists the exiting columns/rows will be bumped and the new row/column will be inserted at the specified index.
Also an added or inserted row/column will by default fill unspecified cells with empty cells.
from dearpygui.core import *
from dearpygui.simple import *

with window("Tutorial"):
    add_table("Table Example", ["Header 0", "Header 1"])
    add_row("Table Example", ["row 0", "text"])
    add_row("Table Example", ["row 2", "text"])
    add_column("Table Example", "Header 3", ["data","data"])
    insert_row("Table Example", 1, ["row 1", "inserted row", "inserted row"])
    insert_column("Table Example", 2, "Header 2", ["inserted with column", "inserted column", "inserted column"])

start_dearpygui()
Additionally, headers and cells can be renamed and their values be changed.
from dearpygui.core import *
from dearpygui.simple import *

def modify_tables(sender, data):
    log_debug(f"Table Called: {sender}")
    coord_list = get_table_selections("Table Example")
    log_debug(f"Selected Cells (coordinates): {coord_list}")
    for coordinates in coord_list:
        set_table_item("Table Example", coordinates[0], coordinates[1], "New Value")
    set_headers("Table Example", ["New Header 0", "New Header 1", "New Header 2"])


show_logger()

with window("Tutorial"):
    add_spacing(count=5)
    add_button("Modify Selected Table Values", callback=modify_tables)
    add_spacing(count=5)
    add_table("Table Example", ["Header 0", "Header 1"])
    add_row("Table Example", ["awesome row", "text"])
    add_row("Table Example", ["super unique", "unique text"])
    add_column("Table Example", "Header 2", ["text from column", "text from column"])
    add_row("Table Example", ["boring row"])

start_dearpygui()
Results:


Tables cells are selectable. This means that we can apply a callback to the table and retrieve which cell was selected through the sender and even get the text inside the cell.
from dearpygui.core import *
from dearpygui.simple import *

def table_printer(sender, data):
    log_debug(f"Table Called: {sender}")
    coord_list = get_table_selections("Table Example")
    log_debug(f"Selected Cells (coordinates): {coord_list}")
    names = []
    for coordinates in coord_list:
        names.append(get_table_item("Table Example", coordinates[0], coordinates[1]))
    log_debug(names)


show_logger()

with window("Tutorial"):
    add_table("Table Example", ["Header 0", "Header 1"], callback=table_printer)
    add_row("Table Example", ["awesome row", "text"])
    add_row("Table Example", ["super unique", "unique text"])
    add_column("Table Example", "Header 3", ["text from column", "text from column"])
    add_row("Table Example", ["boring row"])

start_dearpygui()
Directory dialogs are used by calling select_directory_dialog which must be given a return callback. The return callback‘s data argument will be filled out with the directory path & folder path as a list of strings.
Typically directory dialog are called by another widget such as a button so this is how it will be done in the example.
from dearpygui.core import *
from dearpygui.simple import *

def directory_picker(sender, data):
    select_directory_dialog(callback=apply_selected_directory)

def apply_selected_directory(sender, data):
    log_debug(data)  # so we can see what is inside of data
    directory = data[0]
    folder = data[1]
    set_value("directory", directory)
    set_value("folder", folder)
    set_value("folder_path", f"{directory}\\{folder}")

show_logger()

with window("Tutorial"):
    add_button("Directory Selector", callback=directory_picker)
    add_text("Directory Path: ")
    add_same_line()
    add_label_text("##dir", source="directory", color=[255, 0, 0])
    add_text("Folder: ")
    add_same_line()
    add_label_text("##folder", source="folder", color=[255, 0, 0])
    add_text("Folder Path: ")
    add_same_line()
    add_label_text("##folderpath", source="folder_path", color=[255, 0, 0])

start_dearpygui()
File dialogs are used by calling open_file_dialog which must be given a return callback. The return callback‘s data argument will be filled out with the directory path & file path as a list of strings. Extensions are an optional keyword to the file dialog that will give selections to filter the displayed files in the dialog based on their extensions.
Typically file dialog are called by another widget such as a button so this is how it will be done in the example.
from dearpygui.core import *
from dearpygui.simple import *

def file_picker(sender, data):
    open_file_dialog(callback=apply_selected_file, extensions=".*,.py")


def apply_selected_file(sender, data):
    log_debug(data)  # so we can see what is inside of data
    directory = data[0]
    file = data[1]
    set_value("directory", directory)
    set_value("file", file)
    set_value("file_path", f"{directory}\\{file}")

show_logger()

with window("Tutorial"):
    add_button("Directory Selector", callback=file_picker)
    add_text("Directory Path: ")
    add_same_line()
    add_label_text("##filedir", source="directory", color=[255, 0, 0])
    add_text("File: ")
    add_same_line()
    add_label_text("##file", source="file", color=[255, 0, 0])
    add_text("File Path: ")
    add_same_line()
    add_label_text("##filepath", source="file_path", color=[255, 0, 0])

start_dearpygui()
The menu bar consists of the following components:
Menus can be nested as necessary.
Any widget can be added to a menu.
Basic Usage
import dearpygui.core as dpg
import dearpygui.contexts as cxt
import dearpygui.simple as smpl


def print_me(sender, data):
    print(f"Menu Item: {sender}")

with cxt.window(label="Tutorial"):

    with cxt.menu_bar():

        with cxt.menu(label="File"):

            dpg.add_menu_item(label="Save", callback=print_me)
            dpg.add_menu_item(label="Save As", callback=print_me)

            with dpg.menu(label="Settings"):

                dpg.add_menu_item(label="Setting 1", callback=print_me)
                dpg.add_menu_item(label"Setting 2", callback=print_me)

        dpg.add_menu_item(label="Help", callback=print_me)

        with dpg.menu(label="Widget Items"):

            dpg.add_checkbox(label="Pick Me", callback=print_me)
            dpg.add_button(label="Press Me", callback=print_me)
            dpg.add_color_picker4(label="Color Me", callback=print_me)

smple.start_dearpygui()
Results:

Basics
Tooltips are windows that appear when a widget is hovered. In Dear PyGui tooltips are containers that can contain any other widget. Tooltips are 1 of 2 widgets in which the first argument is not the name of the tooltip, but widget that the tooltip is associated with.
Usage
import dearpygui.core as dpg
import dearpygui.contexts as cxt
import dearpygui.simple as smpl

with cxt.window(label="Tutorial"):

    tooltip_parent = dpg.add_text("Hover me")

    with cxt.tooltip(parent=tooltip_parent):
        dpg.add_text("A tooltip")

smpl.start_dearpygui()
Results:

Basics
Popups are windows that appear when the mouse is clicked a widget. In Dear PyGui popups are containers that can contain any other widget. Popups are 1 of 2 widgets in which the first argument is not the name of the popup, but the widget that the popup is associated with. Popups can also be modal.
Regular Usage
Normally when used, a popup exist until you click away from it. By default, a right click activates the popup. An example is found below:
from dearpygui.core import *
from dearpygui.simple import *

with window("Tutorial"):

    add_text("Right Click Me")

    with popup("Right Click Me", "Popup ID", mousebutton=mvMouseButton_Right):
        add_text("A popup")

start_dearpygui()
Results:

Mouse Button options include:
Modal Usage
When the modal keyword is set to True, the popup will be modal. This prevents the user from interacting with other windows until the popup is closed. To close the popup, the close_popup(...) command must be used. Below is an example:
from dearpygui.core import *
from dearpygui.simple import *

with window("Tutorial"):

    add_text("Right Click Me")

    with popup("Right Click Me", "Popup ID", modal=True):
        add_button("Close", callback=lambda:close_popup("Popup ID"))

start_dearpygui()
Results:

Basics
A Node Editor presents an editable schematic or graph, displaying nodes and the connections between their attributes. It allows you to view, modify, and create new node connections. You can see an example below:

There are 4 main components:
Regular usage
You must first create a node editor, followed by nodes which contains attributes. Attributes can contain any Dear PyGui widgets. Below is a basic example. You can grab an output pin and connect it to an input pin. You can detach a link by ctrl clicking and dragging the link away.
with node_editor("Node Editor"):
with node("Node 1"):

    with node_attribute("Node A1"):
        add_input_float("F1", width=150)

    with node_attribute("Node A2", output=True):
        add_input_float("F2", width=150)

with node("Node 2##demo"):

    with node_attribute("Node A3"):
        add_input_float("F3", width=200)

    with node_attribute("Node A4", output=True):
        add_input_float("F4", width=200)
Link and Delink Callbacks
You can specify a callback to be ran when a link is created or destroyed like so:
with node_editor("Node Editor 1", link_callback=some_link_callback, delink_callback=some_delink_callback):
    pass
Programmatic Control
You can create and destroy links programmatically using add_node_link(...) and delete_node_link(...) like so:
add_node_link("Node Editor 1", "Node A2", "Node A3")
delete_node_link("Node Editor 1", "Node A2", "Node A3")
You can also retrieve selected nodes and links (and clear this selections with the following commands)
get_selected_nodes("Node Editor 1")
get_selected_links("Node Editor 1")
get_links("Node Editor 1")
clear_selected_nodes("Node Editor 1")
clear_selected_links("Node Editor 1")
原文:https://www.cnblogs.com/sushiyv/p/14792104.html