HTML(Hyper Text Markup Language)(超文本标记语言)。基本结构:
<!DOCTYPE html>
<html lang="en">
<head>
    <meta charset="UTF-8">
    <title>Title</title>
</head>
<body>
页面部分内容
</body>
</html>
标签不再区分大小写
元素可以省略结束标签
空元素语法的元素
空元素语法的元素有area、base、br、col、command、embed、hr、img、input、keygen、link、mata、param、source、wbr。
这些空元素标签不允许将开始标签和结束标签分开定义。例如,<img.../>元素不允许写成如下形式:
<img src=‘a.gif‘ alt="a"></img>
<img .../>元素应该是空元素,因此它可以写成如下形式:
<img src=‘a.gif‘ alt="a"/>
与此同时,HTML5不要求遵守xml规范,所以写成如下形式:
<img src=‘a.gif‘ alt="a">
可以省略结束标签的元素
可以省略结束标签的元素有colgroup、dt、dd、li、optgroup、p、rt、rp、thead、tbody、tfoot、tr、td、th。
可以省略全部标签的元素
可以省略全部标签的元素有html、head、body、colgroup、tbody。
支持Boolean值的属性
允许部分标志性的属性可以省略属性值,比如:
<input checked type="checkbox"/>
<input readonly type="text"/>
<input disabled type="text"/>
<option value="1" selected/>
这些值都支持boolean值的属性,因此等同于下面代码:
<input checked="true" type="checkbox"/>
<input readonly="true" type="text"/>
<input disabled="true" type="text"/>
<option value="1" selected="true">a</option>
也可以使用空值,将true去掉。
允许属性值不使用引号
<!--...-->  定义注释
<html>
    根元素。允许省略。
</html>
<head>
    页面头部分,允许省略
</head>
<title>页面标签</title>
<body>
    页面主体
</body>
<h1></h1>到<h6></h6>定义标题1到标题6
<p>
    定义段落
</p>
<br> 插入一个换行
<hr> 定义水平线
<div>
    定义文档中的节
</div>
<span>表示一段一般性的文本,默认不换行</span>
几乎所有html元素都可指定id、style、class、dir、title等通用属性。id为HTML元素指定唯一标识符。class和style是css样式相关属性
<!DOCTYPE html>
<html>
<head>
	<meta http-equiv="Content-Type" content="text/html; charset=utf-8" />
	<title>基本元素</title>
</head>
<body>
	<!-- 采用标题一到标题六来输出文本 -->
	<h1>疯狂Java讲义</h1>
	<h2>疯狂Android讲义</h2>
	<h3>轻量级Java EE企业应用实战</h3>
	<h4>疯狂XML讲义</h4>
	<h5>疯狂前端开发讲义</h5>
	<h6>经典Java EE企业应用实战</h6>
	<!-- 输出一条水平线 -->
	<hr />
	<!-- 使用三个span定义段文本 -->
	<span>Tomcat</span><span>Jetty</span><span>Resin</span>
	<!-- 输出换行 -->
	<br />
	<!-- 使用三个div定义三节 -->
	<div>Tomcat</div><div>Jetty</div><div>Resin</div>
	<!-- 使用三个p定义三个段落 -->
	<p>Tomcat<p>Jetty<p>Resin
</body>
</html>
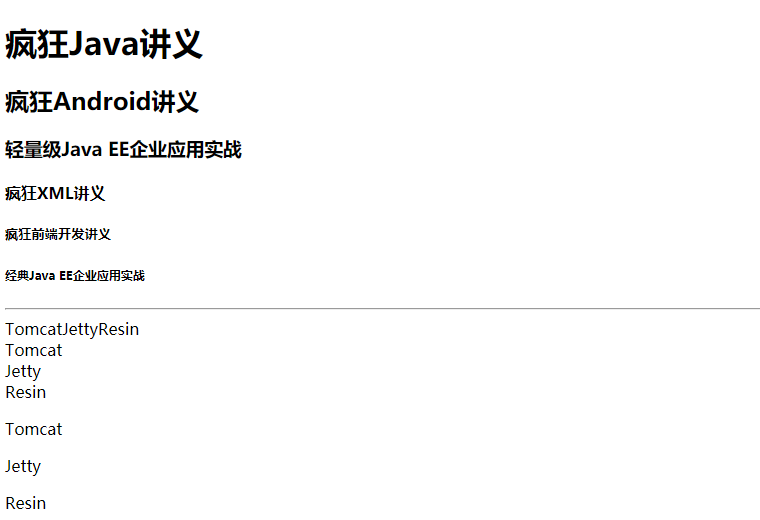
span元素不会换行、div会换行、p会产生一个段落;span和p只能包含文本、图像、超链接、文本格式化元素、表单控件元素等内容;p可以包含span,span不能包含p,div可以包含p、span外,还可以包含h1到h6、<form.../>、<tale.../>、列表项元素和<div.../>元素。
推荐使用<article.../>、<section.../>、<nav.../>等代替div
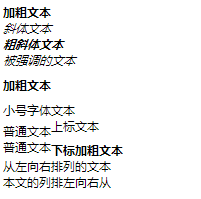
<b>定义粗体文本</b>
<i>定义斜体文本</i>
<em>定义强调文本</em>
<strong>定义粗体文本</strong>
<small>定义小号文本</small>
<sup>定义上标文本</sup>
<sub>定义下标文本</sub>
<bdo>定义文本显示的方向</bdo>
<!DOCTYPE html>
<html>
<head>
	<meta name="author" content="Yeeku.H.Lee(CrazyIt.org)" />
	<meta http-equiv="Content-Type" content="text/html; charset=utf-8" />
	<title> 文本格式化元素 </title>
</head>
<body>
	<span><b>加粗文本</b></span><br />
	<span><i>斜体文本</i></span><br />
	<span><b><i>粗斜体文本</i></b></span><br />
	<span><em>被强调的文本</em></span><br />
	<p><strong>加粗文本</strong></p>
	<small><span>小号字体文本</span></small><br />
	<div>普通文本<sup>上标文本</sup></div>
	<span>普通文本<strong><sub>下标加粗文本</sub></strong></span><br />
	<!-- 指定文本从左向右(正常情况)排列 -->
	<bdo dir="ltr">从左向右排列的文本</bdo><br />
	<!-- 指定文本从右向左排列 -->
	<bdo dir="rtl">从右向左排列的文本</bdo><br />
</body>
</html>
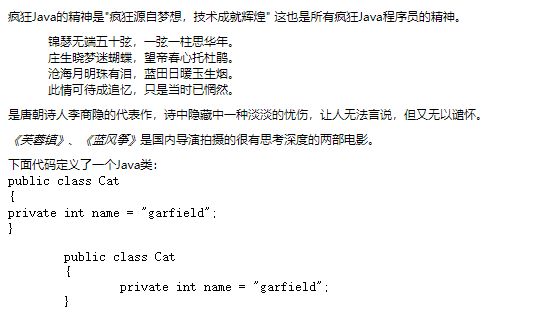
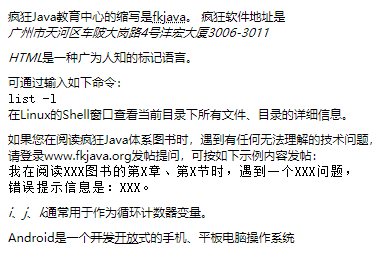
<abbr>表示一个缩写,使用时建议指定title,该属性用于指定该缩写代表的全称</abbr>
<address>表示一个地址,浏览器通常会用斜体字显示其包含的文本</address>
<blockquote>
    定义一段长的引用文本。浏览器会用缩进的方式显示这段文本,可以指定cite属性,用于指定引用文本的url或出处
</blockquote>
<q>一段很短的文本,浏览器会添加引号</q>
<cite>表示作品的标题,浏览器通常用斜体表示</cite>
<code>表示代码</code>
<dfn>定义一个专业术语,通常用粗体或斜体显示</dfn>
<del>定义文档中被删除的文本,浏览器通常以中划线显示</del>
<ins>被插入的文本,通常以下划线显示</ins>
del和ins通常结合使用用于表示文档被修订的效果,使用这两个元素时都可指定如下属性:cite,url;datetime:日期。
<pre>表示该元素包含的文本已经进行了预格式化,会保留空格、回车、Tab键</pre>
<samp>定义示范文本内容</samp>
<kbd>定义键盘文本</kbd>
<var>表示一个变量</var>
<!DOCTYPE html>
<html>
<head>
	<meta name="author" content="Yeeku.H.Lee(CrazyIt.org)" />
	<meta http-equiv="Content-Type" content="text/html; charset=utf-8" />
	<title> 语义相关元素 </title>
</head>
<body>
<!-- 使用q表示一段短的引用文本。 -->
<p>疯狂Java的精神是<q>疯狂源自梦想,技术成就辉煌</q>
这也是所有疯狂Java程序员的精神。</p>
<div>
<!-- 使用blockquote表示一段长的引用文本。 -->
<blockquote cite="李义山诗集">
锦瑟无端五十弦,一弦一柱思华年。<br>
庄生晓梦迷蝴蝶,望帝春心托杜鹃。<br>
沧海月明珠有泪,蓝田日暖玉生烟。<br>
此情可待成追忆,只是当时已惘然。</blockquote>
是唐朝诗人李商隐的代表作,诗中隐藏中一种淡淡的忧伤,让人无法言说,但又无以谴怀。</div>
<p>
<cite>《芙蓉镇》</cite>、<cite>《蓝风筝》</cite>是国内导演拍摄的很有思考深度的两部电影。</p>
<p>
下面代码定义了一个Java类:<br>
<code>
	public class Cat<br>
	{<br>
		private int name = "garfield";<br>
	}<br>
</code>
</p>
<!-- pre元素包含的内容是“预格式化”文本。 -->
<pre>
	public class Cat
	{
		private int name = "garfield";
	}
</pre>
<p>
</body>
</html>
<!DOCTYPE html>
<html>
<head>
	<meta name="author" content="Yeeku.H.Lee(CrazyIt.org)" />
	<meta http-equiv="Content-Type" content="text/html; charset=utf-8" />
	<title> 语义相关元素 </title>
</head>
<body>
<!-- 使用abbr定义缩写 -->
疯狂Java教育中心的缩写是<abbr title="疯狂Java教育">fkjava</abbr>。
<!-- 使用address定义地址 -->
疯狂软件地址是<address>广州市天河区车陂大岗路4号沣宏大厦3006-3011</address>
<!-- 使用dfn定义专业术语 -->
<p>
<dfn>HTML</dfn>是一种广为人知的标记语言。
</p>
<p>
可通过输入如下命令:<br>
<kbd>list -l</kbd><br>
在Linux的Shell窗口查看当前目录下所有文件、目录的详细信息。</p>
<p>
如果您在阅读疯狂Java体系图书时,遇到有任何无法理解的技术问题,<br/>
请登录www.fkjava.org发帖提问,可按如下示例内容发帖:<br/>
<!-- 使用samp定义范例文本 -->
<samp>
我在阅读XXX图书的第X章、第X节时,遇到一个XXX问题,<br/>
错误提示信息是:XXX。
</samp>
</p>
<!-- 使用var定义变量 -->
<var>i</var>、<var>j</var>、<var>k</var>通常用于作为循环计数器变量。
<!-- 使用del和ins表示修订 -->
<p>Android是一个<del>开发</del><ins>开放</ins>式的手机、平板电脑操作系统</p>
</body>
</html>
使用<a.../>定义超链接,可以指定id、class、style、dir、title、onclick属性,还可以指定以下重要属性:
<!DOCTYPE html>
<html>
<head>
	<meta name="author" content="Yeeku.H.Lee(CrazyIt.org)" />
	<meta http-equiv="Content-Type" content="text/html; charset=utf-8" />
	<title> 超链接 </title>
</head>
<body>
<!-- 在本窗口打开另一个资源 -->
<a href="http://www.crazyit.org"><b>疯狂Java联盟</b></a><br />
<!-- 在新窗口中打开另一个资源 -->
<a href="http://www.crazyit.org"
	target="_blank"><em>疯狂Java联盟</em></a><br />
<!-- 为图像增加超链接 -->
<a href="http://www.crazyit.org"><img src="images/logo.jpg"
	alt="疯狂Java联盟"/></a><br />
<!-- 基于相对路径指定另一个资源 -->
<a href="text.html">文本格式化元素</a><br />
</body>
</html>
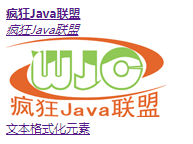
粗体字超链接、斜体字超链接、图像超链接、普通超链接。
最后一个超链接的href是一个文件名,会被当成相对路径,加上该页面的基准路径作为关联的资源。
此外<a.../>元素还可以生成一个命名锚点,用于在HTML页面中生成一个定位点,这样允许超链接直接链接到指定页面的该定位点。插入锚点要指定name属性,即该锚点名称。比如
<!--生成命名锚点-->
<a name="text">test</a>
接下来就可使用超链接定位到该锚点
<a href="anchor2.html#test">定位到test锚点</a>
定位到指定锚点需要在url资源后指定锚点名,用#隔开,如果要链接到当前页面的锚点#前可省略。
<ul>
定义无序列表,只能包含li子元素
</ul>
<ol>
定义有序列表,可以指定如下属性:start:指定列表项的起始数字;type:指定使用哪种类型的编号。reversed:排序反转。
</ol>
<li>定义列表项</li>
<dl>
定义术语列表,只能包含dt和dd两种子元素
</dl>
<dt>定义标题列表项</dt>
<dd>定义普通列表项</dd>
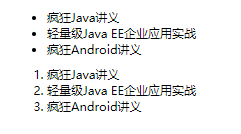
```
```html
<!DOCTYPE html>
<html>
<head>
<meta name="author" content="Yeeku.H.Lee(CrazyIt.org)" />
<meta http-equiv="Content-Type" content="text/html; charset=utf-8" />
<title> 列表相关元素 </title>
</head>
<body>
<!-- 定义无序列表 -->
<ul>
<li>疯狂Java讲义</li>
<li>轻量级Java EE企业应用实战</li>
<li>疯狂Android讲义</li>
</ul>
<!-- 定义有序列表 -->
<ol>
<li>疯狂Java讲义</li>
<li>轻量级Java EE企业应用实战</li>
<li>疯狂Android讲义</li>
</ol>
</body>
</html>
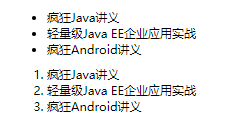
<!DOCTYPE html>
<html>
<head>
	<meta name="author" content="Yeeku.H.Lee(CrazyIt.org)" />
	<meta http-equiv="Content-Type" content="text/html; charset=utf-8" />
	<title> 列表相关元素 </title>
</head>
<body>
	<h2>dt定义标题、dd定义解释</h2>
	<dl>
		<dt>Java<dt>
		<dd>Java是一门广泛使用的、跨平台的开发语言</dd>
		<dt>疯狂Java体系图书</dt>
		<dd>疯狂Java体系图书是李刚老师积十年之功创作的一套系统的Java学习图书,<br>
		且多次升级保持与最新技术同步,对广大初学者帮助很大。</dd>
		<dd>疯狂Java体系图书均已得到广泛的市场认同,多次重印成为超级畅销图书,<br>
		并被多所“985”、“211”高校选作教材,<br>
		部分图书已被翻译成繁体中文版、授权到台湾地区。</dd>
	</dl>
</body>
</html>
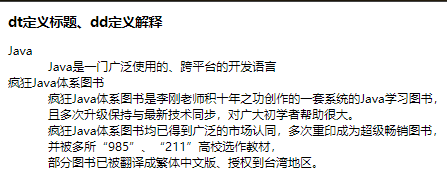
<img.../>使用时必须指定如下两个属性:
src:指定图片所在位置。
alt:指定一段文本作为图片的提示信息。
除此之外也可指定:
height:指定图片高度,可以是百分比或像素值。
width:指定图片宽度,可以是百分比或像素值。
另外,与图片相关的还有如下两个元素:
<map>定义图片映射,主要可以包含一个或多个area子元素,每个area定义一个区域,不同区域连接到不同url</map>
<area>:定义图片映射的内部区域,可以指定shape:指定内部区域是哪种区域,默认是rect矩形,还可以是circle、ploy;coords:指定多个坐标值,用于确定区域位置;href:确定区域所连接的资源;alt:指定一段文本作为图片提示信息;target。
<!DOCTYPE html>
<html>
<head>
	<meta name="author" content="Yeeku.H.Lee(CrazyIt.org)" />
	<meta http-equiv="Content-Type" content="text/html; charset=utf-8" />
	<title> 图片相关元素 </title>
</head>
<body>
<h4>普通图片</h4>
<img src="images/logo.jpg" alt="疯狂Java的Logo" /><br>
<h4>定义图片,指定高、宽</h4>
<img src="images/logo.jpg" width="300" height="120"
	alt="疯狂Java的Logo" /><br>
<h4>图片上添加链接</h4>
<a href="http://www.crazyit.org"><img src="images/logo.jpg"
alt="疯狂Java的Logo" /></a><br>
</body>
</html>
图片加载不出来时会显示alt里面的内容。
创建分区链接图片
为<img.../>元素指定usemap属性让该图片使用图片映射,设置usemap属性值为#mapname即可。
<!DOCTYPE html>
<html>
<head>
	<meta http-equiv="Content-Type" content="text/html; charset=GBK" />
	<title> 图片相关元素 </title>
</head>
<body>
<h4>定义图片,使用指定的图片映射</h4>
<img src="images/logo.jpg" width="300"
	height="120" border="0" usemap="#test"
	alt="疯狂Java的Logo" /><br />
<!-- 定义图片映射 -->
<map name="test" id="test">
	<!-- 为该图片映射定义2个区域 -->
	<area shape="circle" coords="57,55,25"
		href="http://www.fkjava.org" alt="leegang.org" />
	<area shape="poly" coords="188,28,185,50,200,74,224,72,246,51"
		href="http://www.crazyit.org" alt="crazyit.org" />
</map>
</body>
</html>

使用map定义了两个区域,分别是圆形和多边形区域,接下来在<img.../>中通过usemap属性指定使用名为test的图片映射,这样就可以在该图片的不同位置创建不同的链接了。鼠标移动到不同位置可以显示不同链接。
提交图片的点击坐标
前面介绍了将img放在a元素内即可创建带链接的图片,此时如果为该img指定ismap属性,当用户点击该图片导航到目标链接时,还会将用户点击图片的坐标提交给服务器。
<table>
    定义表格,只能包含0或1个caption子元素用于定义表格标题,0或1个thead子元素定义表格头,0或1个tfoot子元素定义表格脚,多个tr子元素定义表格行,多个tbody子元素定义表格体。还可指定以下参数:cellpadding:指定单元格内容和单元格边框之间的间距,可以是像素值或百分比;cellspacing:指定单元格之间的间距;width:指定表格的宽度
</table>
<caption>定义表格标题</caption>
<tr>定义表格行</tr>
<td>定义单元格</td>
<th>定义表格的表头单元格</th>
<tbody>定义表格主体</tbody>
<thead>定义表格头</thead>
<tfooot>定义表格脚</tfooot>
使用tbody时可以将一个表格分为几个独立的部分。tbody元素可以将表格中的一行或几行合并成一组。
在tbody中必须使用tr子元素来定义表格行

<html>
<head>
	<meta name="author" content="Yeeku.H.Lee(CrazyIt.org)" />
	<meta http-equiv="Content-Type" content="text/html; charset=utf-8" />
	<title> 简单表格 </title>
</head>
<body>
<table style="width:400px" border="1">
	<caption><b>疯狂Java体系图书</b></caption>
	<tr>
		<th>书名</th>
		<th>作者</th>
	</tr>
	<tr>
		<td>疯狂Java讲义</td>
		<td>李刚</td>
	</tr>
	<tr>
		<td>轻量级Java EE企业应用实战</td>
		<td>李刚</td>
	</tr>
</table>
</body>
</html>
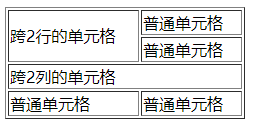
下面代码示范了一个跨行跨列的表格。
<html>
<head>
	<meta name="author" content="Yeeku.H.Lee(CrazyIt.org)" />
	<meta http-equiv="Content-Type" content="text/html; charset=utf-8" />
	<title> 跨行、跨列的表格 </title>
</head>
<body>
<table style="width:240px" border="1">
	<tr>
		<td rowspan="2">跨2行的单元格</td>
		<td>普通单元格</td>
	</tr>
	<tr>
		<td>普通单元格</td>
	</tr>
	<tr>
		<td colspan="2">跨2列的单元格</td>
	</tr>
	<tr>
		<td>普通单元格</td>
		<td>普通单元格</td>
	</tr>
</table>
</body>
</html>
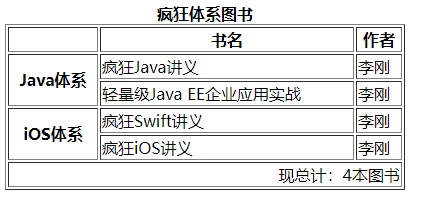
下面表格将使用thead、tbody、tfoot:
<html>
<head>
<meta name="author" content="Yeeku.H.Lee(CrazyIt.org)" />
<meta http-equiv="Content-Type" content="text/html; charset=utf-8" />
<title> 带tbody的表格 </title>
</head>
<body>
<table border="1" style="width:400px">
<caption><b>疯狂体系图书</b></caption>
<thead>
<tr>
<th> </th>
<th>书名</th>
<th>作者</th>
</tr>
</thead>
<tfoot>
<tr>
<td colspan="3" style="text-align:right">现总计:4本图书</td>
</tr>
</tfoot>
<tbody>
<tr>
<th rowspan="2">Java体系</th>
<td>疯狂Java讲义</td>
<td>李刚</td>
</tr>
<tr>
<td>轻量级Java EE企业应用实战</td>
<td>李刚</td>
</tr>
</tbody>
<tbody>
<tr>
<th rowspan="2">iOS体系</th>
<td>疯狂Swift讲义</td>
<td>李刚</td>
</tr>
<tr>
<td>疯狂iOS讲义</td>
<td>李刚</td>
</tr>
</tbody>
</table>
</body>
</html>
上面代码在table元素中添加了一个thead、一个tfoot、两个tbody元素,一个table元素可以包含多个tbody元素。
上面的tfoot必须位于tbody元素之前,但浏览器解释表格时会放到最后。
如果决定要用thead、tfoot,建议要用thead、tfoot、tbody的顺序使用,且只能在table元素内使用。
可使用,为表格中的一个或多个列指定属性值。
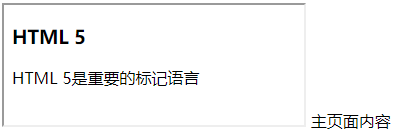
iframe元素用于在普通HTML页面中生成一个行内框架,可以直接放在HTML页面的任意位置。可指定以下属性:
<!DOCTYPE html>
<html>
<head>
	<meta name="author" content="Yeeku.H.Lee(CrazyIt.org)" />
	<meta http-equiv="Content-Type" content="text/html; charset=utf-8" />
	<title> 行内框架 </title>
</head>
<body>
<iframe src="img1.html" width="200" height="120"></iframe>
主页面内容
</body>
</html>
srcdoc属性允许直接指定html片段,这样iframe元素将直接显示该srcdoc所指定的html片段。
例如如下页面代码定义了同时指定srcdoc和src属性的iframe元素,此时srcdoc会覆盖src属性:
<html>
<head>
	<meta name="author" content="Yeeku.H.Lee(CrazyIt.org)" />
	<meta http-equiv="Content-Type" content="text/html; charset=utf-8" />
	<title> 行内框架 </title>
</head>
<body>
<iframe src="img1.html" width="300" height="120"
	srcdoc="<h3>HTML 5</h3><div>HTML 5是重要的标记语言</div>"></iframe>
主页面内容
</body>
</html>
sandbox是一个安全性方面的属性,用于对框架中的网页增加一些额外限制,支持以下属性:
allow-forms属性值
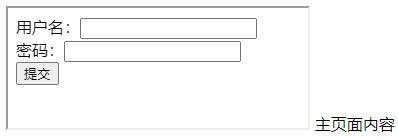
<html>
<head>
	<meta name="author" content="Yeeku.H.Lee(CrazyIt.org)" />
	<meta http-equiv="Content-Type" content="text/html; charset=utf-8" />
	<title> 行内框架 </title>
</head>
<body>
<iframe src="form.html" width="300" height="120"
	sandbox="allow-forms allow-same-origin"></iframe>
主页面内容
</body>
</html>
allow-forms allow-same-origin必须结合使用,原因可能是浏览器要求行内框架所加载的页面与包含iframe的页面必须是同源才可提交。
allow-scripts属性值
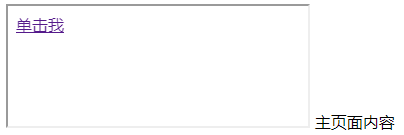
<html>
<head>
	<meta name="author" content="Yeeku.H.Lee(CrazyIt.org)" />
	<meta http-equiv="Content-Type" content="text/html; charset=utf-8" />
	<title> 行内框架 </title>
</head>
<body>
<iframe src="scripts.html" width="300" height="120"
	sandbox="allow-scripts"></iframe>
主页面内容
</body>
</html>
<html>
<head>
	<meta name="author" content="Yeeku.H.Lee(CrazyIt.org)" />
	<meta http-equiv="Content-Type" content="text/html; charset=utf-8" />
	<title> 脚本页面 </title>
</head>
<body>
<a href="" onclick="this.innerHTML=this.innerHTML + ‘有趣‘; alert(‘确定‘);">
单击我</a>
</body>
</html>
allow-top-navigation属性值
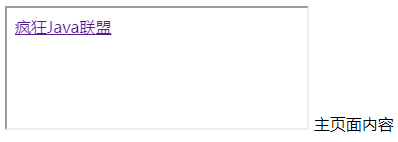
<html>
<head>
	<meta name="author" content="Yeeku.H.Lee(CrazyIt.org)" />
	<meta http-equiv="Content-Type" content="text/html; charset=utf-8" />
	<title> 行内框架 </title>
</head>
<body>
<iframe src="nav.html" width="300" height="120"
	sandbox="allow-top-navigation"></iframe>
主页面内容
</body>
</html>
<html>
<head>
	<meta name="author" content="Yeeku.H.Lee(CrazyIt.org)" />
	<meta http-equiv="Content-Type" content="text/html; charset=utf-8" />
	<title> 表单页面 </title>
</head>
<body>
<a href="http://www.crazyit.org" alt="疯狂Java联盟" target="_top">疯狂Java联盟</a>
</body>
</html>
allow-same-origin属性值
允许将iframe框架内的网页视为与使用该iframe元素的网页来自相同的源--两个网页所在url的域名相同、端口相同,这样才可以使用Ajax与服务器交互,加载来自服务器的内容,从cookie或web storage中读取内容。
id属性用于为html元素指定唯一标识,当程序使用JavaScript编程时即可通过该属性获取元素。
style属性为HTML元素指定css样式。
class属性用于匹配css样式的class选择器。
下面代码为页面上的div元素指定了id属性,这样接下来就可以在js脚本中通过id访问该div:
<html>
<head>
	<meta name="author" content="Yeeku.H.Lee(CrazyIt.org)" />
	<meta http-equiv="Content-Type" content="text/html; charset=utf-8" />
	<title> id属性 </title>

</head>
<body>
<div id="show" style="width:400px;height:120px;background-color:red;"></div>
<a href="#" onclick="change();">改变颜色</a>
<script type="text/javascript">
	var change = function()
	{
		var div = document.getElementById("show");  // ①
		div.style.backgroundColor = div.style.backgroundColor == ‘red‘?
			‘green‘ : (div.style.backgroundColor == ‘green‘? ‘blue‘: ‘red‘);
	}
</script>
</body>
</html>
class属性则用于为HTML元素匹配css样式的class选择器:
<html>
<head>
	<meta name="author" content="Yeeku.H.Lee(CrazyIt.org)" />
	<meta http-equiv="Content-Type" content="text/html; charset=utf-8" />
	<title> class属性 </title>
	<style type="text/css">
		div.content {
			width: 300px;
			height: 120px;
			border: 1px solid black;
			float:left;
		}
	</style>
</head>
<body>
<div class="content">测试内容一</div>
<div class="content" style="float:right">测试内容二</div>
</body>
</html>
.content{}定义了一个class为content的css样式,这样就会把页面中所有class为content的div元素设置成对应的宽高边框。
用于设置元素中内容的排列方向,支持ltr和rtl两个属性值

<html>
<head>
	<meta name="author" content="Yeeku.H.Lee(CrazyIt.org)" />
	<meta http-equiv="Content-Type" content="text/html; charset=utf-8" />
	<title> dir属性 </title>
</head>
<body>
<div dir="ltr">测试内容dir设为ltr</div>
<div dir="rtl">测试内容dir设为rtl</div>
<table width="500" border="1">
<tr>
<td dir="ltr">表格内容dir设为ltr</td>
<td dir="rtl">表格内容dir设为rtl</td>
</tr>
<table>
</body>
</html>
告诉浏览器和搜索引擎:网页或网页中的元素的内容所使用的语言。该属性的属性值应该是符合标准的语言代码,比如zh代表中文、en代表英语、fr代表法语、ja代表日语。
通过<html.../>元素的lang属性设置整个页面的语言:
<html lang="zh">
部分元素使用其他语言也可再次指定lang属性:
<html lang="zh">
<head>
	<meta name="author" content="Yeeku.H.Lee(CrazyIt.org)" />
	<meta http-equiv="Content-Type" content="text/html; charset=utf-8" />
	<title> lang属性 </title>
</head>
<body>
<div lang="ja">テスト内容</div>
<div lang="en">Test Content</div>
</body>
</html>
当html页面中有多个元素时可通过accesskey属性指定激活该元素的快捷键,这样用户通过键盘快捷键就可以激活对于html元素。
<html lang="zh">
<head>
	<meta name="author" content="Yeeku.H.Lee(CrazyIt.org)" />
	<meta http-equiv="Content-Type" content="text/html; charset=utf-8" />
	<title> accesskey属性 </title>
</head>
<body>
用户名(n):<input name="name" type="text" accesskey="n"/><br>
密码(p):<input name="pass" type="text" accesskey="p"/>
<a href="http://www.fkjava.org" accesskey="x">疯狂软件<a>
</body>
</html>
按下alt+n快捷键。
当用户浏览网页时可通过按键盘上的tab键不断切换窗口或页面中HTML元素来获取得焦点,tabindex属性则用于控制窗口、HTML元素获取焦点得顺序。比如将一个HTML元素的tabindex属性值设为1就代表该元素会在用户第一次按下tab键时获得焦点。
<html lang="zh">
<head>
	<meta name="author" content="Yeeku.H.Lee(CrazyIt.org)" />
	<meta http-equiv="Content-Type" content="text/html; charset=utf-8" />
	<title> tabindex属性 </title>
</head>
<body>
<a href="#" tabindex="2">疯狂Java联盟</a>
<a href="#" tabindex="1">HTML 5学习</a>
<a href="#" tabindex="3">Java学习</a>
</body>
</html>
如果该属性设置为True,那么浏览器将会允许开发者直接编辑该HTML元素里的内容。
下面示范了把div、table转换成可编辑状态:

<html>
<head>
	<meta name="author" content="Yeeku.H.Lee(CrazyIt.org)" />
	<meta http-equiv="Content-Type" content="text/html; charset=utf-8" />
	<title> contentEditable属性 </title>
</head>
<body>
<!-- 直接指定contentEditable="true"表明该元素是可编辑的 -->
<div contentEditable="true" style="width:500px;border:1px solid black">
疯狂Java讲义
<!-- 该元素的父元素有contentEditable="true",因此该表格也是可编辑的 -->
<table style="width:420px;border-collapse:collapse" border="1">
<tr>
	<td>疯狂Java讲义</td>
	<td>疯狂Android讲义</td>
</tr>
<tr>
	<td>轻量级Java EE企业应用实战</td>
	<td>经典Java EE企业应用实战</td>
</tr>
</table>
</div>
<hr/>
<!-- 这个表格默认是不可编辑的
	双击之后该表格变为可编辑状态 -->
<table id="target"
	ondblclick="this.contentEditable=true;"
	style="width:420px;border-collapse:collapse" border="1">
<tr>
	<td>HTML 5</td>
	<td>Ruby</td>
</tr>
<tr>
	<td>C/C++</td>
	<td>Python</td>
</tr>
</table>
</body>
</html>
该属性相当于一个全局的contentEditable属性,如果把整个页面的designMode设置为on,都可编辑,默认为off。
在JavaScript代码中只能修改整个HTML页面的designMode属性。
<html>
<head>
	<meta name="author" content="Yeeku.H.Lee(CrazyIt.org)" />
	<meta http-equiv="Content-Type" content="text/html; charset=utf-8" />
	<title> designMode属性 </title>
</head>
<body ondblclick="document.designMode=‘on‘;">   双击该页面打开整个页面的designMode状态。
<div>aaaa</div>
<table style="width:420px;border-collapse:collapse" border="1">
<tr>
	<td>疯狂Java讲义</td>
	<td>疯狂Android讲义</td>
</tr>
<tr>
	<td>轻量级Java EE企业应用实战</td>
	<td>经典Java EE企业应用实战</td>
</tr>
</table>
</body>
</html>
设为true就通知浏览器不显示该组件,浏览器不会保留该组件所占用的空间。
<html>
<head>
	<meta name="author" content="Yeeku.H.Lee(CrazyIt.org)" />
	<meta http-equiv="Content-Type" content="text/html; charset=utf-8" />
	<title> hidden属性 </title>
</head>
<body>
<div id="target" hidden="true" style="height:80px">
文字内容
</div>
<button onclick="var target=document.getElementById(‘target‘);
	target.hidden=!target.hidden;">显示/隐藏</button>
</body>
</html>
设置了该属性浏览器将会负责对用户输入的文本内容执行输入检查,不通过浏览器会对拼错的单词进行提示:
<html>
<head>
	<meta name="author" content="Yeeku.H.Lee(CrazyIt.org)" />
	<meta http-equiv="Content-Type" content="text/html; charset=utf-8" />
	<title> spellcheck属性 </title>
</head>
<body>
<!-- 指定执行拼写检查 -->
<textarea spellcheck rows="3" cols="40">
</textarea>
</body>
</html>
用于为HTML元素设置上下文菜单,当用户在该元素上单击鼠标右键时会激发该菜单。
article元素代表页面上独立完整的一篇文章,内部可以使用header元素定义文章标题,footer元素定义文章脚注,section把文章分成几个段落,article作为它的附属文章。
section用于对页面的内容进行分块,通常建议section包含一个标题,也就是h1到h6;可以包含多个article元素,表示分块内部包含多篇文章;可以嵌套section表示有子分块。
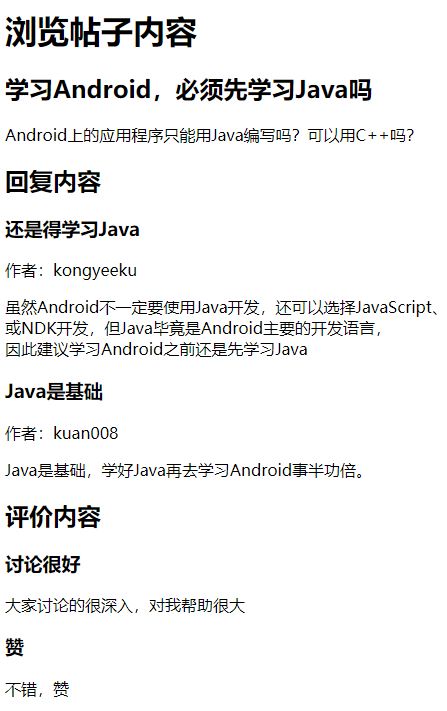
<html>
<head>
	<meta name="author" content="Yeeku.H.Lee(CrazyIt.org)" />
	<meta http-equiv="Content-Type" content="text/html; charset=utf-8" />
	<title> 论坛帖子 </title>
</head>
<body>
<h1>浏览帖子内容</h1>
<article>
	<h2>学习Android,必须先学习Java吗</h2>
	<p>Android上的应用程序只能用Java编写吗?可以用C++吗?</p>
	<!-- 帖子的“回复”部分,用section元素表示  -->
	<section>
		<h2>回复内容</h2>
		<!-- 每个article代表一个回复 -->
		<article>
			<!-- 回复的标题 -->
			<h3>还是得学习Java</h3>
			<div>作者:kongyeeku</div>
			<p>虽然Android不一定要使用Java开发,还可以选择JavaScript、<br>
				或NDK开发,但Java毕竟是Android主要的开发语言,<br>
				因此建议学习Android之前还是先学习Java</p>
		</article>
		<!-- 每个article代表一个回复 -->
		<article>
			<!-- 回复的标题 -->
			<h3>Java是基础</h3>
			<div>作者:kuan008</div>
			<p>Java是基础,学好Java再去学习Android事半功倍。</p>
		</article>
	</section>
	<!-- 帖子的“评价”部分,用section元素表示  -->
	<section>
		<h2>评价内容</h2>
		<!-- 每个article代表一个评价 -->
		<article>
			<!-- 评价的标题 -->
			<h3>讨论很好</h3>
			<p>大家讨论的很深入,对我帮助很大</p>
		</article>
		<!-- 每个article代表一个评价 -->
		<article>
			<!-- 评价的标题 -->
			<h3>赞</h3>
			<p>不错,赞</p>
		</article>
	</section>
</article>
</body>
</html>
header元素通常用于代表标题
footer元素主要用于父级元素定义脚注部分,包含文章的版权、作者授权等。
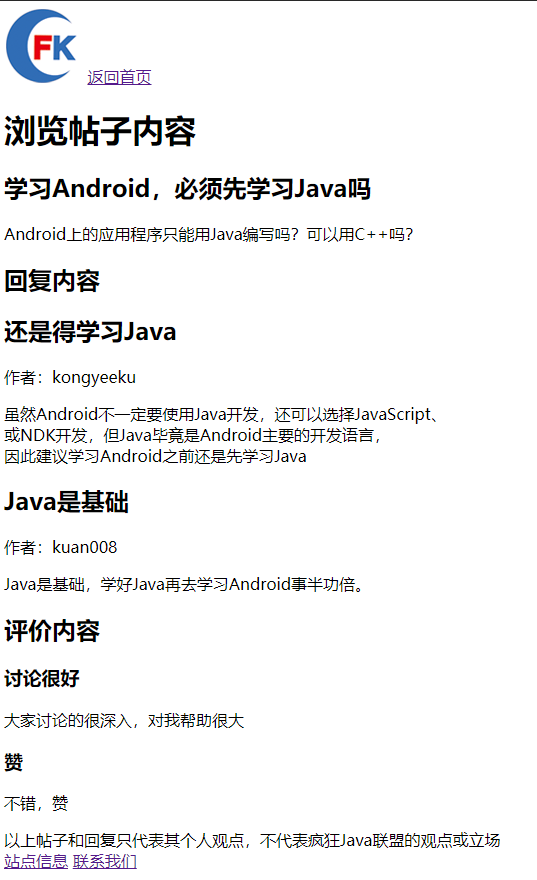
当网页内容、article、section包含了更多复杂内容的标题时,此时建议使用header元素组织他们,对上面的网页进行修改:
<html>
<head>
<meta name="author" content="Yeeku.H.Lee(CrazyIt.org)" />
<meta http-equiv="Content-Type" content="text/html; charset=utf-8" />
<title> 论坛帖子 </title>
</head>
<body>
<!-- 网页标题 -->
<header>
<img src="images/fklogo.gif" alt="疯狂软件"/>
<a href="#">返回首页</a>
<h1>浏览帖子内容</h1>
</header>
<article>
<h2>学习Android,必须先学习Java吗</h2>
<p>Android上的应用程序只能用Java编写吗?可以用C++吗?</p>
<!-- 帖子的“回复”部分,用section元素表示 -->
<section>
<h2>回复内容</h2>
<!-- 每个article代表一个回复 -->
<article>
<!-- 回复的标题 -->
<header>
<h2>还是得学习Java</h2>
<div>作者:kongyeeku</div>
</header>
<p>虽然Android不一定要使用Java开发,还可以选择JavaScript、<br>
或NDK开发,但Java毕竟是Android主要的开发语言,<br>
因此建议学习Android之前还是先学习Java</p>
</article>
<!-- 每个article代表一个回复 -->
<article>
<!-- 回复的头部 -->
<header>
<h2>Java是基础</h2>
<div>作者:kuan008</div>
</header>
<p>Java是基础,学好Java再去学习Android事半功倍。</p>
</article>
</section>
<!-- 帖子的“评价”部分,用section元素表示 -->
<section>
<h2>评价内容</h2>
<!-- 每个article代表一个评价 -->
<article>
<!-- 评价的标题 -->
<h3>讨论很好</h3>
<p>大家讨论的很深入,对我帮助很大</p>
</article>
<!-- 每个article代表一个评价 -->
<article>
<!-- 评价的标题 -->
<h3>赞</h3>
<p>不错,赞</p>
</article>
</section>
<!-- 帖子的“脚注” -->
<footer>
以上帖子和回复只代表其个人观点,不代表疯狂Java联盟的观点或立场
</footer>
</article>
<footer>
<a href="#">站点信息</a>
<a href="#">联系我们</a>
</footer>
</body>
</html>
用header改变了网页body的标题,不再以简单的h1元素作为标题,此时可以添加logo等其他元素。
如果article所包含的标题也需要更丰富的内容同样可用header添加标题
用footer添加脚注分别作为article和整个网页的附加信息。
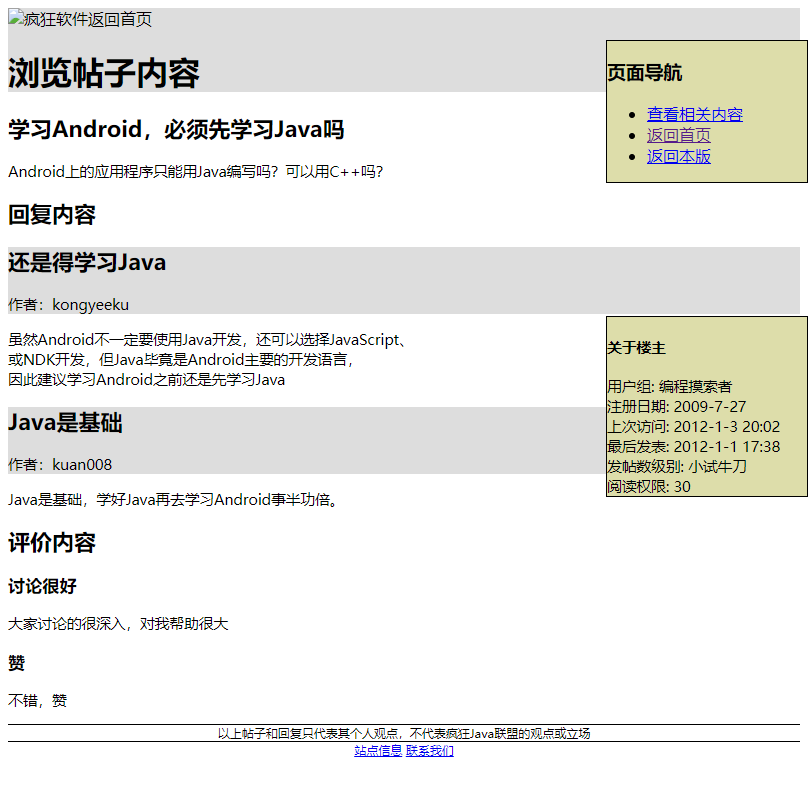
nav用于定义页面上的导航条,包括页面上方的主导航条、侧边的边导航栏、页面内部的页面导航、页面下方的底部导航。
aside用于定义当前页面或当前文章的附属信息,通常推荐aside元素使用css渲染成侧边栏。
将aside放在body内部表明整个页面添加边栏。
将aside元素放在其他父元素内部表明为父元素添加边栏。
<html>
<head>
	<meta name="author" content="Yeeku.H.Lee(CrazyIt.org)" />
	<meta http-equiv="Content-Type" content="text/html; charset=utf-8" />
	<title> 论坛帖子 </title>
	<link rel="stylesheet" type="text/css" href="css.css"/>
</head>
<body>
<!-- 网页标题 -->
<header>
	<img src="fklogo.gif" alt="疯狂软件"/>返回首页
	<h1>浏览帖子内容</h1>
</header>
<article>
	<h2>学习Android,必须先学习Java吗</h2>
	<p>Android上的应用程序只能用Java编写吗?可以用C++吗?</p>
	<!-- 帖子的“回复”部分,用section元素表示  -->
	<section>
		<h2>回复内容</h2>
		<!-- 每个article代表一个回复 -->
		<article>
			<!-- 回复的标题 -->
			<header>
				<h2>还是得学习Java</h2>
				<div>作者:kongyeeku</div>
			</header>
			<p>虽然Android不一定要使用Java开发,还可以选择JavaScript、<br>
				或NDK开发,但Java毕竟是Android主要的开发语言,<br>
				因此建议学习Android之前还是先学习Java</p>
		</article>
		<!-- 每个article代表一个回复 -->
		<article>
			<!-- 回复的头部 -->
			<header>
				<h2>Java是基础</h2>
				<div>作者:kuan008</div>
			</header>
			<p>Java是基础,学好Java再去学习Android事半功倍。</p>
		</article>
	</section>
	<!-- 帖子的“评价”部分,用section元素表示  -->
	<section>
		<h2>评价内容</h2>
		<!-- 每个article代表一个评价 -->
		<article>
			<!-- 评价的标题 -->
			<h3>讨论很好</h3>
			<p>大家讨论的很深入,对我帮助很大</p>
		</article>
		<!-- 每个article代表一个评价 -->
		<article>
			<!-- 评价的标题 -->
			<h3>赞</h3>
			<p>不错,赞</p>
		</article>
	</section>
	<!-- 帖子的“脚注” -->
	<footer>
		以上帖子和回复只代表其个人观点,不代表疯狂Java联盟的观点或立场
	</footer>
	<!-- 该aside放在article内部,将作为该文章的“边栏”信息 -->
	<aside>
		<section>
		<h4>关于楼主</h4>
		<div>用户组: 编程摸索者</div>
		<div>注册日期: 2009-7-27</div>
		<div>上次访问: 2012-1-3 20:02</div>
		<div>最后发表: 2012-1-1 17:38</div>
		<div>发帖数级别: 小试牛刀</div>
		<div>阅读权限: 30</div>
		</section>
	</aside>
</article>
<footer>
	<a href="#">站点信息</a>
	<a href="#">联系我们</a>
</footer>
<!-- 该aside放在body内部,将作为整个HTML文档的“边栏”信息 -->
<aside>
	<h3>页面导航</h3>
	<nav>
		<ul>
			<li><a href="#">查看相关内容</a></li>
			<li><a href="http://www.crazyit.org">返回首页</a></li>
			<li><a href="http://www.crazyit.org/forum-63-1.html">返回本版</a></li>
		</ul>
	</nav>
</aside>
</body>
</html>
一个HTML最多包含一个main元素,用于包含网页中除导航条、logo、版权信息等之外的主要内容。
<html>
<head>
	<meta name="author" content="Yeeku.H.Lee(CrazyIt.org)" />
	<meta http-equiv="Content-Type" content="text/html; charset=utf-8" />
	<title> 回复 </title>
</head>
<body>
<!-- 网页标题 -->
<header>
	<h1>浏览回复内容</h1>
</header>
<main>
<h2>还是得学习Java</h2>
<div>作者:kongyeeku</div>
<p>虽然Android不一定要使用Java开发,还可以选择JavaScript、<br>
	或NDK开发,但Java毕竟是Android主要的开发语言,<br>
	因此建议学习Android之前还是先学习Java</p>
</main>
</body>
</html>
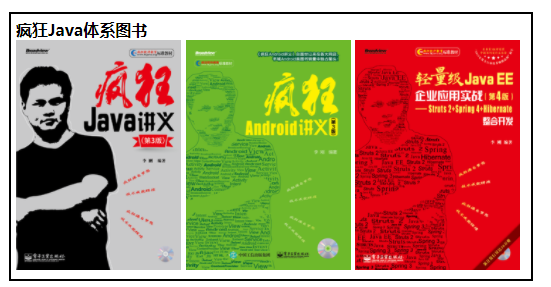
figure元素用于表示一块独立的图片区域,内部可包含一或多个img元素。
figuecaption通常放在figure内部用于定义图片区域标题。
<html>
<head>
	<meta name="author" content="Yeeku.H.Lee(CrazyIt.org)" />
	<meta http-equiv="Content-Type" content="text/html; charset=utf-8" />
	<title> 图片区域 </title>
</head>
<body>
<figure style="border:2px solid black;padding:5px;width:510px">
	<figcaption><b>疯狂Java体系图书</b></figcaption>
	<img src="images/java.png" alt="疯狂Java讲义" style="width:165px;height:230px"/>
	<img src="images/android.png" alt="疯狂Android讲义" style="width:165px;height:230px"/>
	<img src="images/javaee.png" alt="轻量级Java EE企业应用实战" style="width:165px;height:230px"/>
</figure>
</body>
</html>
用于显示HTML页面中需要重点关注的内容,会用黄色显示
<html>
<head>
	<meta name="author" content="Yeeku.H.Lee(CrazyIt.org)" />
	<meta http-equiv="Content-Type" content="text/html; charset=utf-8" />
	<title> mark元素 </title>
</head>
<body>
<h1>mark元素</h1>
<article>
	<header>
		<h2>疯狂软件即将引入<mark>HTML 5</mark>相关课程</h2>
	</header>
	<p>
	<mark>HTML 5</mark>是下一代的HTML规范,<br>
	<mark>HTML 5</mark>即将把前端开发者从繁重的开发中释放出来。<br>
</article>
</body>
</html>
用来显示被标注内容是日期、时间或者是日期时间,可以使用如下属性:datetime:主要用于向机器提供时间,属性值应该符合yyyy-MM-ddTHH:mm格式的日期时间,也可只指定日期或时间;pubdate:表明是否为发布日期。

<html>
<head>
	<meta name="author" content="Yeeku.H.Lee(CrazyIt.org)" />
	<meta http-equiv="Content-Type" content="text/html; charset=utf-8" />
	<title> time元素 </title>
</head>
<body>
为了把握技术潮流的脉搏,疯狂软件教育计划在
<time datetime="2012-04-01">2012年4月</time>
引入<mark>HTML 5</mark>的相关课程。<br/>
疯狂软件教育的上课时间是<time datetime="09:00">早上9点</time>
到<time datetime="17:30">下午5点半</time>。<br>
疯狂软件教育将于龙年的<time datetime="2012-01-30T09:00">正月初八</time>
开始上班,也就是<time>2012-01-30</time>。
本通知发布时间是<time datetime="2012-01-08T09:00" pubdate>2012年1月8日</time>
</body>
</html>
由于前几个日期、时间都不是标准的日期、时间格式,所以在使用time元素时要指定datetime,而最后一个2012-01-30已经满足格式所以不用。
details元素用于显示一段详细信息或某个主题的细节。summary通常放在detail内部为其定义摘要信息,默认可见,当用户点击摘要信息浏览器会显示出details里的详细内容。
<html>
<head>
	<meta name="author" content="Yeeku.H.Lee(CrazyIt.org)" />
	<meta http-equiv="Content-Type" content="text/html; charset=utf-8" />
	<title> details元素 </title>
</head>
<body>
<details>
	<summary>芙蓉镇</summary>
	《芙蓉镇》是一部极好的电影,每个中国人都不应该错过。
</details>
</body>
</html>
用于为东亚文字定义解释
用于将一段文本从它所在上下文中隔离出来
<html>
<head>
	<meta name="author" content="Yeeku.H.Lee(CrazyIt.org)" />
	<meta http-equiv="Content-Type" content="text/html; charset=utf-8" />
	<title> bdi元素 </title>
</head>
<body>
<ul>
  <li><bdi>孙悟空</bdi>: 20步。
  <li><bdi>Jack</bdi>: 12步。
  <li><bdi>????</bdi>: 23步。
</ul>
</body>
</html>
第三个人是阿拉伯名,不隔离出来会导致浏览器显示混乱。
用于指定在文本的何处适合添加换行。对于有些英文单词或术语太长,浏览器可能会在错误的位置换行。

<html>
<head>
	<meta name="author" content="Yeeku.H.Lee(CrazyIt.org)" />
	<meta http-equiv="Content-Type" content="text/html; charset=utf-8" />
	<title> wbr元素 </title>
</head>
<body>
wbr元素用于告诉浏览器合适的换行位置,<br>
至于是否需要换行则由浏览器决定。比如国际化单词:inter<wbr>national<wbr>ization.
</body>
</html>
menu用于定义菜单
menuitem用于定义菜单项
menu可指定type、label两个属性,label代表该菜单文本;type可指定为content值,用于表明该菜单是一个弹出式菜单,这样该菜单既可作为其他组件的contextmenu属性的属性值。
menuitem支持如下属性:
head元素可定义HTML文档头,可包含以下子元素:
用于链接图标、css样式文件等各种外部资源,还支持以下属性:
使用link载入css样式单
<title> 链接外部CSS样式单 </title>
	<!-- 引入outer.css样式单文件 -->
	<link href="outer.css" rel="stylesheet" type="text/css" />
定义页面的图标
<title> 定义网站图标 </title>
	<!-- 引入outer.css样式单文件 -->
	<link href="java.ico" rel="shortcut icon" type="image/x-icon" />
预先加载资源
例如,页面中有一个超链接,如果项目希望该页面加载时能提交预加载超链接所链接的资源
<html>
<head>
	<meta name="author" content="Yeeku.H.Lee(CrazyIt.org)" />
	<meta http-equiv="Content-Type" content="text/html; charset=utf-8" />
	<title> 预加载资源 </title>
	<!-- 引入outer.css样式单文件 -->
	<link href="base.html" rel="prefetch" type="text/html" />
</head>
<body>
<a href="base.html">访问base.html</a>
</body>
</html>
必须是空元素。可指定href:指定所有链接的基准路径和target。
<html>
<head>
	<meta http-equiv="Content-Type" content="text/html; charset=utf-8" />
	<title> base元素 </title>
	<base target="_blank" href="http://www.crazyit.org" />
</head>
<body>
	<a href="index.php">疯狂Java联盟</a>
</body>
</html>
定义页面元信息,即指定一些name-value对,可指定如下属性:
可以为网页指定如下关键字和描述信息,有利于搜索引擎收录站点:
<head>
    <title>疯狂java联盟</title>
    <meta name="author" content="Yeeku.H.Lee" />
	<meta name="website" content="http://www.crazyit.org" />
	<meta name="copyright" content="2001-2016 crazyit.org" />
	<meta name="Keywords" content="Java" />
</head>
如果只需简单设置网页使用的字符集,则可:
<meta charset="utf-8" />
http-equiv属性支持的值主要有:
expires:指定网页的过期时间。一旦网页过期,必须重新从服务器下载:
<meta http-equiv="expires" content="Sat sep 27 16:12:36 CST 2008" />
pragma:指定禁止浏览器从本地磁盘缓存中获取该页面内容,浏览器一旦离开网页就无法脱机访问该页面:
<meta http-equiv="pragma" content="no-cache" />
refresh:指定浏览器多长时间后自动刷新指定页面:
<!-- 设置2秒后自动刷新页面 -->
<meta http-equiv="refresh" content="2" />
<!-- 设置2秒后自动刷新其他页面 -->
<meta http-equiv="refresh" content="2;URL=http://www.zzd.com" />
set-cookie:设置Cookie。如果网页过期,那么客户端上的cookie也将被删除:
<meta http-equiv="set-cookie"
content="name=value expires= Sat sep 27 16:12:36 CST 2008,path=/" />
content-type:设置该页面的内容类型和所用的字符集:
<meta http-equiv="content-type" content="text/html;charset=utf-8" />
img元素默认可拖动,a元素只要设置了href属性默认也可拖动:
<html>
<head>
	<meta name="author" content="Yeeku.H.Lee(CrazyIt.org)" />
	<meta http-equiv="Content-Type" content="text/html; charset=utf-8" />
	<title> 可拖动 </title>
</head>
<body>
<a href="http://www.fkjava.org">疯狂软件教育</a>
<img src="logo.jpg" alt="crazyit"/>
</body>
</html>
对于普通元素要把它变成可拖动的,要把draggable属性设为true,此时并没携带数据,要为被拖动元素的ondragstart事件指定监听器,在该监听器中让拖动操作可以携带数据:
<html>
<head>
	<meta name="author" content="Yeeku.H.Lee(CrazyIt.org)" />
	<meta http-equiv="Content-Type" content="text/html; charset=utf-8" />
	<title> 可拖动的Div </title>
</head>
<body>
<div id="source" style="width:80px;height:80px;
	border:1px solid black;
	background-color: #bbb;"
	draggable="true">疯狂软件教育</div>
<script type="text/javascript">
	var source = document.getElementById("source");
	source.ondragstart = function(evt)
	{
		// 让拖动操作携带数据
		evt.dataTransfer.setData("text/plain" , "疯狂软件");
	}
</script>
</body>
</html>
上面的被拖动元素被拖动时会显示禁止标志,因为元素被拖过document对象时,该对象阻止了默认的拖动事件,而其他HTML组件也位于document对象内,因此不接受放。
应该为document的ondragover事件指定监听器,在监听器中取消document对拖动事件的默认行为,比如在上面的JS代码后面增加
document.ondragover = function(evt)
{
	//取消事件行为
	return false;
}
当用户释放时火狐浏览器会打开新的页面,即拖放携带的url,chrome浏览器不会。
如果想取消拖放操作的默认行为,则可以为document的ondrop事件绑定监听器:
document.ondrop = function(evt)
{
	// 取消事件的默认行为
	return false;
}
实现一个可以自由拖动的div元素,即只要监听document的ondrop方法,当用户把div放到document中时,通过JavaScript代码把该元素移动到该位置。
<html>
<head>
	<meta http-equiv="Content-Type" content="text/html; charset=utf-8" />
	<title> 可自由拖动的Div </title>
</head>
<body>
<div id="source" style="width:80px;height:80px;
	border:1px solid black;
	background-color: #bbb;"
	draggable="true">疯狂软件教育</div>
<script type="text/javascript">
	var source = document.getElementById("source");
	source.ondragstart = function(evt)
	{
		// 让拖动操作携带数据
		evt.dataTransfer.setData("text/plain" , "www.fkjava.org");
	}
	document.ondragover = function(evt)
	{
		// 取消事件的默认行为
		return false;
	}
	document.ondrop = function(evt)
	{
		source.style.position = "absolute";
		source.style.left = evt.pageX + "px";
		source.style.top = evt.pageY + "px";
		// 取消事件的默认行为
		return false;
	}
</script>
</body>
</html>
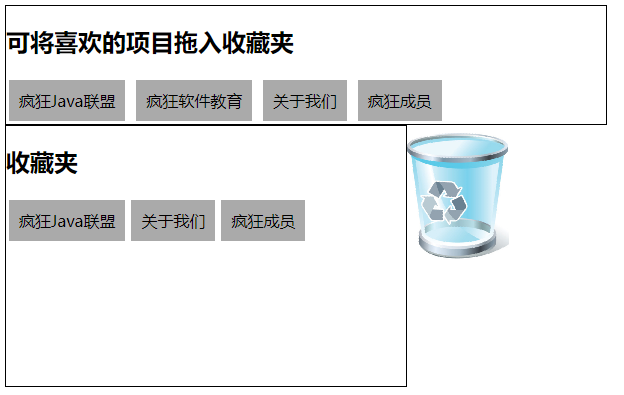
拖放事件有一个dataTransfer属性,该属性值是一个DataTransfer对象。通过该对象,可以在拖放开始时(ondragstart事件)将拖放源的数据存入DataTransfer对象中,然后在拖放结束时从DataTransfer对象中读取数据。
下面实现了一个允许通过拖放来添加、删除收藏项的功能:
<html>
<head>
	<meta name="author" content="Yeeku.H.Lee(CrazyIt.org)" />
	<meta http-equiv="Content-Type" content="text/html; charset=utf-8" />
	<title> 通过拖放实现添加、删除 </title>
	<style type="text/css">
		div>div{
			display: inline-block;
			padding: 10px;
			background-color: #aaa;
			margin: 3px;
		}
	</style>
</head>
<body>
<div style="width:600px;border:1px solid black;">
<h2>可将喜欢的项目拖入收藏夹</h2>
<div draggable="true" ondragstart="dsHandler(event);">疯狂Java联盟</div>
<div draggable="true" ondragstart="dsHandler(event);">疯狂软件教育</div>
<div draggable="true" ondragstart="dsHandler(event);">关于我们</div>
<div draggable="true" ondragstart="dsHandler(event);">疯狂成员</div>
</div>
<div id="dest"
	style="width:400px;height:260px;
	border:1px solid black;float:left;">
	<h2 ondragleave="return false;">收藏夹</h2>
</div>
<img id="gb" draggable="false" src="garbagebin.png"
	alt="垃圾桶" style="float:left;"/>
<script type="text/javascript">
	var dest = document.getElementById("dest");
	// 开始拖动事件的事件监听器
	var dsHandler = function(evt)
	{
		// 将被拖动元素的innerHTML属性值设置成被拖动的数据
		evt.dataTransfer.setData("text/plain"
			, "<item>" + evt.target.innerHTML);
	}
	dest.ondrop = function(evt)
	{
		evt.preventDefault();
		var text = evt.dataTransfer.getData("text/plain");
		// 如果该text以<item>开头
		if (text.indexOf("<item>") == 0)
		{
			// 创建一个新的div元素
			var newEle = document.createElement("div");
			// 以当前时间为该元素生成一个唯一的ID
			newEle.id = new Date().getUTCMilliseconds();
			// 该元素内容为“拖”过来的数据
			newEle.innerHTML = text.substring(6);
			// 设置该元素允许拖动
			newEle.draggable="true";
			// 为该元素的开始拖动事件指定监听器
			newEle.ondragstart = function(evt)
			{
				// 将被拖动元素的id属性值设置成被拖动的数据
				evt.dataTransfer.setData("text/plain"
					, "<remove>" + newEle.id);
			}
			dest.appendChild(newEle);
		}
	}
	// 当把被拖动元素“放”到垃圾桶上时激发该方法。
	document.getElementById("gb").ondrop = function(evt)
	{
		var id = evt.dataTransfer.getData("text/plain");
		// 如果id以<remove>开头
		if (id.indexOf("<remove>") == 0)
		{
			// 根据“拖”过来的数据,获取被拖动的元素
			var target = document.getElementById(id.substring(8));
			// 删除被拖动的元素
			dest.removeChild(target);
		}
	}
	document.ondragover = function(evt)
	{
		// 取消事件的默认行为
		return false;
	}
	document.ondrop = function(evt)
	{
		// 取消事件的默认行为
		return false;
	}
</script>
</body>
</html>
使用表单向服务器提交请求,表单、表单控件的主要作用是收集用户输入,当用户提交表单时,用户输入的内容将被作为请求参数提交到远程服务器。
form元素用于生成输入表单,该元素不会生成可视化部分,也不包含任何表单控件,可指定以下属性:
action:单击确认时,表单被提交到哪个地址,必填。
method:发送get或post请求,通常是post,必填。
enctype:指定对表单内容进行编码使用的字符集。有如下三个值:
name:表单的唯一名称,建议该属性值与id属性值保持一致。
target:指定以何方式打开目标url,_blank,_parent,_self,_top。
提交表单时,表单控件会被转换成请求参数,规则如下:
<html>
<head>
	<meta name="author" content="Yeeku.H.Lee(CrazyIt.org)" />
	<meta http-equiv="Content-Type" content="text/html; charset=utf-8" />
	<title> 表单 </title>
</head>
<body>
<form action="http://www.crazyit.org" method="get">
	单行文本框:<input id="username" name="username" type="text" /><br />
	不能编辑的文本框:<input id="username2" name="username" type="text"
		readonly="readonly" /><br />
	密码框:<input id="password" name="password" type="password" /><br />
	隐藏域:<input id="hidden" name="hidden" type="hidden" /><br />
	第一组单选框:<br />
	红:<input id="color" name="color" type="radio" value="red"/>
	绿:<input id="color2" name="color" type="radio" value="green" />
	蓝:<input id="color3" name="color" type="radio" value="blue"/><br />
	第二组单选框:<br />
	男性:<input id="gender" name="gender" type="radio" value="male"/>
	女性:<input id="gender2" name="gender" type="radio" value="female" /><br />
	两个复选框:<br />
	<input id="website" name="website" type="checkbox"
		value="leegang.org" />
	<input id="website2" name="website" type="checkbox"
		value="crazyit.org" /><br />
	文件上传域:<input id="file" name="file" type="file"/><br />
	图像域:<input type="image" src="img/wjc.gif" alt="疯狂Java联盟"
		width="27" height="31"/><br />
	下面是四个按钮:<br />
	<input id="ok" name="ok" type="submit" value="提交" />
	<input id="dis" name="dis" type="submit" value="提交"
		disabled />
	<input id="cancel" name="cancel" type="reset" value="重填"/>
	<input id="no" name="no" type="button" value="无动作" />
</form>
</body>
</html>
单行文本框、密码输入框都用于接收用户输入,隐藏域不能,只用于提交额外的请求参数,即隐藏域的value属性值。
单、复选框不能接收用户输入,定义时可指定value设置它们所对应的请求参数值。当它们被勾选后才会生成对应的请求参数。
在表单元素中定义标签,这些标签可以对其他可生成请求参数的表单控件元素(比如单行文本框、密码框等)进行说明,label不需要生成请求参数,所以不用指定value属性。
用户单击label生成的标签时,该标签关联的表单控件元素就会获得焦点。
让标签和表单控件关联有两种方式:
<html>
<head>
	<meta name="author" content="Yeeku.H.Lee(CrazyIt.org)" />
	<meta http-equiv="Content-Type" content="text/html; charset=utf-8" />
	<title> label元素 </title>
</head>
<body>
<form action="http://www.crazyit.org" method="get">
	<label for="username">单行文本框:</label>
	<input id="username" name="username" type="text" /><br />
	<label>密码框:<input id="password" name="password" type="password" />
	</label><br />
	<input id=‘ok‘ type="submit" value="登录疯狂Java联盟" />
</form>
</body>
</html>
单击表单控件前面的标签时,该表单控件就可以获得输入焦点。
定义一个按钮,内部可包含文本、文本格式化标签、图像等内容。
button和input type=button相比有更强大的功能,还有如下几个属性:
<html>
<head>
	<meta name="author" content="Yeeku.H.Lee(CrazyIt.org)" />
	<meta http-equiv="Content-Type" content="text/html; charset=utf-8" />
	<title> button生成按钮 </title>
</head>
<body>
<form action="http://www.crazyit.org" method="get">
	<button type="button"><b>提交</b></button><br />
	<button type="submit"><img src="images/wjc.gif" alt="crazyit.org"/>
		</button><br />
</form>
</body>
</html>
select元素用于创建列表框或下拉菜单,必须和option元素结合使用,每一个option元素代表一个列表项或菜单项。
select本身并不能指定value属性,列表框或下拉菜单控件对应的参数值由option元素生成,当用户选中了多个列表项或菜单项后,这些列表项或菜单项的value将作为该select元素所对应的请求参数值。
支持如下属性:
disabled:设置禁用该列表框和下拉菜单。属性的值只能是disabled或省略。
multiple:设置该列表框和下拉菜单是否允许多选。
size:指定该列表框内可同时显示多少个列表项。
select元素里只能包含如下两种子元素:
<html>
<head>
	<meta name="author" content="Yeeku.H.Lee(CrazyIt.org)" />
	<meta http-equiv="Content-Type" content="text/html; charset=utf-8" />
	<title> select元素 </title>
</head>
<body>
<form action="http://www.crazyit.org" method="post">
	下面是简单下拉菜单:<br />
	<select id="skills" name="skills">
		<option value="java">Java语言</option>
		<option value="c">C语言</option>
		<option value="ruby">Ruby语言</option>
	</select><br /><br /><br />
	下面是允许多选的列表框:<br />
	<select id="books" name="books"
		multiple="multiple" size="4">
		<option value="java">疯狂Java讲义</option>
		<option value="android">疯狂Android讲义</option>
		<option value="ee">轻量级Java EE企业应用实战</option>
	</select><br />
	下面是允许多选的列表框:<br />
	<select id="leegang" name="leegang"
		multiple="multiple" size="6">
		<optgroup label="疯狂Java体系图书">
			<option value="java">疯狂Java讲义</option>
			<option value="android">疯狂Android讲义</option>
			<option value="ee">轻量级Java EE企业应用实战</option>
		</optgroup>
		<optgroup label="其他图书">
			<option value="struts">Struts 2.1权威指南</option>
			<option value="ror">RoR敏捷开发最佳实践</option>
		</optgroup>
	</select><br />
	<button type="submit"><b>提交</b></button><br />
</form>
</body>
</html>
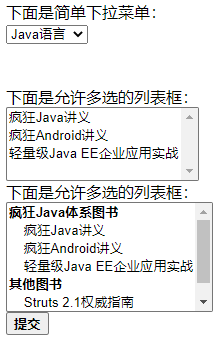
用于生成多行文本域,可以接受用户输入,用户可以选中文本域内的文本,所以还可以指定onselect、onchange两个属性,还可指定以下属性:
textarea元素也应指定name属性,作为textarea对应请求参数的参数名,但不能指定value属性,textarea之间的内容将作为请求参数的参数值。
<html>
<head>
	<meta name="author" content="Yeeku.H.Lee(CrazyIt.org)" />
	<meta http-equiv="Content-Type" content="text/html; charset=utf-8" />
	<title> 多行文本域 </title>
</head>
<body>
<form action="http://www.crazyit.org" method="post">
	简单多行文本域:<br />
	<textarea name="txt1" cols="20" rows="2"></textarea><br />
	只读的多行文本域:<br />
	<textarea name="txt2" cols="28" rows="4" readonly>
疯狂Java讲义
轻量级Java EE企业应用实战
	</textarea><br />
	<button type="submit"><b>提交</b></button><br />
</form>
</body>
</html>
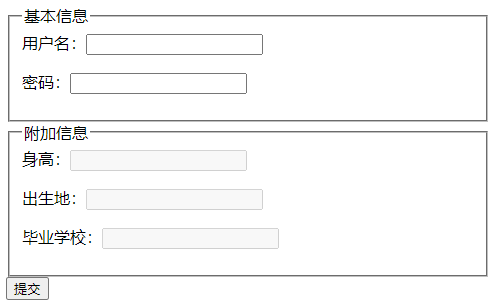
fieldset用于对表单内表单元素进行分组。浏览器会以特殊方式显示它们。可指定如下属性:
legend元素应该放在fieldset元素内,用于为其设置标题。
<html>
<head>
	<meta name="author" content="Yeeku.H.Lee(CrazyIt.org)" />
	<meta http-equiv="Content-Type" content="text/html; charset=utf-8" />
	<title> fieldset </title>
</head>
<body>
<form action="http://www.crazyit.org" method="post">
	<fieldset name="basic">
	<legend>基本信息</legend>
	用户名:<input id="username" name="username" type="text" /><p>
	密码:<input id="password" name="password" type="password" />
	</fieldset>
	<fieldset name="extra" disabled>
	<legend>附加信息</legend>
	身高:<input id="height" name="height" type="text" /><p>
	出生地:<input id="birth" name="birth" type="text" /><p>
	毕业学校:<input id="school" name="school" type="text" />
	</fieldset>
	<input id="ok" name="ok" type="submit" value="提交" />
</form>
</body>
</html>
用于定义该表单控件对应的表单,属性值应为它所属表单的id。
<html>
<head>
	<meta name="author" content="Yeeku.H.Lee(CrazyIt.org)" />
	<meta http-equiv="Content-Type" content="text/html; charset=utf-8" />
	<title> form属性 </title>
</head>
<body>
<form id="addForm" action="add">
	物品名:<input type="text" name="name"/>
	<input type="submit" value="添加"/>
</form>
物品描述:<textarea name="desc" form="addForm"></textarea>
</body>
</html>
一个是form元素,一个是form属性。textarea不在form元素内部,但它指定了form属性,所以也属于addform。

有多个提交按钮时可动态地让表单提交到不同的url:
<html>
<head>
	<meta name="author" content="Yeeku.H.Lee(CrazyIt.org)" />
	<meta http-equiv="Content-Type" content="text/html; charset=utf-8" />
	<title> formaction属性 </title>
</head>
<body>
<form method="post">
	用户名:<input type="text" name="name"/><br/>
	密码:<input type="password" name="name"/><br/>
	<input type="submit" value="注册" formaction="regist"/>
	<input type="submit" value="修改" formaction="login"/>
</form>
</body>
</html>
测试formmethod属性:
<html>
<head>
	<meta name="author" content="Yeeku.H.Lee(CrazyIt.org)" />
	<meta http-equiv="Content-Type" content="text/html; charset=utf-8" />
	<title> formmethod属性 </title>
</head>
<body>
<form method="post" action="pro">
	用户名:<input type="text" name="name"/><br/>
	密码:<input type="password" name="name"/><br/>
	<input type="submit" value="GET提交" formmethod="get"/>
	<input type="submit" value="POST提交" formmethod="post"/>
</form>
</body>
</html>
测试formenctype属性:
<!DOCTYPE html>
<html>
<head>
	<meta name="author" content="Yeeku.H.Lee(CrazyIt.org)" />
	<meta http-equiv="Content-Type" content="text/html; charset=utf-8" />
	<title> formenctype属性 </title>
</head>
<body>
<form method="post" action="pro">
	用户名:<input type="text" name="name"/><p>
	密码:<input type="password" name="name"/><p>
	头像:<input type="file" name="pic"/><p>
	<input type="submit" value="普通注册"
		formenctype="application/x-www-form-urlencoded"/>
	<input type="submit" value="上传图片"
	formenctype="multipart/form-data"/>
</form>
</body>
</html>
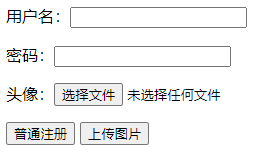
第一个按钮会以普通方式提交表单,第二个按钮会采用multipart/form-data方式提交表单,可以实现文件上传。
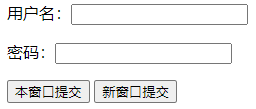
测试formtarget:
<html>
<head>
	<meta name="author" content="Yeeku.H.Lee(CrazyIt.org)" />
	<meta http-equiv="Content-Type" content="text/html; charset=utf-8" />
	<title> formtarget属性 </title>
</head>
<body>
<form method="post" action="pro">
	用户名:<input type="text" name="name"/><p>
	密码:<input type="password" name="name"/><p>
	<input type="submit" value="本窗口提交" formtarget="_self"/>
	<input type="submit" value="新窗口提交" formtarget="_blank"/>
</form>
</body>
</html>
当为某个表单控件增加该属性后,浏览器打开该页面时该组件就会自动获得焦点。
由于打开页面时只能有一个控件获得焦点,因此整个页面上最多只能有一个表单控件可设置该属性。
<html>
<head>
	<meta name="author" content="Yeeku.H.Lee(CrazyIt.org)" />
	<meta http-equiv="Content-Type" content="text/html; charset=utf-8" />
	<title> autofocus属性 </title>
</head>
<body>
<form method="post" action="pro">
	用户名:<input type="text" name="name"/><p>
	密码:<input type="password" name="name" autofocus/><p>
	<input type="submit" value="提交"/>
	<input type="reset" value="重设"/>
</form>
</body>
</html>
在未输入时显示提示信息
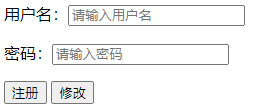
<html>
<head>
	<meta name="author" content="Yeeku.H.Lee(CrazyIt.org)" />
	<meta http-equiv="Content-Type" content="text/html; charset=utf-8" />
	<title> placeholder属性 </title>
</head>
<body>
<form method="post">
	用户名:<input type="text" name="name" placeholder="请输入用户名"/><p>
	密码:<input type="password" name="name" placeholder="请输入密码"/><p>
	<input type="submit" value="注册" formaction="regist"/>
	<input type="submit" value="修改" formaction="login"/>
</form>
</body>
</html>
通常和datalist元素结合使用,属性值是datalist组件的id,既允许用户输入也允许用户通过下拉菜单选择。
<html>
<head>
	<meta name="author" content="Yeeku.H.Lee(CrazyIt.org)" />
	<meta http-equiv="Content-Type" content="text/html; charset=utf-8" />
	<title> list属性 </title>
</head>
<body>
<form method="post" action="buy">
	请输入图书:<input type="text" name="name" list="books"/><p>
	<input type="submit" value="购买"/>
</form>
<datalist id="books">
	<option value="java">疯狂Java讲义</option>
	<option value="ee">轻量级Java EE企业应用实战</option>
	<option value="android">疯狂Android讲义</option>
</datalist>
</body>
</html>
用于设置表单是否支持自动完成功能,如果启用自动完成功能,浏览器会根据用户上次提交的数据生成列表框供用户选择或提示自动完成。
<html>
<head>
	<meta name="author" content="Yeeku.H.Lee(CrazyIt.org)" />
	<meta http-equiv="Content-Type" content="text/html; charset=utf-8" />
	<title> autocomplete属性 </title>
</head>
<body>
<form action="pro.action" method="post" autocomplete="on">
姓名:<input type="text" name="name" /><p>
住址: <input type="text" name="addr" /><p>
电邮: <input type="text" name="email" autocomplete="off" /><p>
<input type="submit" value="提交"/>
</form>
</body>
</html>
用于在JavaScript脚本中访问该label所关联的表单元素。
<html>
<head>
	<meta name="author" content="Yeeku.H.Lee(CrazyIt.org)" />
	<meta http-equiv="Content-Type" content="text/html; charset=utf-8" />
	<title> control属性 </title>
</head>
<body>
<form action="pro.action" method="post" autocomplete="on">
<label id="nameLb">姓名:
<input type="text" name="name" /></label><p>
<input type="submit" value="提交"/>
<input type="button" value="重设"
	onclick="document.getElementById(‘nameLb‘).control.value=‘crazyit‘;"/>
</form>
</body>
</html>
定义了一个label元素,在label元素内部定义了一个文本框,通过该label的control属性可访问该文本框。
因此第13行先获取页面上的label元素,然后调用该元素的control属性访问该文本框。
用于获取该表单元素所关联的多个label元素。表单元素与label之间具有一对多的关联关系,label元素获取它关联的表单元素使用control属性,而表单元素获取它关联的多个label属性。
<html>
<head>
	<meta name="author" content="Yeeku.H.Lee(CrazyIt.org)" />
	<meta http-equiv="Content-Type" content="text/html; charset=utf-8" />
	<title> control属性 </title>
</head>
<body>
<form action="pro.action" method="post" autocomplete="on">
<label>姓名:
<input id="name" type="text" name="name" /></label>
<label for="name"><small>请输入姓名</small></label><p>
<input type="button" value="第一个"
	onclick="alert(document.getElementById(‘name‘).labels[0])"/>
<input type="button" value="第二个"
	onclick="alert(document.getElementById(‘name‘).labels[1])"/>
</form>
</body>
</html>
返回文本框内的文字选择方向。
<html>
<head>
	<meta name="author" content="Yeeku.H.Lee(CrazyIt.org)" />
	<meta http-equiv="Content-Type" content="text/html; charset=utf-8" />
	<title> selectionDirection属性 </title>
</head>
<body>
<form action="pro.action" method="post" autocomplete="on">
<label id="nameLb">姓名:
<input type="text" name="name" /></label><p>
<input type="button" value="获取"
	onclick="alert(document.getElementById(‘nameLb‘).control.selectionDirection);"/>
</form>
</body>
</html>
设为true表明该复选框的状态暂时不确定。只有浏览者在界面上执行操作,不管它是勾选还是取消勾选,属性值都会变成true。

<html>
<head>
	<meta name="author" content="Yeeku.H.Lee(CrazyIt.org)" />
	<meta http-equiv="Content-Type" content="text/html; charset=utf-8" />
	<title> indeterminate属性 </title>
</head>
<body>
<form action="pro.action" method="post" autocomplete="on">
<label id="colorLb">红色:
<input type="checkbox" name="color" /></label><p>
<input type="button" value="设置"
	onclick="document.getElementById(‘colorLb‘).control.indeterminate=true;"/>
<input type="button" value="获取"
	onclick="alert(document.getElementById(‘colorLb‘).control.indeterminate);"/>
</form>
</body>
</html>
新增了以下几种可能的类型:
上面六种type属性值都用于获取各种日期、时间,因此对于这几种type属性值的input元素额外支持如下属性:

<html>
<head>
	<meta name="author" content="Yeeku.H.Lee(CrazyIt.org)" />
	<meta http-equiv="Content-Type" content="text/html; charset=utf-8" />
	<title> 功能丰富的input元素 </title>
</head>
<body>
<form action="do">
type="color"的文本框:<br/><input name="color" type="color"/><p>
type="date"的文本框:<br/><input name="date" type="date"/><p>
type="time"的文本框:<br/><input name="time" type="time"/><p>
type="datetime-local"的文本框:<br/><input name="datetime-local" type="datetime-local"/><p>
type="month"的文本框:<br/><input name="month" type="month"/><p>
type="week"的文本框:<br/><input name="week" type="week"/><p>
type="email"的文本框:<br/><input name="email" type="email" multiple/><p>
type="tel"的文本框:<br/><input name="tel" type="tel"/><p>
type="url"的文本框:<br/><input name="url" type="url"/><p>
type="number"的文本框:<br/><input name="number" type="number" min="0" max="100" step="5"/><p>
type="range"的文本框:<br/><input name="range" type="range" min="0" max="100" step="5"/><p>
type="search"的文本框:<br/><input name="search" type="search"/><p>
<input value="提交" type="submit"/>
</form>
</body>
</html>
用于显示输出,比如计算机结果或脚本的输出。output元素应该属于某个表单,即要么定义在表单内部要么为它指定form属性。还有其他属性:
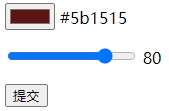
<html>
<head>
	<meta name="author" content="Yeeku.H.Lee(CrazyIt.org)" />
	<meta http-equiv="Content-Type" content="text/html; charset=utf-8" />
	<title> output元素 </title>
</head>
<body>
<form action="do">
<input id="color1" name="color1" type="color" onchange="a.value=this.value;"/>
<output name="a" for="color1"></output><p>
<input id="range1" name="range1" type="range" min="0" max="100" step="5"
	onchange="b.value=this.value;"/>
<output name="b" for="range1"></output><p>
<input value="提交" type="submit"/>
</form>
</body>
</html>
两个output元素能实时显示对应input元素的值,为了让output实时显示对应input元素的值,设置了onchange:当文本框发送改变时,output能随之改变、显示对应input的值。
用于表示一个已知最大值和最小值的数仪表,比如电池电量,速度表。可指定以下属性:

<html>
<head>
	<meta name="author" content="Yeeku.H.Lee(CrazyIt.org)" />
	<meta http-equiv="Content-Type" content="text/html; charset=utf-8" />
	<title> meter元素 </title>
</head>
<body>
<form action="do" method="get">
行车速度是:<meter name="speed" value="120" min="0" max="220" low="0" high="160">
	120</meter>千米/小时。<p>
<input value="提交" type="submit"/>
</form>
</body>
</html>
用于表示一个进度条,可指定max、value属性。
<html>
<head>
	<meta name="author" content="Yeeku.H.Lee(CrazyIt.org)" />
	<meta http-equiv="Content-Type" content="text/html; charset=utf-8" />
	<title> progress元素 </title>
</head>
<body>
<form action="do" method="get">
任务完成比:<progress value="30" max="100">30/100</progress><p>
<input value="提交" type="submit"/>
</form>
</body>
</html>
原文:https://www.cnblogs.com/zzdshidashuaige/p/14802551.html