1.直接看截图:

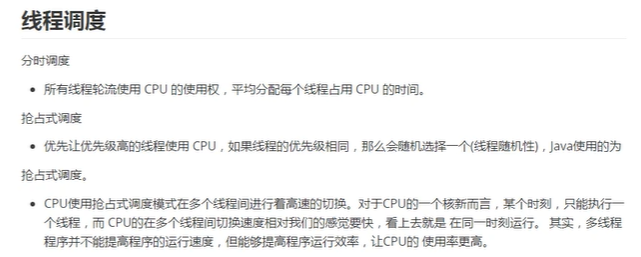
电脑只能干一件事情,学习多线程的意义在于让多个路径更合理的交替执行。CPU的高速切换给我们一种多个线程在同时执行的假象。
2.


1.1)该类要实现Tread进程
1.2)代码演示:
进程1的类:
1 public class MyThread extends Thread{
2     @Override
3     public void run() {
4         for(int i = 0;i<10;i++){
5             System.out.println("汗滴禾下土"+i);
6         }
7     }
8 }
Main()方法:
 1 public class Demo01 {
 2     public static void main(String[] args) {
 3         //创建线程对象
 4         MyThread thread = new MyThread();
 5         //启动线程
 6         thread.start();
 7         for(int i = 0;i<10;i++){
 8             System.out.println("锄禾日当午"+i);
 9         }
10     }
11 }
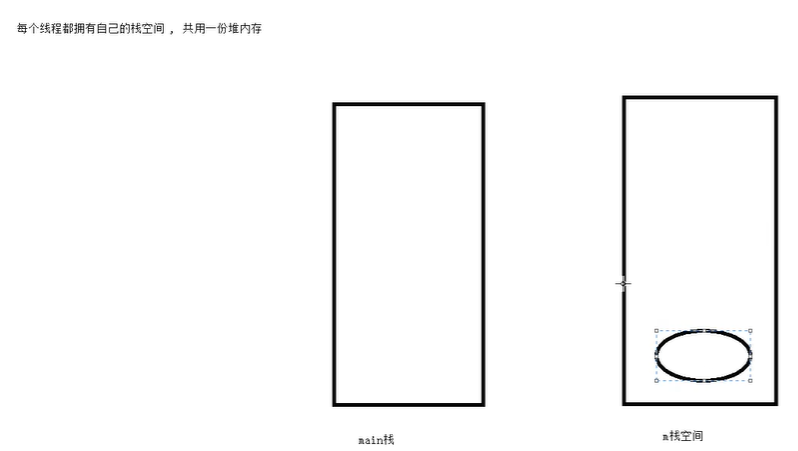
一下是对上述代码的解释:
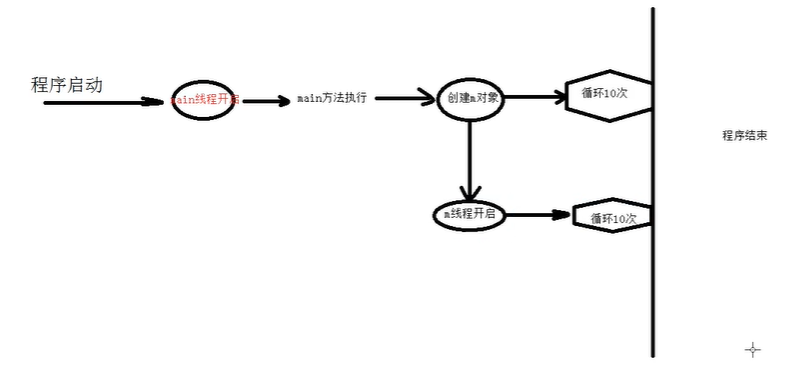
由一个线程调用的方法,该方法也会执行在这个线程中
2.1)实现Runnable()接口
2.2)代码演示:
线程1:
 1 /**
 2  * 用于给线程执行的任务
 3  */
 4 public class MyRunnable implement Runnable{
 5     @Override
 6     public void run() {
 7         for(int i = 0;i<10;i++){
 8             System.out.println("汗滴禾下土"+i);
 9         }
10     }
11 }
主线程(Main方法):
 1 public class Demo01 {
 2     public static void main(String[] args) {
 3         //1.创建一个任务对象
 4         MyRunnable runnable = new MyRunnable();
 5         //2.创建一个线程对象,并给他一个任务
 6         Thread t = new Thread(runnable);
 7         //3.启动线程
 8         t.start();
 9         for(int i = 0;i<10;i++){
10             System.out.println("锄禾日当午"+i);
11         }
12     }
13 }
打印的结果同上面相同

虽然Runnable接口很有优势,但也会使用继承Thread,因为它可以创建线程很方便:
 1 public class Demo02 {
 2     public static void main(String[] args) {
 3         //采用匿名内部类的方式创建线程
 4        new Thread(){
 5            @Override
 6            public void run() {
 7                for(int i = 0;i<10;i++){
 8                    System.out.println("锄禾日当午"+i);
 9                }
10            }
11        }.start();
12         for(int i = 0;i<10;i++){
13             System.out.println("汗滴禾下土"+i);
14         }
15     }
16 }
1.常见的构造方法

(name是给线程起的名字)
2.常用的方法:
2.1)getName();获取线程的名字
2.2) getPriority();获取线程的优先级
2.3)getStatic();获取线程的状态
2.4)isAlive();判断该线程是否活着
2.5)isDaemon();判断该线程是否为守护线程
2.6)sleep(long millis);让线程休眠多长的时间
2.7)sleep(lont millis,int nanos);
2.8)start();开始线程
2.9)
2.10)
 1 public class Demo02 {
 2     public static void main(String[] args) {
 3         //首先打印出主程序的名称
 4         System.out.println(Thread.currentThread().getName());
 5         //采用匿名内部类的方式创建一个线程
 6         new Thread(new MyRunnable(),"谁知盘中餐").start();
 7
 8     }
 9     //创建一个静态的内部类
10     static class MyRunnable implements Runnable{
11
12         @Override
13         public void run() {
14             System.out.println(Thread.currentThread().getName());
15         }
16     }
17 }
currentThread()获取当前的线程,返回的是一个线程
1 public class Demo02 {
2     public static void main(String[] args) throws InterruptedException {
3        for(int i = 0;i<10;i++){
4            System.out.println(i);
5            Thread.sleep(1000);
6        }
7     }
8 }
3.3)线程阻塞:可以理解为比较消耗时间的操作,比如一个线程要执行100行代码,其中有十行代码是读取文件,这个过程花费了比较多的时间,可以认为是线程阻塞。
常见的线程阻塞有读取文件,等待用户输入等
 1 public class Demo02 {
 2     /**
 3      * 需求:我想在Main()方法结束后终端子程序
 4      * 1.为子程序打一个标记
 5      * 2.在任务类中catch()块中处理
 6      * @param args
 7      * @throws InterruptedException
 8      */
 9     public static void main(String[] args) throws InterruptedException {
10         Thread t = new Thread(new MyRunnable());
11         t.start();
12         for(int i = 0;i<5;i++){
13             System.out.println(Thread.currentThread().getName()+":"+i);
14         }
15         //1.为子程序打一个标记
16         t.interrupt();
17     }
18     static class MyRunnable implements Runnable{
19
20         @Override
21         public void run() {
22             for(int i = 0;i<10;i++){
23                 System.out.println(Thread.currentThread().getName()+":"+i);
24                 try {
25                     Thread.sleep(1000);
26                 } catch (InterruptedException e) {
27                    // e.printStackTrace();
28                     //2.在任务类中catch()块中处理
29                     System.out.println("你可以去死掉了");
30                     return;//结束该线程任务
31                 }
32             }
33         }
34     }
35 }
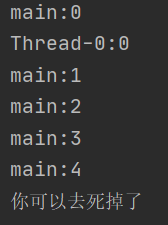

守护线程在启动线程之前设置
 1 public class Demo02 {
 2     /**
 3      * 需求:我想在Main()方法结束后终端子程序
 4      * 1.为子程序打一个标记
 5      * 2.在任务类中catch()块中处理
 6      * @param args
 7      * @throws InterruptedException
 8      */
 9     public static void main(String[] args) throws InterruptedException {
10         Thread t = new Thread(new MyRunnable());
11         //将他设置为守护线程
12         t.setDaemon(true);
13         t.start();
14         for(int i = 0;i<5;i++){
15             System.out.println(Thread.currentThread().getName()+":"+i);
16             Thread.sleep(1000);
17         }
18     }
19     static class MyRunnable implements Runnable{
20
21         @Override
22         public void run() {
23             for(int i = 0;i<10;i++){
24                 System.out.println(Thread.currentThread().getName()+":"+i);
25                 try {
26                     Thread.sleep(1000);
27                 } catch (InterruptedException e) {
28                    // e.printStackTrace();
29                     //2.在任务类中catch()块中处理
30                     System.out.println("你可以去死掉了");
31                     return;//结束该线程任务
32                 }
33             }
34         }
35     }
36 }
提取出来就是这个样子:
1  Thread t = new Thread(new MyRunnable());
2          //将他设置为守护线程
3          t.setDaemon(true);
4          t.start();
1.线程不安全:当多个线程异步处理同一个数据时,会导致数据不安全问题
2.1)代码演示(买票)
 1 public class Dem01 {
 2     public static void main(String[] args) {
 3         //创建任务对象
 4         Runnable run = new saleTicket();
 5         //一个任务被多个线程执行
 6         Thread t1 = new Thread(run);
 7         Thread t2 = new Thread(run);
 8         Thread t3 = new Thread(run);
 9         //启动线程
10         t1.start();
11         t2.start();
12         t3.start();
13
14     }
15     /**
16      * 写一个任务类,进行卖票
17      */
18     static class saleTicket implements Runnable{
19         private //票的数量
20                 int count = 10;
21         @Override
22         public void run() {
23             while (count > 0) {
24                 System.out.println("正在售票");
25                 try {
26                     Thread.sleep(1000);
27                 } catch (InterruptedException e) {
28                     e.printStackTrace();
29                 }
30                 count--;
31                 System.out.println("还有余票" + count);
32             }
33         }
34     }
35 }
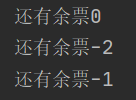
这个结果显然是不合理的,原因:当只剩最后一张票时,线程A先抢到时间戳,进入循环,此时她改变了count的数量变为0,但是,此时在他还没有跳出循环的时候,线程B C 都进来了,就这导致后面出现余票-1 -2的现象。
2.线程安全1——同步代码块synchronized
2.1)语法:synchronized(同一个对象){ 排队执行的代码块 }
2.1)代码演示(对买票系统的改进)
 1 public class Dem01 {
 2     public static void main(String[] args) {
 3         //创建任务对象
 4         Runnable run = new saleTicket();
 5         //一个任务被多个线程执行
 6         Thread t1 = new Thread(run);
 7         Thread t2 = new Thread(run);
 8         Thread t3 = new Thread(run);
 9         //启动线程
10         t2.start();
11         t1.start();
12         t3.start();
13
14     }
15
16     /**
17      * 写一个任务类,进行卖票
18      */
19     static class saleTicket implements Runnable {
20         //票的数量
21         private int count = 10;
22         //创建一个对象,作为锁
23         private Object o = new Object();
24         @Override
25         public void run() {
26             while (true) {
27                 synchronized (o) {
28                     if (count > 0) {
29                         System.out.println("正在售票");
30                         try {
31                             Thread.sleep(1000);
32                         } catch (InterruptedException e) {
33                             e.printStackTrace();
34                         }
35                         count--;
36                         System.out.println(Thread.currentThread().getName()+":还有余票" + count);
37                     } else {
38                         break;
39                     }
40                 }
41             }
42         }
43     }
44 }
谁的线程先启动,谁就先抢到时间戳,在后续中也会较快抢到时间戳,因为他离锁最近
3.线程安全2——同步方法:
3.1)在任务类中,将方法代码块抽去出来,将方法用synchronized修饰
3.2)代码演示(对买票的修改)
 1 public class Dem01 {
 2     public static void main(String[] args) {
 3         //创建任务对象
 4         Runnable run = new saleTicket();
 5         //一个任务被多个线程执行
 6         Thread t1 = new Thread(run);
 7         Thread t2 = new Thread(run);
 8         Thread t3 = new Thread(run);
 9         //启动线程
10         t2.start();
11         t1.start();
12         t3.start();
13
14     }
15
16     /**
17      * 写一个任务类,进行卖票
18      */
19     static class saleTicket implements Runnable {
20         //票的数量
21         private int count = 10;
22         @Override
23         public void run() {
24             while (true) {
25                 boolean flag = sale();
26                 if(!flag){
27                     break;
28                 }
29             }
30         }
31         public synchronized boolean sale(){
32             if (count > 0) {
33                 System.out.println("正在售票");
34                 try {
35                     Thread.sleep(1000);
36                 } catch (InterruptedException e) {
37                     e.printStackTrace();
38                 }
39                 count--;
40                 System.out.println(Thread.currentThread().getName()+":还有余票" + count);
41                 return true;
42             }
43             return false;
44         }
45     }
46 }
同步方法的锁对象就是创建该类的对象,就像是Runnable run = new saleTicket();只创建了一个任务,所有为同一把锁
当同步代码块和同步方法同时上锁是,只有当一个锁里面完成后,才可以执行下一个锁,就像两个试衣间只有一个门一样
4.线程安全3——显示锁Lock:
4.1)自己创建一个锁对象。锁Lock 类,他的子类reentrantLock
4.2)Lock l = new reentrantLock(); l.lock()上锁 l.unlock()解锁
4.3)代码演示(对售票的改进)
 1 import java.util.concurrent.locks.Lock;
 2 import java.util.concurrent.locks.ReentrantLock;
 3
 4 public class Dem01 {
 5     public static void main(String[] args) {
 6         //创建任务对象
 7         Runnable run = new saleTicket();
 8         //一个任务被多个线程执行
 9         Thread t1 = new Thread(run);
10         Thread t2 = new Thread(run);
11         Thread t3 = new Thread(run);
12         //启动线程
13         t2.start();
14         t1.start();
15         t3.start();
16
17     }
18
19     /**
20      * 写一个任务类,进行卖票
21      */
22     static class saleTicket implements Runnable {
23         //票的数量
24         private int count = 10;
25         //创建锁对象
26         private Lock l = new ReentrantLock();
27
28         @Override
29         public void run() {
30             while (true) {
31                 //对需要排队的代码块进行上锁
32                 l.lock();
33                 if (count > 0) {
34                     System.out.println("正在售票");
35                     try {
36                         Thread.sleep(1000);
37                     } catch (InterruptedException e) {
38                         e.printStackTrace();
39                     }
40                     count--;
41                     System.out.println(Thread.currentThread().getName() + ":还有余票" + count);
42                 } else {
43                     break;
44                 }
45                 //代码块执行完后解锁
46                 l.unlock();
47             }
48         }
49     }
50 }
5.显示锁和隐式锁的区别
5.1)定义:隐式锁(Synchronized)是Java的关键字,当它用来修饰一个方法或一个代码块时,能够保证在同一时刻最多只有一个线程执行该代码。因为当调用 Synchronized修饰的代码时,并不需要显示的加锁和解锁的过程,所以称之为隐式锁。
显示锁(Lock)是一个接口,提供了无条件的、可轮询的、定时的、可中断的锁获取操作,所有的加锁和解锁操作方法都是显示的,因而称为显示锁。
5.2)区别:(9条消息) 隐式锁与显示锁的区别_ZL_do_it的博客-CSDN博客_显示锁和隐式锁
6.公平锁和非公平锁:公平锁是谁先来排队,谁就先解锁,非公平锁就是谁先抢到谁就先解锁。Java中默认的为非公平锁,如何在Java中构建公平锁:在显示锁中创 建 锁对象时,Lock l = new ReentrantLock(true);添加true
7.线程死锁:
7.1)线程死锁的原因:
7.2)代码演示:警察对罪犯说,你放了人质,我放了你;罪犯对警察说,你放了我,我放了人质。
 1 public class Demo02 {
 2     /**
 3      * 创建了两个线程,两个线程都在等待对方的回答,很有可能造成线程死锁。
 4      * @param args
 5      */
 6     public static void main(String[] args) {
 7         //创建警察和罪犯对象
 8         Culprit c = new Culprit();
 9         Police p = new Police();
10         //罪犯说话想要得到警察回应
11         c.say(p);
12         //创建线程对象
13         new MyTread(c,p).start();
14     }
15
16     static class MyTread extends Thread{
17         private Culprit c;
18         private Police p;
19
20         public MyTread(Culprit c,Police p){
21             this.c = c;
22             this.p = p;
23         }
24         @Override
25         public void run() {
26             p.say(c);
27         }
28     }
29     static class Culprit{
30         //罪犯对警察说的话
31         //罪犯对警察说了话之后要得到警察的回应
32         public synchronized void say(Police p){
33             System.out.println("你放了我,我放了罪犯");
34             p.fun();
35         }
36         //罪犯回应警察的话
37         public synchronized void fun(){
38             System.out.println("我把人质留下,你放了我");
39         }
40     }
41
42     static class Police{
43         //警察对罪犯说的话
44         //警察在说完话之后要得到罪犯的回应
45         public synchronized void say(Culprit c){
46             System.out.println("你放了人质,我放了你");
47             c.fun();
48         }
49         //警察回应罪犯
50         public synchronized void fun(){
51             System.out.println("把人质留下,你可以走了");
52         }
53     }
54 }
7.3)如何避免线程死锁:在任何可能导致锁产生的方法里面,不要在调用其他有可能产生锁的方法。不然的话极有可能产生死锁的问题。
8.多线程通信问题:
8.1)举个栗子来描述一下场景:A线程去下载音乐,B线程要播放音乐,如何让A线程现在完音乐后去告诉B线程你可以播放了,这就涉及到多线程间的通信问题。
8.2)涉及这个问题时常用的方法:Object类中关于线程问题的方法:


8.3)代码演示(生产者和消费者的关系):这里用厨师和服务员之间的关系来体现他。厨师做菜的时候,让服务员这条线程休眠,厨师做好饭后,唤醒服务员,让他去上菜,这个时候厨师休眠,等服务员端回盘子,唤醒厨师,让他做菜,服务员再次休眠。就这样循环。
  1 public class Demo03 {
  2     /**
  3      * 这是一个生产者和消费者两个线程之间的关系,厨师生产一份饭,服务员端走一份,为了让他们工作有序,就要让一个在工作时,
  4      * 另一个在睡觉
  5      *
  6      * @param args
  7      */
  8     public static void main(String[] args) {
  9         //创建类对象
 10         Food f = new Food();
 11         Cook c = new Cook(f);
 12         c.start();
 13         Waiter w = new Waiter(f);
 14         w.start();
 15
 16     }
 17
 18     static class Food {
 19         private String name;
 20         private String taste;
 21
 22         //true为做饭
 23         private boolean flag = true;
 24
 25         //厨师做饭
 26         public void setNameAndTaste(String name, String taste) {
 27             if (flag) {
 28                 this.name = name;
 29                 try {
 30                     Thread.sleep(1000);
 31                 } catch (InterruptedException e) {
 32                     e.printStackTrace();
 33                 }
 34                 this.taste = taste;
 35                 flag = false;
 36
 37                 //唤醒所有休眠的线程
 38                 this.notifyAll();
 39                 try {
 40                     //做好饭之后睡去,等待服务员唤醒
 41                     this.wait();
 42                 } catch (InterruptedException e) {
 43                     e.printStackTrace();
 44                 }
 45             }
 46         }
 47
 48         //服务员获取菜
 49         public void getFood() {
 50             if (!flag) {
 51                 try {
 52                     Thread.sleep(1000);
 53                 } catch (InterruptedException e) {
 54                     e.printStackTrace();
 55                 }
 56                 System.out.println("菜的名字是:" + name + ",味道是:" + taste);
 57                 flag = true;
 58                 this.notifyAll();
 59                 try {
 60                     this.wait();
 61                 } catch (InterruptedException e) {
 62                     e.printStackTrace();
 63                 }
 64             }
 65         }
 66     }
 67
 68     static class Cook extends Thread {
 69         private Food f;
 70
 71         public Cook(Food f) {
 72             this.f = f;
 73         }
 74
 75         @Override
 76         public void run() {
 77             for (int i = 0; i < 10; i++) {
 78                 if (i % 2 == 0) {
 79                     f.setNameAndTaste("老干妈小米粥", "香辣味");
 80                 } else {
 81                     f.setNameAndTaste("煎饼果子", "甜辣味");
 82                 }
 83             }
 84         }
 85
 86     }
 87
 88     static class Waiter extends Thread {
 89         private Food f;
 90
 91         public Waiter(Food f) {
 92             this.f = f;
 93         }
 94
 95         @Override
 96         public void run() {
 97             for (int i = 0; i < 10; i++) {
 98                 f.getFood();
 99             }
100         }
101     }
102
103 }
9.线程的六种状态:
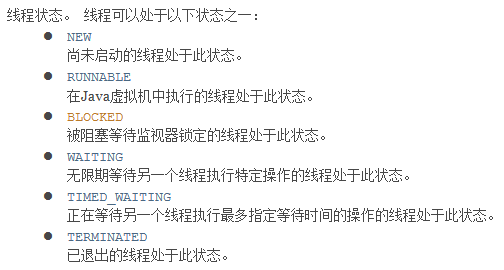
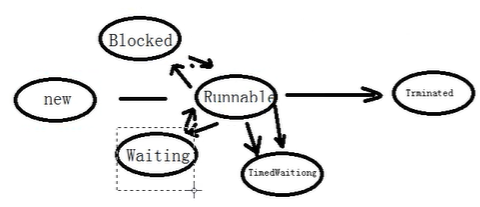
10.带返回值的线程Callable
10.1)这是一个接口
10.2)代码演示如何使 1 import java.util.concurrent.Callable; 2 import java.util.concurrent.ExecutionExcepti 3 import java.util.concurrent.FutureTask;
 4
 5 public class Demo04 {
 6     public static void main(String[] args) throws ExecutionException, InterruptedException {
 7         //2.创建一个Callable对象
 8         Callable<Integer> C = new MyCallable();
 9         //3.创建一个任务对象
10         FutureTask<Integer> f = new FutureTask<>(C);//f.isDone()判断线程是否已经执行完了;f.cancel(true/false);决定是否取消线程,返回布尔类型
11         //4.创建一个线程对象,将任务传给他
12         new Thread(f).start();
13         //当Callable线程调用了get方法后,主程序main就要等到子程序执行完后,得到一个返回值后,才可以执行
14         Integer j = f.get();
15         System.out.println(j);
16         for(int i = 0;i<10;i++){
17             Thread.sleep(100);
18             System.out.println(i);
19         }
20     }
21
22     //1.创建一个类,实现Callable<T>接口,注意他是泛型的
23     static class MyCallable implements Callable<Integer> {
24
25         @Override
26         public Integer call() throws Exception {
27             for(int i = 0;i<10;i++){
28                 Thread.sleep(100);
29                 System.out.println(i);
30             }
31             return 100;
32         }
33     }
34 }
1.概述:就是用来盛放线程的

2.线程池的底层原理之一
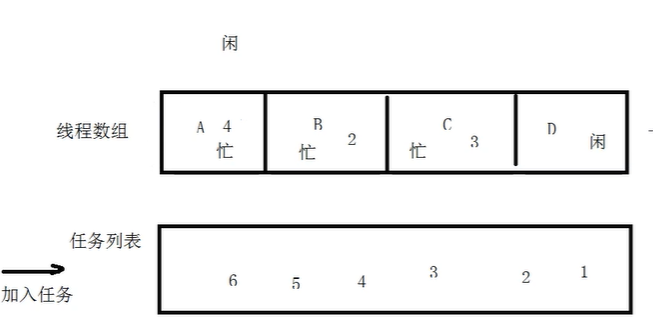
3.线程池的分类
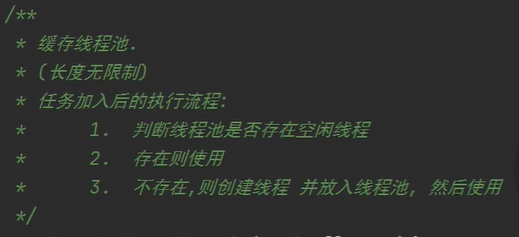
1.缓存线程池
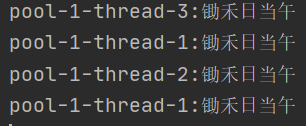
1.2)代码演示
 1 import java.util.concurrent.*;
 2
 3 public class Demo05 {
 4     public static void main(String[] args) {
 5         //1.创建线程池对象
 6         ExecutorService service = Executors.newCachedThreadPool();
 7         //2.向线程池中添加新的任务并且执行他
 8         service.execute(new Runnable() {
 9             @Override
10             public void run() {
11                 System.out.println(Thread.currentThread().getName()+":"+"锄禾日当午");
12             }
13         });
14         service.execute(new Runnable() {
15             @Override
16             public void run() {
17                 System.out.println(Thread.currentThread().getName()+":"+"锄禾日当午");
18             }
19         });
20         service.execute(new Runnable() {
21             @Override
22             public void run() {
23                 System.out.println(Thread.currentThread().getName()+":"+"锄禾日当午");
24             }
25         });
26
27         //让主线程休眠1秒钟,此时上述线程空闲,则不会在扩容,而用原来的线程
28         try {
29             Thread.sleep(1000);
30         } catch (InterruptedException e) {
31             e.printStackTrace();
32         }
33         service.execute(new Runnable() {
34             @Override
35             public void run() {
36                 System.out.println(Thread.currentThread().getName()+":"+"锄禾日当午");
37             }
38         });
39     }
40 }
2.定长线程池
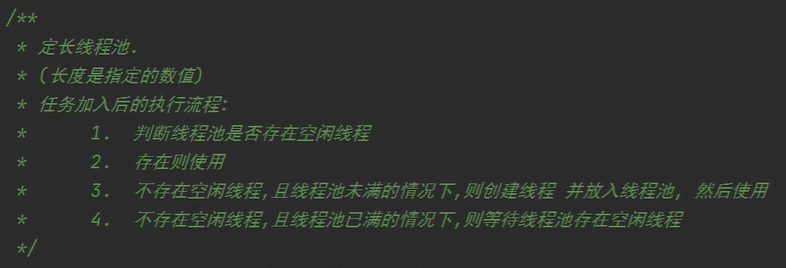
代码演示
 1 import java.util.concurrent.*;
 2
 3 public class Demo05 {
 4     public static void main(String[] args) {
 5         //1.创建线程池对象
 6         ExecutorService service = Executors.newFixedThreadPool(2);
 7         //2.向线程池中添加新的任务并且执行他
 8         service.execute(new Runnable() {
 9             @Override
10             public void run() {
11                 System.out.println(Thread.currentThread().getName()+":"+"锄禾日当午");
12                 try {
13                     Thread.sleep(3000);
14                 } catch (InterruptedException e) {
15                     e.printStackTrace();
16                 }
17             }
18         });
19         service.execute(new Runnable() {
20             @Override
21             public void run() {
22                 System.out.println(Thread.currentThread().getName()+":"+"锄禾日当午");
23                 try {
24                     Thread.sleep(3000);
25                 } catch (InterruptedException e) {
26                     e.printStackTrace();
27                 }
28             }
29         });
30         service.execute(new Runnable() {
31             @Override
32             public void run() {
33                 System.out.println(Thread.currentThread().getName()+":"+"锄禾日当午");
34             }
35         });
36
37         //让主线程休眠1秒钟,此时上述线程空闲,则不会在扩容,而用原来的线程
38         try {
39             Thread.sleep(1000);
40         } catch (InterruptedException e) {
41             e.printStackTrace();
42         }
43         service.execute(new Runnable() {
44             @Override
45             public void run() {
46                 System.out.println(Thread.currentThread().getName()+":"+"锄禾日当午");
47             }
48         });
49     }
50 }
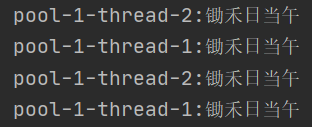
3.单线程线程池
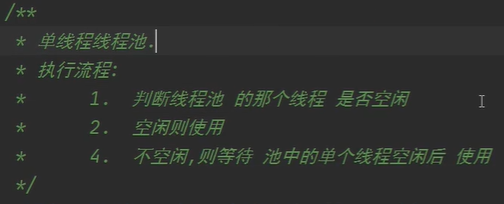
 1 import java.util.concurrent.*;
 2
 3 public class Demo05 {
 4     public static void main(String[] args) {
 5         //1.创建线程池对象
 6         ExecutorService service =Executors.newSingleThreadExecutor();
 7         //2.向线程池中添加新的任务并且执行他
 8         service.execute(new Runnable() {
 9             @Override
10             public void run() {
11                 System.out.println(Thread.currentThread().getName()+":"+"锄禾日当午");
12                 try {
13                     Thread.sleep(3000);
14                 } catch (InterruptedException e) {
15                     e.printStackTrace();
16                 }
17             }
18         });
19         service.execute(new Runnable() {
20             @Override
21             public void run() {
22                 System.out.println(Thread.currentThread().getName()+":"+"锄禾日当午");
23                 try {
24                     Thread.sleep(3000);
25                 } catch (InterruptedException e) {
26                     e.printStackTrace();
27                 }
28             }
29         });
30
31         //让主线程休眠1秒钟,此时上述线程空闲,则不会在扩容,而用原来的线程
32         try {
33             Thread.sleep(1000);
34         } catch (InterruptedException e) {
35             e.printStackTrace();
36         }
37         service.execute(new Runnable() {
38             @Override
39             public void run() {
40                 System.out.println(Thread.currentThread().getName()+":"+"锄禾日当午");
41             }
42         });
43     }
44 }

4.周期定长线程池

4.1)定时执行一次
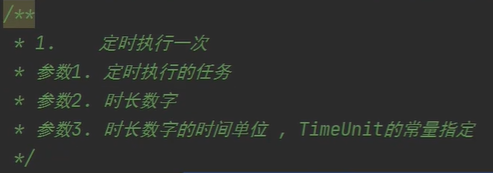
在5秒后会打印出 “锄禾日当午”
 1 import java.util.concurrent.*;
 2
 3 public class Demo05 {
 4     public static void main(String[] args) {
 5         ScheduledExecutorService service = Executors.newScheduledThreadPool(2);
 6         service.schedule(new Runnable() {
 7             @Override
 8             public void run() {
 9                 System.out.println("锄禾日当午");
10             }
11         },5,TimeUnit.SECONDS);
12     }
13 }
4.2)周期定长执行任务
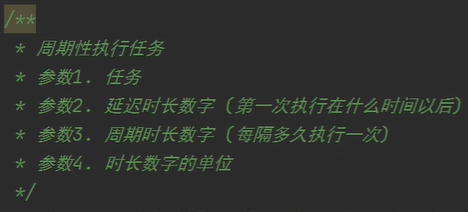
 1 import java.util.concurrent.*;
 2
 3 public class Demo05 {
 4     public static void main(String[] args) {
 5         ScheduledExecutorService service = Executors.newScheduledThreadPool(2);
 6         service.scheduleAtFixedRate(new Runnable() {
 7             @Override
 8             public void run() {
 9                 System.out.println("汗滴禾下土");
10             }
11         },5,2,TimeUnit.SECONDS);
12     }
13 }
1.函数式编程思想
2.格式:Thread t = new Thread((我是参数) ->{我是方法体});
3.仅用来实现接口,实现的接口中只能有一个方法
4.使用的原因:减少冗余
4.1)冗余代码一:
public class Demo05 { public static void main(String[] args) {
        Thread t = new Thread(new MyRunnable());
        t.start();
    }
    static class MyRunnable implements Runnable{
        @Override
        public void run() {
            System.out.println("谁知盘中餐");
        }
    }
}

4.2)冗余代码二:
public class Demo05 {
    public static void main(String[] args) {

        new Thread(new Runnable() {
            @Override
            public void run() {
                System.out.println("锄禾日当午");
            }
        }).start();
    }
}
采用Lamdba表达式:很简洁
public class Demo05 {
    public static void main(String[] args) {
        new Thread(() -> System.out.println("锄禾日当午")).start();
    }
}
5.代码实例:
 1 public class Demo05 {
 2     public static void main(String[] args) {
 3         //面向对象思想
 4 //        print(new Main() {
 5 //            @Override
 6 //            public int sum(int x, int y) {
 7 //                return x+y;
 8 //            }
 9 //        },100,200);
10         //  }
11
12         //Lambda表达式
13         print((int x,int y) ->{return x+y;},100,200);
14
15     }
16
17     public static void print(Main m,int x,int y){
18         int sum = m.sum(x, y);
19         System.out.println(sum);
20     }
21     static interface Main{
22         int sum(int x,int y);
23     }
24 }
原文:https://www.cnblogs.com/baiyangshu/p/14901242.html