const http = require(‘http‘);

// 创建server的两种方式
const server1 = http.createServer((req, res) => {
  res.end("Server1");
});

// server1.listen(8000, () => {
//   console.log("server1启动成功~");
// });

// const server2 = http.createServer((req, res) => {
//   res.end("Server2");
// });

// const server2 = new http.Server((req, res) => {
//   res.end("Server2");
// });

// server2.listen(8001, () => {
//   console.log("server2启动成功~");
// });


// 2.监听方法的使用
server1.listen(8000, () => {
  console.log("server1启动成功~");
  // console.log(server1.address().port);
});
Server通过listen方法来开启服务器,并且在某一个主机和端口上监听网络请求:
listen函数有三个参数:
回调函数:服务器启动成功时的回调函数;
const http = require(‘http‘);

//创建一个web服务器
const server = http.createServer((req, res) => {
  // request对象中封装了客户端给我们服务器传递过来的所有信息
  console.log(req.url);
  console.log(req.method);
  console.log(req.headers);

  res.end("hello")

});

// 启动服务器,并且制定端口号和主机
server.listen(8888, ‘0.0.0.0‘, () => {
  console.log("服务器启动成功~");
});
客户端在发送请求时,会请求不同的数据,那么会传入不同的请求地址:
服务器端需要根据不同的请求地址,作出不同的响应:
那么如果用户发送的地址中还携带一些额外的参数呢?
使用内置模块url, 对它进行解析
const { pathname, query } = url.parse(req.url);
但是 query 信息如何可以获取呢?
 const { pathname, query } = url.parse(req.url);
  if (pathname === ‘/login‘) {
    console.log(query);
    console.log(qs.parse(query));
    const { username, password } = qs.parse(query);
    console.log(username, password);
    res.end("请求结果~");
  }
const http = require(‘http‘);
const url = require(‘url‘);
const qs = require(‘querystring‘);

// 创建一个web服务器
const server = http.createServer((req, res) => {

  const { pathname } = url.parse(req.url);
  if (pathname === ‘/login‘) {
    if (req.method === ‘POST‘) {
      // 拿到body中的数据
      req.setEncoding(‘utf-8‘);
      req.on(‘data‘, (data) => {
        const {username, password} = JSON.parse(data);
        console.log(username, password);
      });

      res.end("Hello World");
    }
  }
});

server.listen(8888, ‘0.0.0.0‘, () => {
  console.log("服务器启动成功~");
});
{
  ‘content-type‘: ‘application/json‘,
  ‘user-agent‘: ‘PostmanRuntime/7.28.0‘,
  accept: ‘*/*‘,
  ‘postman-token‘: ‘3e732a1a-82de-44b1-93a8-bd0c265aa17a‘,
  host: ‘localhost:8888‘,
  ‘accept-encoding‘: ‘gzip, deflate, br‘,
  connection: ‘keep-alive‘,
  ‘content-length‘: ‘46‘
}
content-type是这次请求携带的数据的类型:
content-length:文件的大小和长度
keep-alive:
accept-encoding:告知服务器,客户端支持的文件压缩格式,比如js文件可以使用gzip编码,对应 .gz文件;
accept:告知服务器,客户端可接受文件的格式类型;
user-agent:客户端相关的信息;
如果我们希望给客户端响应的结果数据,可以通过两种方式:
  res.write("响应结果一");
  res.end("Hello World");
如果我们没有调用 end和close,客户端将会一直等待结果:

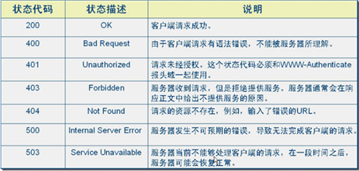
  // 设置状态码
  // 方式一: 直接给属性赋值
  // res.statusCode = 400;
  // 方式二: 和Head一起设置
  res.writeHead(503)
const http = require(‘http‘);

// 创建一个web服务器
const server = http.createServer((req, res) => {

  // 设置响应的header
  // 设置方式一:
  // res.setHeader("Content-Type", "text/plain;charset=utf8");

  // 设置方式二
  res.writeHead(200, {
    "Content-Type": "text/html;charset=utf8"
  });

  // 响应结果
  res.end("<h2>Hello Server</h2>");
});

// 启动服务器,并且制定端口号和主机
server.listen(8888, ‘0.0.0.0‘, () => {
  console.log("服务器启动成功~");
});

const http = require(‘http‘);

// http发送get请求
// http.get(‘http://localhost:8888‘, (res) => {
//   res.on(‘data‘, (data) => {
//     console.log(data.toString());
//   });

//   res.on(‘end‘, () => {
//     console.log("获取到了所有的结果");
//   })
// })

// http发送post请求
const req = http.request({
  method: ‘POST‘,
  hostname: ‘localhost‘,
  port: 8888
}, (res) => {
  res.on(‘data‘, (data) => {
    console.log(data.toString());
  });

  res.on(‘end‘, () => {
    console.log("获取到了所有的结果");
  })
});

req.end();
原文:https://www.cnblogs.com/107w/p/14901788.html