之所以使用Jedis,是因为它操作redis时使用的方法名与redis命令一致。
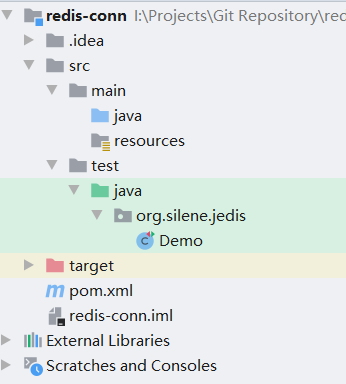
新建一个maven项目,项目结构如下:

<dependencies>
    <!-- https://mvnrepository.com/artifact/redis.clients/jedis -->
    <dependency>
        <groupId>redis.clients</groupId>
        <artifactId>jedis</artifactId>
        <version>2.9.0</version>
    </dependency>

    <!-- https://mvnrepository.com/artifact/org.projectlombok/lombok -->
    <dependency>
        <groupId>org.projectlombok</groupId>
        <artifactId>lombok</artifactId>
        <version>1.18.12</version>
        <scope>provided</scope>
    </dependency>

    <!-- https://mvnrepository.com/artifact/junit/junit -->
    <dependency>
        <groupId>junit</groupId>
        <artifactId>junit</artifactId>
        <version>4.12</version>
        <scope>test</scope>
    </dependency>

</dependencies>
public class Demo {

    @Test
    public void set() {
        // 开启连接
        Jedis jedis = new Jedis("127.0.0.1", 6379);
        // 执行操作
        jedis.set("name", "李四");
        // 关闭连接
        jedis.close();
    }

    @Test
    public void get() {
        Jedis jedis = new Jedis("127.0.0.1", 6379);
        String name = jedis.get("name");
        System.out.println(name);
        jedis.close();
    }
}
程序运行结果过:

使用RDM查看:

想将一个对象存储到redis中,需要先将其转化为字节数组或者json字符串。
<!-- 对象序列化工具 -->
<dependency>
    <groupId>org.springframework</groupId>
    <artifactId>spring-context</artifactId>
    <version>5.3.3</version>
</dependency>

<!-- fastjson -->
<dependency>
    <groupId>com.alibaba</groupId>
    <artifactId>fastjson</artifactId>
    <version>1.2.62</version>
</dependency>
@Data
@NoArgsConstructor
@AllArgsConstructor
public class Person {

    private String name;
    private int age;
    private char sex;
    private Date birthday;

}
@Test
public void setObjByByte() {
    Jedis jedis = new Jedis("127.0.0.1", 6379);

    String key = "zhangsan";
    Person person = new Person("张三", 13, ‘1‘, new Date());

    byte[] keyBytes = key.getBytes();
    byte[] personBytes = SerializationUtils.serialize(person);

    jedis.set(keyBytes, personBytes);
    jedis.close();
}

@Test
public void getObjByByte() {
    Jedis jedis = new Jedis("127.0.0.1", 6379);

    String key = "zhangsan";
    byte[] keyBytes = key.getBytes();
    byte[] bytes = jedis.get(keyBytes);

    Person person = (Person) SerializationUtils.deserialize(bytes);
    System.out.println(person);
    jedis.close();
}


@Test
public void getObjByByte() {
    Jedis jedis = new Jedis("127.0.0.1", 6379);

    String key = "zhangsan";
    byte[] keyBytes = key.getBytes();
    byte[] bytes = jedis.get(keyBytes);

    Person person = (Person) SerializationUtils.deserialize(bytes);
    System.out.println(person);
    jedis.close();
}

@Test
public void setObjByJson() {
    Jedis jedis = new Jedis("127.0.0.1", 6379);

    String key = "zhangsan";
    Person person = new Person("张三", 13, ‘1‘, new Date());

    jedis.set(key, JSON.toJSONString(person));

    jedis.close();
}

@Test
public void getObjByJson() {
    Jedis jedis = new Jedis("127.0.0.1", 6379);

    String key = "zhangsan";
    String person = jedis.get(key);

    System.out.println(person);
    jedis.close();
}


Jedis默认连接池配置如下:
public class GenericObjectPoolConfig extends BaseObjectPoolConfig {
    public static final int DEFAULT_MAX_TOTAL = 8;
    public static final int DEFAULT_MAX_IDLE = 8;
    public static final int DEFAULT_MIN_IDLE = 0;
    private int maxTotal = 8;
    private int maxIdle = 8;
    private int minIdle = 0;

    ...
}
@Test
public void testPool1() {
    // 默认配置连接池
    JedisPool pool = new JedisPool("127.0.0.1", 6379);

    // 获取Jedis连接资源
    Jedis jedis = pool.getResource();

    // 执行操作
    String key = "zhangsan";
    String person = jedis.get(key);
    System.out.println(person);

    //关闭连接
    jedis.close();
}
@Test
public void testPool2() {
    GenericObjectPoolConfig poolConfig = new GenericObjectPoolConfig();
    poolConfig.setMaxTotal(100); //连接池容量
    poolConfig.setMaxIdle(10); //最大空闲连接数
    poolConfig.setMinIdle(0); //最小空闲连接数
    poolConfig.setMaxWaitMillis(2000); //最大超时等待时间,当连接池空闲数为0时,程序等待的最大时间。 单位 ms

    JedisPool pool = new JedisPool(poolConfig, "127.0.0.1", 6379);

    Jedis jedis = pool.getResource();

    String key = "zhangsan";
    String person = jedis.get(key);

    System.out.println(person);

    jedis.close();
}
当客户端有大量重复命令提交到服务器时,为了提升执行效率,Redis提供了管道的操作方式。
具体使用方法及管道使用前后对比如下:
@Test
public void testPipe() {
    GenericObjectPoolConfig poolConfig = new GenericObjectPoolConfig();
    poolConfig.setMaxTotal(100);
    poolConfig.setMaxIdle(10);
    poolConfig.setMinIdle(0);
    poolConfig.setMaxWaitMillis(2000);
    JedisPool pool = new JedisPool(poolConfig, "127.0.0.1", 6379);

    Jedis jedis = pool.getResource();

    // 获取管道
    Pipeline pipeline = jedis.pipelined();

    // 程序开始执行时间戳
    long begin = System.currentTimeMillis();
    // 不使用管道,执行自增10万次自增
    for (int i = 0; i < 100000; i++) {
        jedis.incr("sth");
    }
    long end = System.currentTimeMillis();
    System.out.println("without pipe: " + (end - begin));

    // 程序开始执行时间戳
    long begin1 = System.currentTimeMillis();
    // 使用管道,执行自增10万此
    for (int i = 0; i < 100000; i++) {
        pipeline.incr("foo");
    }
    long end1 = System.currentTimeMillis();
    System.out.println(end1 - begin1);

    jedis.close();

}
程序耗时对比:

原文:https://www.cnblogs.com/wind-ranger/p/14920169.html