1、创建一个react项目
npx create-react-app react-graphql --template typescript
2、根据文档在react中配置Graphql的环境,链接地址
安装依赖包
npm install @apollo/client graphql
在index.ts中配置连接graphql的后端地址
import { ApolloClient, InMemoryCache } from ‘@apollo/client‘;

const client = new ApolloClient({
  uri: ‘http://localhost:7001/graphql‘,
  cache: new InMemoryCache()
});
在index.ts文件中将apollo与react相连接起来
import { ApolloProvider } from ‘@apollo/client/react‘;

import React from ‘react‘;
import ReactDOM from ‘react-dom‘;
import App from ‘./App‘;
import { ApolloClient, InMemoryCache } from ‘@apollo/client‘;
import { ApolloProvider } from ‘@apollo/client/react‘;

const client = new ApolloClient({
  uri: ‘http://localhost:7001/graphql‘,
  // 在这里配置请求头了
  headers: {
    token: storage.getItem(authToken),
  },
  cache: new InMemoryCache()
});

ReactDOM.render(
  <React.StrictMode>
    <ApolloProvider client={client}>
      <App />
    </ApolloProvider>
  </React.StrictMode>,
  document.getElementById(‘root‘)
);
运行项目看是否正常
3、测试是否可以查询数据出来
import React from ‘react‘;
import { useQuery, gql } from ‘@apollo/client‘;

const AccountListGql = gql`
  query AccountList { # 定义查询方法(浏览器上显示的)
    accountList { # 定义与后端对接的方法名
      id
      username
      password
    }
  }
`;

export const Page1: React.FC = () => {
  const { loading, error, data } = useQuery(AccountListGql);
  console.log(loading);
  console.log(error);
  console.log(data);
  return <div>测试查询数据</div>
}
1、简单的查询,上面使用useQuery就可以实现
2、需要传递参数的查询
import React from ‘react‘;
import { gql, useQuery } from ‘@apollo/client‘;

const AccountGql = gql`
  query Account($id: ID!) {
    account(id: $id) {
      id
      username
      password
    }
  }
`;
export const Page2: React.FC = () => {
  const {  data } = useQuery(AccountGql, {
    variables: {
      id: 1
    }
  });
  console.log(data, ‘查询结果‘);
  return <div>根据条件来查询</div>
}
3、点击按钮才触发请求
import React from ‘react‘
import { gql, useLazyQuery } from ‘@apollo/client‘;

const AccountListGql = gql`
  query AccountList { # 定义查询方法(浏览器上显示的)
    accountList { # 定义与后端对接的方法名
      id
      username
      password
    }
  }
`;

export const Page3: React.FC = () => {
  const [getAccount, { loading, data }] = useLazyQuery(AccountListGql);
  if (loading) return null;
  console.log(data, ‘请求回来的数据‘);
  return (
    <div>
      点击按钮请求数据
      <button onClick={() => getAccount()}>点击按钮</button>
    </div>
  )
}
4、点击按钮触发,需要传递参数进去
const AccountGql = gql`
  query Account($id: ID!) {
    account(id: $id) {
      id
      username
      password
    }
  }
`;

export const Page3: React.FC = () => {
  const [getAccount, { loading: loading2, data: account }] = useLazyQuery(AccountGql);
  console.log(account, ‘根据条件返回的数据‘);
  return (
    <div>
      点击按钮请求数据
      <button onClick={() => getAccount({variables: {id:2}})}>传递参数按钮</button>
    </div>
  )
}
5、关于更多的使用请参考文档文档地址
1、文档地址
2、添加数据的操作
import React from ‘react‘;
import {gql, useMutation} from ‘@apollo/client‘;

const AddAccountGql = gql`
  mutation AddAccount($username: String!, $password: String!) {
    createAccount(username: $username, password: $password) {
      code
      message
    }
  }
`;

export const Page4: React.FC = () => {
  const [addTodo, { data }] = useMutation(AddAccountGql);
  console.log(data, ‘创建结果‘);
  const addAccountHandle = () => {
    addTodo({
      variables: {
        username: ‘王五‘,
        password: ‘123456‘,
      }
    })
  };
  return (
    <div>
      <h3>添加数据</h3>
      <button onClick={addAccountHandle}>添加数据</button>
    </div>
  )
}
上面的配置仅仅的对于简单的业务可以满足,如果你要对文件的上传操作上面的配置是不行的,下面介绍在graphql中上传文件的方式
1、安装依赖包
npm install apollo-upload-client@14.1
npm install @types/apollo-upload-client -D
2、修改graphql的配置项,必须要这样配置
import { createUploadLink } from ‘apollo-upload-client‘;
...
const client = new ApolloClient({
  // uri: ‘http://localhost:7001/graphql‘,
  link: {
    uri: ‘http://localhost:7000/graphql‘,
    // 在这里配置请求头了
    headers: {
      token: storage.getItem(authToken),
    },
  },
  cache: new InMemoryCache()
});
3、在react中使用文件上传,这里使用自定义按钮来上传,因为html中自带的上传文件样式太丑了
import { useMutation, gql, useQuery } from ‘@apollo/client‘;

// 上传文件的gql
const fileUploadGql = gql`
  mutation FileUpload($file: Upload!) {
    fileUpload(file: $file)
  }
`;
// 省去100行代码
...
const [uploadFileApi, { data: uploadResult, error: uploadError }] = useMutation(fileUploadGql);
...
// 省去100行代码

const uploadHandler = () => {
  const fileNode: HTMLElement = document.getElementById(‘file‘) as HTMLElement;
  fileNode.click();
  fileNode.addEventListener<‘change‘>(
    ‘change‘,
    function ({
      target: {
        validity,
        files: [file],
      },
    }: // eslint-disable-next-line
               any) {
      setIsShowFile(false);
      validity.valid && uploadFileApi({ variables: { file } });
      setTimeout(() => {
        setIsShowFile(true);
      });
    }
  );
};

// 省去100行代码
{isShowFile && <input type="file" id="file" style={{ display: ‘none‘ }} />}
{imgUrl && (
  <img src={imgUrl}  style={{ width: 100, height: 100, marginBottom: 10 }} />
)}
<div>
  <Button type="primary" onClick={uploadHandler}>上传封面图</Button>
</div>
一般我们使用restfull api的时候会对axios二次封装,在里面统一处理错误,比如token失效的时候你要重定向到登录页面,上面介绍的方法中我们仅仅是使用apollo打通了前后接口,数据能增删改查,也能上传文件了,如果你的业务中没有登录的限制这里也可以不用关心了。但是作为有追求的码农,总要彻底的掌握一门技术,下面介绍如何对apollo二次简单封装,来处理错误
1、在utils/initApollo.ts中对apollo简单的封装
import {
  ApolloClient,
  ApolloLink,
  from as fromLinks,
  InMemoryCache,
  NormalizedCacheObject,
  QueryOptions,
  WatchQueryOptions,
} from ‘@apollo/client‘;
import { onError } from ‘@apollo/client/link/error‘;
import { createUploadLink } from ‘apollo-upload-client‘;
import { authToken } from ‘src/config‘;
import { storage } from ‘./storage‘;

let apolloClient: ApolloClient<NormalizedCacheObject> | null = null;

const defaultOptions = {
  watchQuery: {
    fetchPolicy: ‘no-cache‘,
    errorPolicy: ‘ignore‘,
  } as WatchQueryOptions,
  query: {
    fetchPolicy: ‘no-cache‘,
    errorPolicy: ‘all‘,
  } as QueryOptions,
};

function create(): ApolloClient<NormalizedCacheObject> {
  const httpLink = createUploadLink({
    uri: ‘http://localhost:7000/graphql‘,
    headers: {
      token: storage.getItem(authToken),
    },
  });
  const authMiddleware = new ApolloLink((operation, forward) => {
    const token = storage.getItem(authToken);
    if (token) {
      operation.setContext({
        headers: {
          token,
        },
      });
    }
    return forward(operation);
  });
  // 处理错误的时候
  const errorLink = onError(({ graphQLErrors, networkError }) => {
    console.log(graphQLErrors, ‘错误‘);
    if (graphQLErrors) {
      graphQLErrors.map(({ message, locations, path }) => {
        // 根据错误处理业务,省去100行代码
        console.log(`[GraphQL error]: Message: ${message}, Location: ${locations}, Path: ${path}`);
        return false;
      });
    }
    if (networkError) {
      console.log(`[Network error]: ${networkError}`);
    }
  });
  return new ApolloClient({
    // errorLink 应在 httpLink 前
    link: fromLinks([errorLink, authMiddleware, httpLink]),
    cache: new InMemoryCache(),
    defaultOptions,
    connectToDevTools: true,
  });
}

export const initApollo = (): ApolloClient<NormalizedCacheObject> => {
  if (!apolloClient) {
    apolloClient = create();
  }
  return apolloClient;
};
2、在react的入口文件中使用
import { initApollo } from ‘./utils‘;

const client = new ApolloClient(initApollo());

ReactDOM.render(
  <ApolloProvider client={client}>
  	<Router />
  </ApolloProvider>,
  document.getElementById(‘root‘)
);
1、参考文档
2、安装依赖包
npm install --save graphql
npm install --save-dev @graphql-codegen/cli
3、初始化,直接选择默认和Y就可以
npx graphql-codegen init
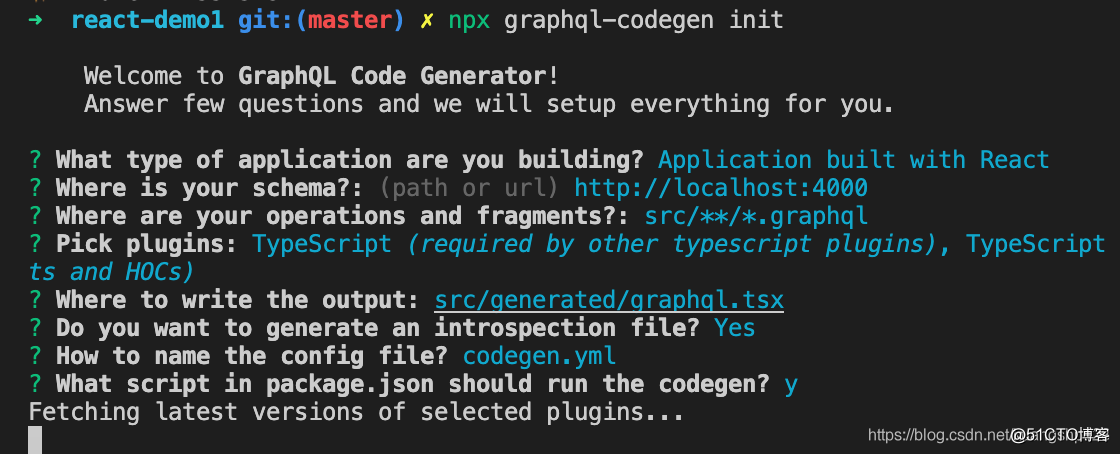
4、默认生成的codegen.yml文件修改如下
overwrite: true
schema: "http://localhost:7000/graphql" # 根据自己后端服务器地址来写,
# schema: "./schema.graphql" # 将后端的schema拷贝到前端项目中
documents: "src/**/*.graphql" # 表示会去查找graphql结尾的文件
generates:
  src/generated/graphql.ts:
    plugins:
      - "typescript"
      - "typescript-operations"
      - "typescript-react-apollo"
5、我们在src文件夹下创建一个graphql的文件夹,创建两个login.graphql和register.graphql文件
# login.graphql文件内容
query Login($username: String!, $password: String!) {
  # 定义查询方法(浏览器上显示的)
  login(data: { username: $username, password: $password }) {
    id
    username
    token
  }
}
# register.graphql文件内容
mutation registerUser($username: String!, $password: String!, $confirmPassword: String!) {
  register(data: { username: $username, password: $password, confirmPassword: $confirmPassword })
}
6、运行安装依赖包
使用命令npx graphql-codegen init初始化的时候,并不会帮我们安装依赖包的,只是会添加依赖包到package.json中
7、运行命令生成对应的hooks,注意这个要看自己根据第三小点生成的命令来运行,或者自己配置的命令
npm run codegen
8、在生成的src/generated/graphql.ts文件中最底部可以查看到生成了登录和注册的hooks,因为我们只写了这两个接口的graphql文件
9、在App.tsx组件中调用
import React, { useEffect } from ‘react‘;
import { useLoginLazyQuery, useRegisterUserMutation } from ‘./generated/graphql‘;

function App(): React.ReactElement {
  const [loginApi, { data: loginResult }] = useLoginLazyQuery();
  const [registerApi] = useRegisterUserMutation();
  const loginHandler = () => {
    loginApi({ variables: { username: ‘admin‘, password: ‘123456‘ } });
  };
  const registerHandler = async () => {
    const result = await registerApi({ variables: { username: ‘test1‘, password: ‘123456‘, confirmPassword: ‘123456‘ } });
    console.log(result, ‘注册结果‘);
  };
  useEffect(() => {
    if (loginResult) {
      console.log(‘登录信息‘, loginResult);
    }
  }, [loginResult]);
  return (
    <div className=‘App‘>
      <button onClick={loginHandler}>登录</button>
      <button onClick={registerHandler}>注册</button>
    </div>
  );
}

export default App;
原文:https://blog.51cto.com/u_3409716/2952051