将整个应用程序划分为三层架构:
表现层(UI):MVC就在这一层,包括View、Model、Controller
业务逻辑层(Service)
数据持久化层(DAO)
@Controller:定义一个控制器类,检测其中的方法是否使用@RequestMapping,不能返回json数据。必须要同时使用@RequestBody
@RestController:等价于@Controller+@RequestBody的功能,用来标注Rest风格的控制器类,接口数据会被反序列化为JSON
@RequestMapping:处理地址映射。用在类上表示类中的所有响应请求的方法都以该地址为父路径
该注解可以指定的属性:
value:请求的地址
method:GET, HEAD, POST, PUT, PATCH, DELETE, OPTIONS, TRACE
有简写:
@GetMapping("/"),等价于@RequestMapping(value="/", method=RequestMethod.GET);
@PostMapping
@DeleteMapping
@PutMapping
consumes:消费信息,指定处理请求的提交内容类型(content-type),例如application/json, text/html
pc端网页常用text/html格式
手机app采用JSON格式
produces:生产消息,指定返回的内容类型。
params:指定requests中必须包含某些参数值才让该方法处理请求;
headers:指定request中必须包含某些指定的header值才处理请求
该注解可以对类或者对方法使用:
 1 @RestController
 2 @RequestMapping("news")
 3 Public class NewsController{
 4   //get
 5   @RequestMapping(value="/",method=RequestMethod.GET)
 6   public void add() {}
 7
 8   //post
 9   @RequestMapping(value="/",method=RequestMethod.POST)
10   public void save(){}
11 }
12
13 //使用以上代码,get和post方式访问add或者save方法的路径都是http://localhost:8080/news/
14 //虽然路径一样但http方法不一样,所以不冲突。
4. @pathvariable:将请求url中的变量映射到参数上。
1 @RequestMapping(value="/product/{id}",method=RequestMethod.GET)
2 public String getProduct(@PathVariable("id") String id){
3     //用这个注解把url中的id拿到
4   Product product=productRepository.findById(id);
5   return "product/show";
6 }
1. GET
1 @GetMapping("/{id}")
2 public ModelAndView getArticle(@PathVariable("id") Integer id) throws Exception{
3   Article article=articleRepository.findById(id);
4   ModelAndView mav=new ModelaAndView("article/show");
5   mav.addObject("article",articles);
6   return mav;
7 }
其他HTTP方法都有类似的Mapping操作
使用@PathVariable 注解,对于/{id}形式的url可以获取;
写入方法的形参中,对于参数以=出现在url中的情况:
1 @RequestMapping("/addUser")
2 public String addUser(String username){
3   //...
4 }
5 //可以获取url参数如:
6 //http://localhost:8080/user/?username=xxxx
3. Bean
1 public String addUser(userModel user)
@ModelAttribute
HttpServletRequest
@RequestParam
@ResponseBody接收JSON数据
MultipartFile
数据库表对应的实体类,暂时将数据存储在内存中等待持久化。实体Bean
1 @Getter
2 @Setter
3 public class User{
4   private long id;
5   private String name;
6 }
7 //使用@Getter和@Setter注解会自动生成get和set方法
|
动作 |
普通CRUD的URL |
普通CRUD的HTTP方法 |
Restful的URL |
Restful的CRUD的http方法 |
|---|---|---|---|---|
|
查询 |
Article/id=1 |
GET |
Article/{id} |
GET |
|
添加 |
Article/title=xxx&body=xxx |
GET/POST |
Article |
POST |
|
修改 |
Article/update?id=xxx |
GET |
Article/{id} |
PUT/PATCH |
|
删除 |
Article/delete?id=xxx |
GET |
Article{id} |
DELETE |
如果发现找不到常用的@RestController等注解,(例如从官网下载项目包),可以修改pom.xml中的脚手架org.spring-framework.boot-web,然后刷新maven重试。
可以展示api
1. 在pom.xml中添加依赖
 1 <!--file:pom.xml-->
 2 <!--Swagger依赖-->
 3         <dependency>
 4             <groupId>io.springfox</groupId>
 5             <artifactId>springfox-swagger2</artifactId>
 6             <version>2.9.2</version>
 7         </dependency>
 8         <!--Swagger-UI依赖 -->
 9         <dependency>
10             <groupId>io.springfox</groupId>
11             <artifactId>springfox-swagger-ui</artifactId>
12             <version>2.9.2</version>
13         </dependency>
2. swagger配置编写
 1 //file:config/SwaggerConfig
 2 /**
 3  * Swagger 配置文件
 4  */
 5 @Configuration
 6 public class SwaggerConfig {
 7     @Bean
 8     public Docket createRestApi() {
 9         return new Docket(DocumentationType.SWAGGER_2)
10                 .apiInfo(apiInfo())
11                 .select()
12                 .apis(RequestHandlerSelectors.basePackage("com.example.demo.controller"))
13
14                 .paths(PathSelectors.any())
15                 .build();
16     }
17
18     private ApiInfo apiInfo() {
19         return new ApiInfoBuilder()
20                 .title(" RESTful APIs")
21                 .description("RESTful APIs")
22                 .termsOfServiceUrl("http://localhost:8080/")
23                 .contact("long")
24                 .version("1.0")
25                 .build();
26     }
27 }
3. 更新启动类配置,加上注解@EnableSwagger2
什么是 MyBatis ?
Apahce的?个开源项?
一款优秀的持久层框架,它?持?定义 SQL、存储过程以及高级映射,免除了几乎所有的 JDBC 代码以及设置参数和获取结果集的?作,通过简单的 XML 或注解来配置和映射 Java对象到数据库中的记录
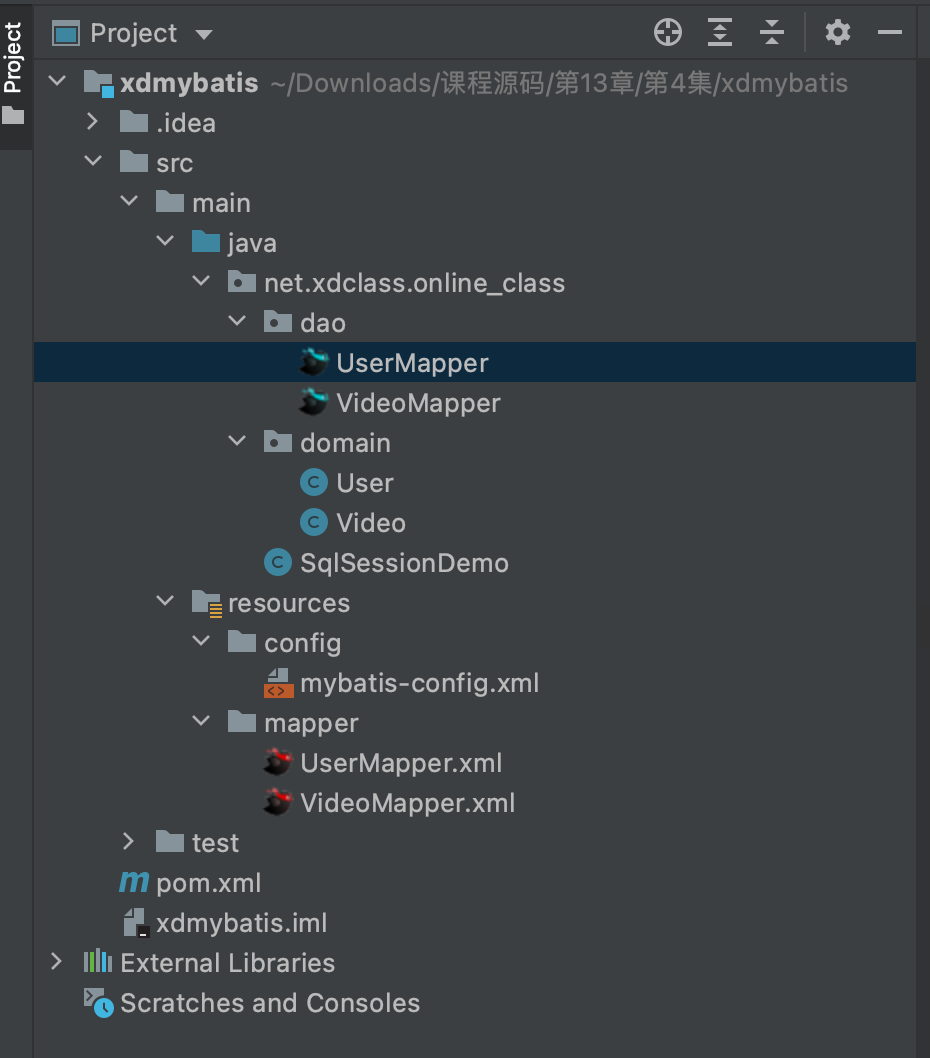
新建?个测试的maven项?,依赖地址 https://mvnrepository.com/artifact/org.mybatis/mybatis/3.5.4
每个基于 MyBatis 的应用都是以?个SqlSessionFactory的实例为核?
SqlSessionFactory 的实例可以通过 SqlSessionFactoryBuilder 获得
SqlSessionFactoryBuilder 可以从 XML 配置文件或一个预先配置的 Configuration 实例来构建出 SqlSessionFactory 实例
?厂设计模式?面需要获取SqlSession ,?面提供了在数据库执? SQL 命令所需的所有?法

 1 //net.xdclass.online_class.dao.VideoMapper
 2 package net.xdclass.online_class.dao;
 3
 4 import net.xdclass.online_class.domain.Video;
 5 import org.apache.ibatis.annotations.Param;
 6
 7 public interface VideoMapper {
 8     /**
 9      * 根据视频id查找视频对象
10      * @param videoId
11      * @return
12      */
13     Video selectById(@Param("video_id") int videoId);
14 }
 1 <!--
 2   resources/mapper/VideomMapper.xml
 3   -->
 4 <?xml version="1.0" encoding="UTF-8" ?>
 5 <!DOCTYPE mapper
 6         PUBLIC "-//mybatis.org//DTD Mapper 3.0//EN"
 7         "http://mybatis.org/dtd/mybatis-3-mapper.dtd">
 8 <!--
 9 namespace: 名称空间,一般需要保持全局唯一, 最好是和dao层的java接口一致,
10 可以映射 sql语句 到对应的方法名称和参数、返回类型
11 mybatis是使用接口动态代理
12 -->
13 <mapper namespace="net.xdclass.online_class.dao.VideoMapper">
14     <!--
15     statement sql
16     id: 当前mapper下需要唯一
17     resultType : sql查询结果集的封装
18     -->
19     <select id="selectById" resultType="net.xdclass.online_class.domain.Video">
20         select * from video where id = #{video_id}
21     </select>
22 </mapper>
 1 public class SqlSessionDemo {
 2     public static void main(String [] args) throws IOException {
 3         String resouce = "config/mybatis-config.xml";
 4         //读取配置文件
 5         InputStream inputStream =  Resources.getResourceAsStream(resouce);
 6
 7         //构建Session工厂
 8         SqlSessionFactory sqlSessionFactory = new SqlSessionFactoryBuilder().build(inputStream);
 9
10         //获取Session,jdk8语法
11         try(SqlSession sqlSession = sqlSessionFactory.openSession()){
12             VideoMapper videoMapper = sqlSession.getMapper(VideoMapper.class);
13             Video video = videoMapper.selectById(44);
14             //System.out.println(video.toString());
15
16             //通过注解
17             //List<Video> videoList =  videoMapper.selectList();
18
19             List<Video> videoList = videoMapper.selectListByXML();
20             System.out.println(videoList.toString());
21         }
22     }
23 }
to be continued~
原文:https://www.cnblogs.com/gurui2333/p/15001457.html