在微信小程序中,插槽的使用可以使组件更加灵活,通用性更强
1.创建一个组件,在组件的JS中声明启用多插槽模式,因为在默认情况下,一个组件的 wxml 中只能有一个 slot
Component({
  options: {
    multipleSlots: true // 在组件定义时的选项中启用多slot支持
  },
  properties: {

 },
  methods: {

  }
})
2.在组件的 wxml 中使用多个 slot ,以不同的 name 来区分
<!-- 组件模板 -->
<view class="wrapper">
  <slot name="before"></slot>
  <view>这里是组件的内部细节</view>
  <slot name="after"></slot>
</view>
3.在需要的页面上使用组件
<!-- 引用组件的页面模板 -->
<view>
  <component-tag-name>
    <!-- 这部分内容将被放置在组件 <slot name="before"> 的位置上 -->
    <view slot="before">这里是插入到组件slot name="before"中的内容</view>
    <!-- 这部分内容将被放置在组件 <slot name="after"> 的位置上 -->
    <view slot="after">这里是插入到组件slot name="after"中的内容</view>
  </component-tag-name>
</view>
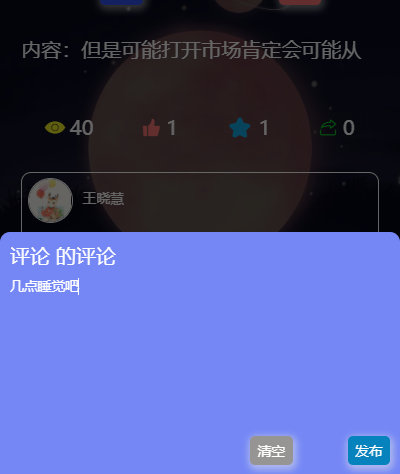
4.实例 自定了一个弹框的组件,具体代码如下所示:
4.1 组件的JS文件
 1 // components/popModal/index.js
 2 Component({
 3   /**
 4    * 组件的属性列表
 5    */
 6   options: {
 7     multipleSlots: true  //插槽
 8   },
 9   properties: {
10     animationData: {
11       type : Object,
12       value : {}
13     }
14   },
15
16   /**
17    * 组件的初始数据
18    */
19   data: {
20     height : wx.getSystemInfoSync().windowHeight,
21     show : false,
22   },
23
24   /**
25    * 组件的方法列表
26    */
27   methods: {
28     closeModal(){
29       this.setData({
30         show : false,
31         animationData : {}
32       })
33     },
34     showModal(){
35       this.setData({
36         show : true
37       })
38     },
39   }
40 })
4.2 组件的Wxml文件
 1 <view class="toast-modal-box" wx:if="{{show}}">
 2   <view class="toast-modal-bg" style="height:{{height}}px;" bindtap="closeModal"></view>
 3   <view class="toast-modal-container" animation="{{animationData}}">
 4     <!-- 具名插槽 -->
 5     <slot name="header"></slot>
 6     <slot name="body"></slot>
 7     <!-- 匿名插槽 -->
 8     <slot></slot>
 9   </view>
10 </view>
4.3 在需要的页面json中注册组件
1 {
2   "usingComponents": {
3     "popModal" : "/components/popModal/index"
4   }
5 }
4.4 在需要的页面中使用组件
 1 <!-- 弹出框 -->
 2 <popModal id="showModal" animationData="{{animationData}}">
 3   <view slot="header" class="color-ff">评论 <text class="read-btn">{{userName}}</text> 的评论</view>
 4   <view slot="body" class="color-ff">
 5     <textarea class="mt20 font28" placeholder="请输入你的评论~" value="{{reply}}" bindinput="toReply"></textarea>
 6   </view>
 7   <view class="bottom-btn-box flex3 color-ff">
 8     <view class="active_t bottom-btn clear" bindtap="clearReply">清空</view>
 9     <view class="active_t bottom-btn submit" bindtap="commitReply">发布</view>
10   </view>
11 </popModal>
4.5 最终效果预览

原文:https://www.cnblogs.com/wxhcode/p/15069807.html