?
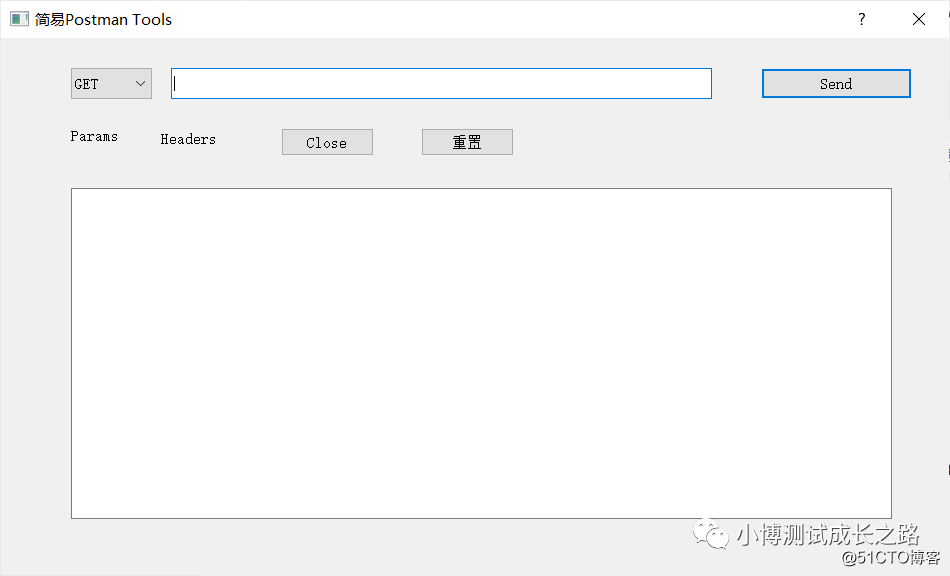
在掌握了以上4篇文章的内容后,我们可以画出一个简易的postman工具的页面,如下图所示:
接下来,我们就实现send按钮发送请求的功能:
要实现这个功能,主要需要了解以下几点:
1、下拉框如何获取选中的值
获取ComboBox索引和选中的文本值,索引从0开始
ComboBox.currentIndex(), ComboBox.currentText()
2、文本框如果获取选中的值
QLineEdit.text()
3、按钮怎么绑定事件
QPushButton.clicked.connect(方法名)
4、怎么将某个文本显示到某个控件上
控件名.append("文本")
完整的代码如下:
import sys, requests
from PySide2.QtCore import QFile
from PySide2.QtUiTools import QUiLoader
from PySide2.QtWidgets import QApplication


# 1、创建一个应用程序
app = QApplication(sys.argv)


# 2、打开.ui文件
qFile = QFile(‘postman.ui‘)
qFile.open(QFile.ReadOnly) # 只读方式


# 3、加载文件,生成一个页面对象
ui = QUiLoader().load(qFile)
qFile.close()


# 做一些逻辑处理
def click_send_btn():
    method =ui.method_comboBox.currentText().lower()
    url = ui.url_text.text()
    res = requests.request(method=method, url=url).text
    ui.res_textEdit.append(res)
    print(method, url)


def click_exit_btn():
    ui.close()


ui.send_btn.clicked.connect(click_send_btn)
ui.close_btn.clicked.connect(click_exit_btn)


# 4、显示应用程序
ui.show()
app.exec_()
页面UI设计文件源码如下:
<?xml version="1.0" encoding="UTF-8"?>
<ui version="4.0">
 <class>PostmanTools</class>
 <widget class="QDialog" name="PostmanTools">
  <property name="geometry">
   <rect>
    <x>0</x>
    <y>0</y>
    <width>948</width>
    <height>537</height>
   </rect>
  </property>
  <property name="windowTitle">
   <string>简易Postman Tools</string>
  </property>
  <widget class="QComboBox" name="method_comboBox">
   <property name="geometry">
    <rect>
     <x>70</x>
     <y>30</y>
     <width>81</width>
     <height>31</height>
    </rect>
   </property>
   <item>
    <property name="text">
     <string>GET</string>
    </property>
   </item>
   <item>
    <property name="text">
     <string>POST</string>
    </property>
   </item>
  </widget>
  <widget class="QLineEdit" name="url_text">
   <property name="geometry">
    <rect>
     <x>170</x>
     <y>30</y>
     <width>541</width>
     <height>31</height>
    </rect>
   </property>
  </widget>
  <widget class="QPushButton" name="send_btn">
   <property name="geometry">
    <rect>
     <x>760</x>
     <y>30</y>
     <width>151</width>
     <height>31</height>
    </rect>
   </property>
   <property name="text">
    <string>Send</string>
   </property>
  </widget>
  <widget class="QLabel" name="label">
   <property name="geometry">
    <rect>
     <x>70</x>
     <y>90</y>
     <width>72</width>
     <height>15</height>
    </rect>
   </property>
   <property name="text">
    <string>Params</string>
   </property>
  </widget>
  <widget class="QLabel" name="label_2">
   <property name="geometry">
    <rect>
     <x>160</x>
     <y>90</y>
     <width>121</width>
     <height>21</height>
    </rect>
   </property>
   <property name="text">
    <string>Headers</string>
   </property>
  </widget>
  <widget class="QTextEdit" name="res_textEdit">
   <property name="geometry">
    <rect>
     <x>70</x>
     <y>150</y>
     <width>821</width>
     <height>331</height>
    </rect>
   </property>
  </widget>
  <widget class="QPushButton" name="close_btn">
   <property name="geometry">
    <rect>
     <x>280</x>
     <y>90</y>
     <width>93</width>
     <height>28</height>
    </rect>
   </property>
   <property name="text">
    <string>Close</string>
   </property>
  </widget>
  <widget class="QPushButton" name="reset_btn">
   <property name="geometry">
    <rect>
     <x>420</x>
     <y>90</y>
     <width>93</width>
     <height>28</height>
    </rect>
   </property>
   <property name="text">
    <string>重置</string>
   </property>
  </widget>
 </widget>
 <resources/>
 <connections/>
</ui>
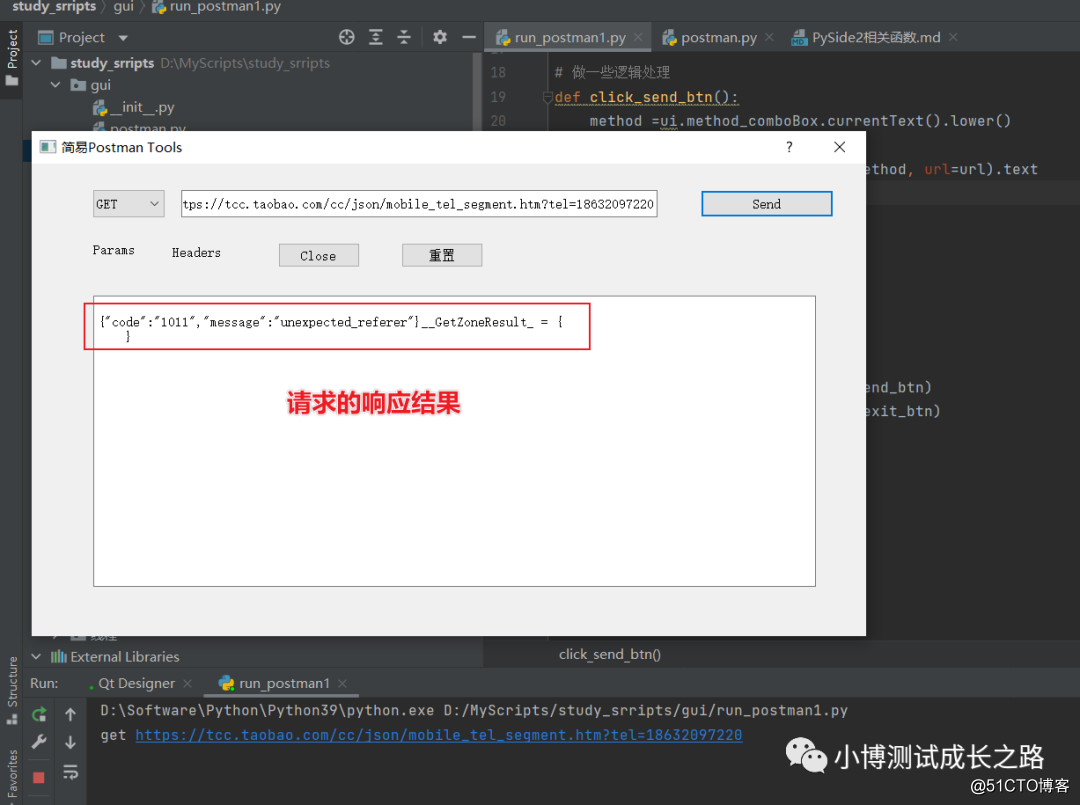
运行效果:
接下来就可以自己扩展一下页面设计,然后实现更多的功能。另外,如果响应结果太大,页面渲染会卡死,也可以思考一下如何去优化。
Python GUI编程:通过PySide2实现一个简单的postman工具
原文:https://blog.51cto.com/u_7739395/3309237