1.第一步:导入需要依赖的jar包,用到的Jar包有springboot的启动类,mybatis依赖,mysql数据库驱动,jdbc连接驱动,lombok生成实体类的get,set等相关方法,
因为需要创建的是一个web项目,所以需要引入webjar包。
 1 <?xml version="1.0" encoding="UTF-8"?>
 2 <project xmlns="http://maven.apache.org/POM/4.0.0"
 3          xmlns:xsi="http://www.w3.org/2001/XMLSchema-instance"
 4          xsi:schemaLocation="http://maven.apache.org/POM/4.0.0 http://maven.apache.org/xsd/maven-4.0.0.xsd">
 5     <modelVersion>4.0.0</modelVersion>
 6
 7     <groupId>org.example</groupId>
 8     <artifactId>springboot_mybatis</artifactId>
 9     <version>1.0-SNAPSHOT</version>
10
11     <properties>
12         <java.version>1.8</java.version>
13     </properties>
14
15     <parent>
16         <groupId>org.springframework.boot</groupId>
17         <artifactId>spring-boot-starter-parent</artifactId>
18         <version>2.1.3.RELEASE</version>
19     </parent>
20
21     <dependencies>
22         <dependency>
23             <groupId>org.springframework.boot</groupId>
24             <artifactId>spring-boot-starter-web</artifactId>
25         </dependency>
26
27         <dependency>
28             <groupId>org.springframework.boot</groupId>
29             <artifactId>spring-boot-starter-jdbc</artifactId>
30         </dependency>
31
32         <dependency>
33             <groupId>mysql</groupId>
34             <artifactId>mysql-connector-java</artifactId>
35             <version>5.1.47</version>
36         </dependency>
37
38         <!--mybatis -->
39         <dependency>
40             <groupId>org.mybatis.spring.boot</groupId>
41             <artifactId>mybatis-spring-boot-starter</artifactId>
42             <version>2.0.1</version>
43         </dependency>
44
45         <dependency>
46             <groupId>org.projectlombok</groupId>
47             <artifactId>lombok</artifactId>
48         </dependency>
49
50
51     </dependencies>
52
53
54 </project>
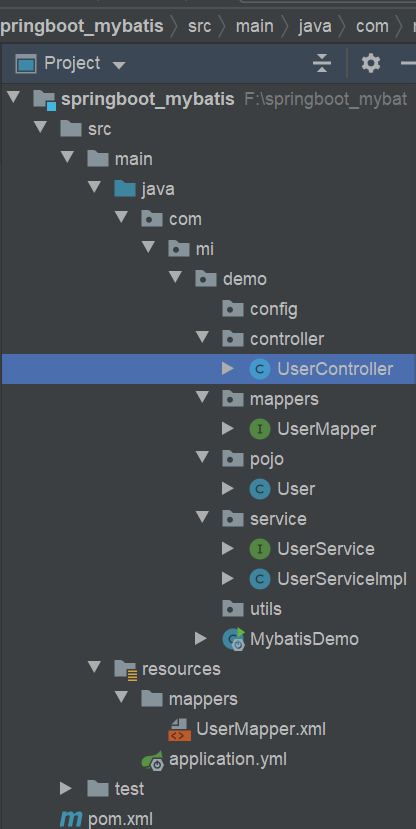
2.创建package,如图所示。

3.创建快速启动类。
 1 package com.mi.demo;
 2
 3 import org.mybatis.spring.annotation.MapperScan;
 4 import org.mybatis.spring.annotation.MapperScans;
 5 import org.springframework.boot.SpringApplication;
 6 import org.springframework.boot.autoconfigure.SpringBootApplication;
 7
 8 /**
 9  * @author 王杰
10  */
11 @SpringBootApplication
12 @MapperScan("com.mi.demo.mappers")
13 public class MybatisDemo {
14     public static void main(String[] args) {
15
16         SpringApplication.run (MybatisDemo.class,args);
17     }
18 }
3.1编写springboot-application.yml配置文件。
 1 spring:
 2   datasource:
 3     driver-class-name: com.mysql.jdbc.Driver
 4     url: jdbc:mysql://localhost:3306/bbpay
 5     username: root
 6     password: root
 7   application:
 8     name: springboot-mybatis
 9 server:
10   port: 9999
11 mybatis:
12   # mybatis 别名扫描
13   type-aliases-package: com.mi.demo.pojo
14   # mapper.xml文件位置,如果没有映射文件,请注释掉
15   mapper-locations: classpath:mappers/**.xml
4.编写mapper接口文件
 1 package com.mi.demo.mappers;
 2
 3 import com.mi.demo.pojo.User;
 4
 5 /**
 6  * @author 王杰
 7  */
 8 public interface UserMapper {
 9     User findUserById(Long id);
10 }
5.编写service接口文件,以及serviceimpl文件
 1 package com.mi.demo.service;
 2
 3 import com.mi.demo.mappers.UserMapper;
 4 import com.mi.demo.pojo.User;
 5
 6 /**
 7  * @author 王杰
 8  */
 9 public interface UserService  {
10
11     User findUserById(Long id);
12 }
 1 package com.mi.demo.service;
 2
 3 import com.mi.demo.mappers.UserMapper;
 4 import com.mi.demo.pojo.User;
 5 import org.springframework.beans.factory.annotation.Autowired;
 6 import org.springframework.stereotype.Service;
 7
 8 @Service
 9 public class UserServiceImpl implements UserService {
10
11     @Autowired
12     UserMapper userMapper;
13
14     @Override
15     public User findUserById(Long id) {
16         return userMapper.findUserById (id);
17     }
18 }
5.编写controller控制层文件。
 1 package com.mi.demo.controller;
 2
 3 import com.mi.demo.pojo.User;
 4 import com.mi.demo.service.UserService;
 5 import org.springframework.beans.factory.annotation.Autowired;
 6 import org.springframework.stereotype.Controller;
 7 import org.springframework.stereotype.Service;
 8 import org.springframework.web.bind.annotation.*;
 9
10 import java.util.Map;
11
12 /**
13  * @author 王杰
14  */
15 @RestController
16 public class UserController {
17
18     @Autowired
19     UserService userService;
20
21     @GetMapping("user/{id}")
22     public String findUserById(@PathVariable("id") Long id){
23
24
25         User user = userService.findUserById (id);
26         return user.toString ();
27     }
28 }
6.实体类:
 1 package com.mi.demo.pojo;
 2
 3 import lombok.Data;
 4
 5 /**
 6  * @author 王杰
 7  */
 8 @Data
 9 public class User {
10
11     private Long id;
12     private String username;
13     private String password;
14     private String email;
15
16 }
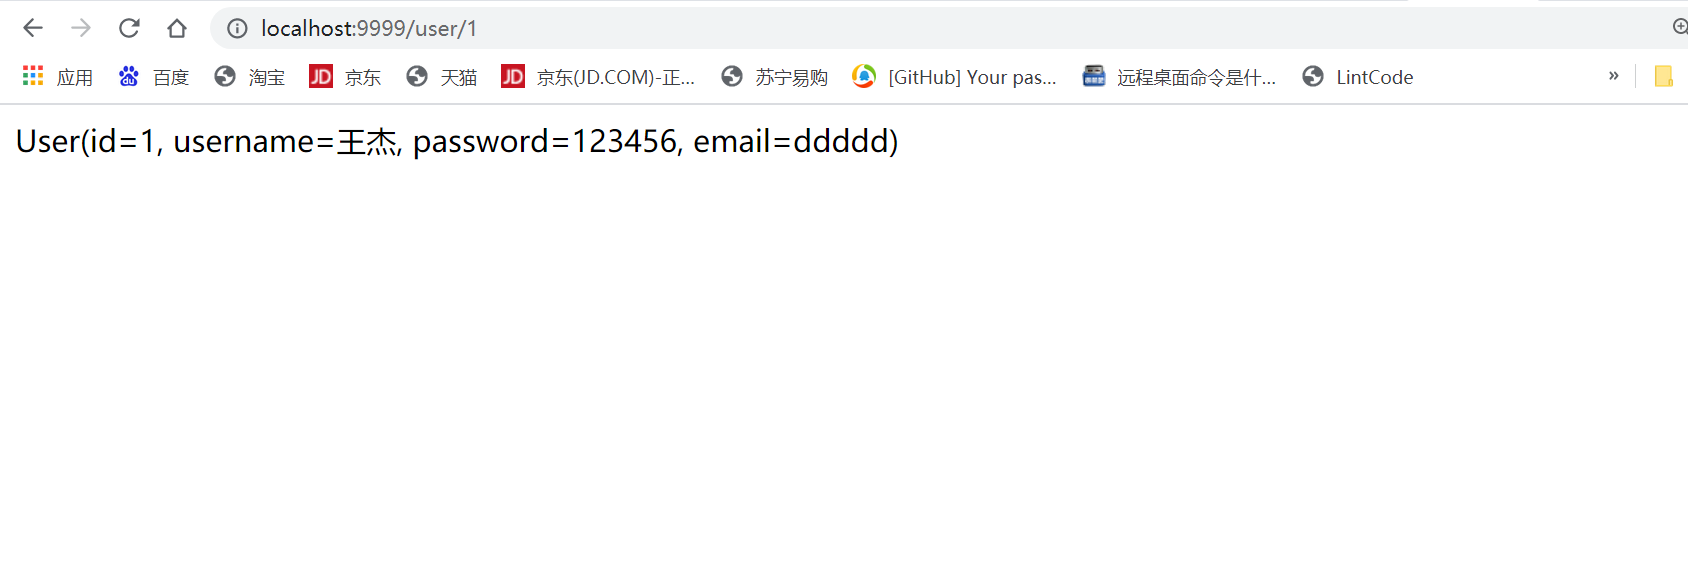
7.启动运行

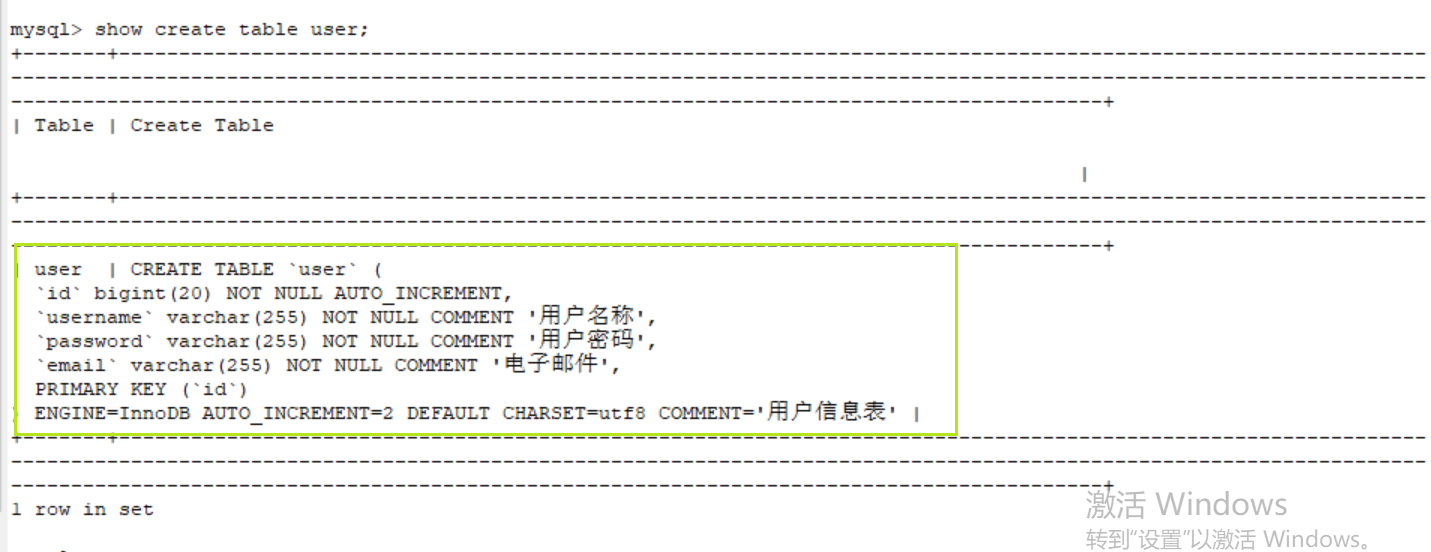
最后,我把项目放到gitee上面了,地址在下面,有需要的朋友可以自行下载,数据设计如图所示:

gitee地址链接:
https://gitee.com/lecibupidechengxuyuan/springboot_mybatis.git
最后,如果这篇文章对您有帮助的话,就有劳点个赞,这是对我最大的鼓励。 蟹蟹!!!
原文:https://www.cnblogs.com/wangjie-logs/p/15167638.html