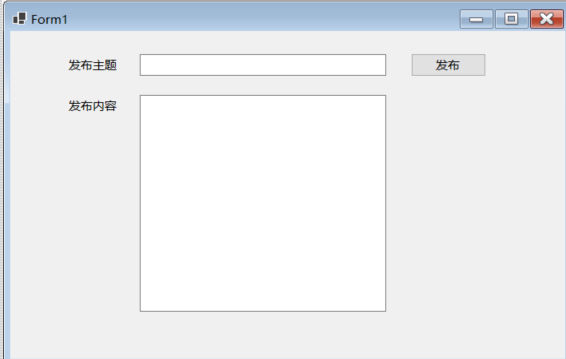
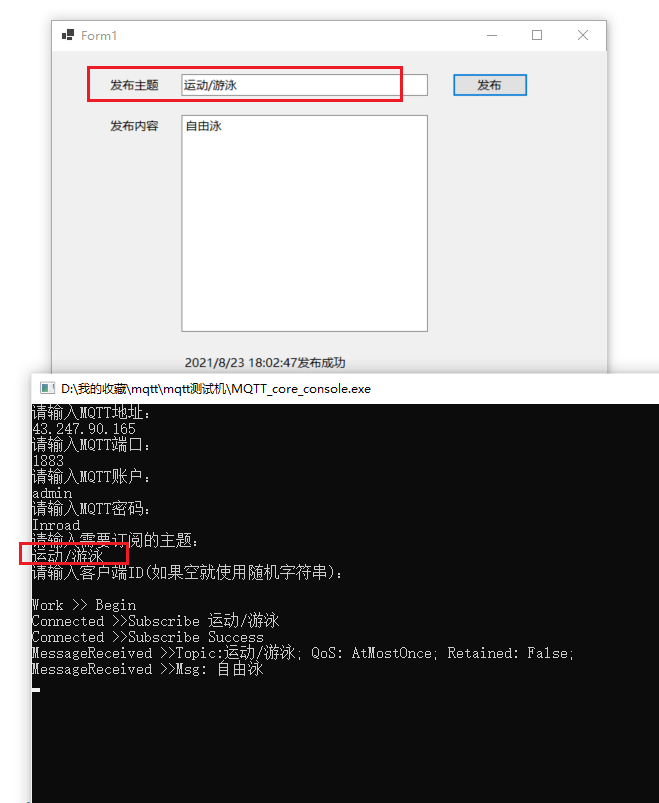
这个网址解释MQTT通俗易懂 可以先看一下理论
https://blog.csdn.net/qq_28877125/article/details/78325003


贴代码
   public partial class Form1 : Form
    {
        public static MqttClient mqttClient = null;
        private static IMqttClientOptions options = null;
        private static MqttApplicationMessageBuilder mamb = new MqttApplicationMessageBuilder();
        /// <summary>
        /// 保留
        /// </summary>
        private static bool Retained = false;
        /// <summary>
        /// 服务质量
        /// <para>0 - 至多一次</para>
        /// <para>1 - 至少一次</para>
        /// <para>2 - 刚好一次</para>
        /// </summary>
        private static int QualityOfServiceLevel = 0;

        public Form1()
        {
            InitializeComponent();
        }


        private void BtnPublish_Click(object sender, EventArgs e)
        {
            TCYBpublish(this.txtcontent.Text, this.txtPubTopic.Text);
        }

        /// <summary>
        /// 太仓雅本mqtt上传
        /// </summary>
        /// <param name="message"></param>
        /// <param name="businesscode"></param>
        /// <returns></returns>
        public async Task TCYBpublish(string message, string topic)
        {
            try
            {
                try
                {
                    if (mqttClient == null)
                    {
                        mqttClient = new MqttFactory().CreateMqttClient() as MqttClient;
                    }

                    if (options == null)
                    {
                        options = new MqttClientOptionsBuilder()
                            //mqtt地址 端口
                             .WithTcpServer("xx.xxx.xx.xxx", 1883)
                             //用户名 密码
                             .WithCredentials("xxx", "xxx")
                             //有的服务端要求具体的clientid 有的随机
                             .WithClientId(Guid.NewGuid().ToString().Substring(0, 5))
                             .Build();
                        await mqttClient.ConnectAsync(options);
                    }
                    //mqttClient.ApplicationMessageReceivedHandler = new MQTTMessageHandler();
                    mqttClient.DisconnectedHandler = new MqttClientDisconnectedHandlerDelegate(new Func<MqttClientDisconnectedEventArgs, Task>(Disconnected));
                    Console.WriteLine("mqtt连接成功");
                }
                catch (Exception e)
                {
                    Console.WriteLine("mqtt连接失败");
                }
                MqttApplicationMessageBuilder mamb1 = new MqttApplicationMessageBuilder();
                mamb1.WithTopic(topic).WithPayload(message).WithRetainFlag(Retained);
                if (QualityOfServiceLevel == 0)
                {
                    mamb1 = mamb1.WithAtMostOnceQoS();
                }
                else if (QualityOfServiceLevel == 1)
                {
                    mamb1 = mamb1.WithAtLeastOnceQoS();
                }
                else if (QualityOfServiceLevel == 2)
                {
                    mamb1 = mamb1.WithExactlyOnceQoS();
                }
                await mqttClient.PublishAsync(mamb1.Build());
                lbllog.Text =DateTime.Now+ "发布成功";

            }
            catch (Exception e)
            {
            }
        }

        private async Task Disconnected(MqttClientDisconnectedEventArgs e)
        {
            try
            {
                await Task.Delay(TimeSpan.FromSeconds(5));
                await mqttClient.ConnectAsync(options);
            }
            catch (Exception exp)
            {
            }
        }
    }

原文:https://www.cnblogs.com/yunnn/p/15177087.html