近几年,互联网企业从消费互联网向产业互联网转型。在消费互联网时期,企业面对的时C端消费者,而产业互联网面对的是B端用户。产业互联网涉及方方面面,企业信息化的建设就是B端用户的业务之一,在企业就存在上下级关系,存在审批业务,需要流程管理。在企业信息化建设中流程管理也是重要的一部分,如下基于flowable简单的分析流程定义。
流程
流程实例
任务
form表单
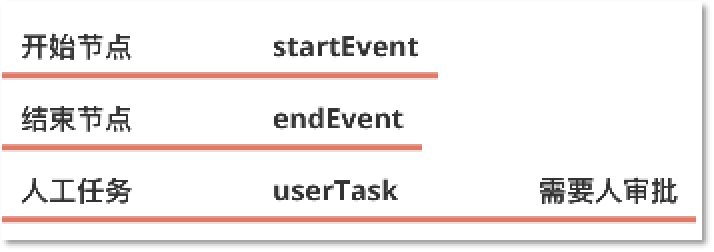
开始节点,结束节点和人工任务节点
网关

自动服务任务

顺序流

网关分支

网关合并

官网地址:https://flowable.com/
帮助文档:https://flowable.com/open-source/docs/bpmn/ch02-GettingStarted/
中文帮助文档:https://tkjohn.github.io/flowable-userguide/#_introduction
github代码:https://github.com/flowable/flowable-engine
flowable的发展
如下是JBoss,Alfresco和Flowable三个团队的流程软件关键时间点描述:

第一步、从flowable的github地址上下载如下几个war,部署到apache的webapps下
flowable-admin.war
flowable-idm.war
flowable-modeler.war
flowable-rest.war
flowable-task.war
第二步、修改如上几个包的配置文件,配置mysql数据地址或者使用自身的h2数据库进行实验。
修改admin idm modeler rest和task这5个包的配置文件WEB-INF/classes/flowable-default.properties,本实验使用的是mysql数据库。
spring.datasource.driver-class-name=com.mysql.jdbc.Driver
spring.datasource.url=jdbc:mysql://127.0.0.1:3306/flowable?characterEncoding=UTF-8
spring.datasource.username=flowable
spring.datasource.password=flowable
配置后,启动tomcat服务器并登录。
访问flowable的流程设计器
地址:http://localhost:8080/flowable-modeler
账号密码:admin/test

登录后,可以访问flowable的管理页面
地址:http://localhost:8080/flowable-admin/#/engine
可以看到flowable流程由如下几个引擎组成

可以通过编辑REST端点检查对应的服务运行是否正常。
本例中以流程引擎为例简单的说明。
定义一个简单的请假流程,包括一个开始节点,一个审批节点,经过排他网关后,审批通过后发送一个http通知,审批拒绝后也发送一个http通知。

如上流程定义使用bpmn2.0的xml表示大致如下所示
<?xml version="1.0" encoding="UTF-8"?>
<definitions>
  <process id="flow_h1" name="holiday-new" isExecutable="true">
    <documentation>请求流程描述</documentation>
    <startEvent id="startEvent1" name="请假开始" flowable:formKey="formKey1" flowable:formFieldValidation="true">
      <extensionElements>
        <flowable:formProperty id="employee" name="请假人" type="string" required="true"></flowable:formProperty>
        <flowable:formProperty id="noOfHolidays" name="天数" type="long" required="true"></flowable:formProperty>
      </extensionElements>
    </startEvent>
    <userTask id="approveKey1" name="审批节点1" flowable:formFieldValidation="true"></userTask>
    <exclusiveGateway id="sid-D7F080C0-BC9D-4C03-B9EB-2D81E4010CA6" name="审批是否通过"></exclusiveGateway>
    <serviceTask id="AcceptKey1" name="通过" flowable:class="org.example.tut.flowable.handler.HolidayRejectionHandler"></serviceTask>
    <serviceTask id="RejectKey1" name="拒绝" flowable:class="org.example.tut.flowable.handler.HolidayApprovalHandler"></serviceTask>
    <endEvent id="sid-E86D23D8-DC24-44D0-B96D-BA3E8CF801C0"></endEvent>
    <serviceTask id="RejectHttpKey1" name="HTTP测试节点" flowable:type="http">
      <extensionElements>
        <flowable:field name="requestMethod">
          <flowable:string><![CDATA[POST]]></flowable:string>
        </flowable:field>
        <flowable:field name="requestUrl">
          <flowable:string><![CDATA[http://127.0.0.1:9901/test]]></flowable:string>
        </flowable:field>
        <flowable:field name="requestBody">
          <flowable:expression><![CDATA[Reject action, employee ${employee} apply ${noOfHolidays} days with reason ${description}]]></flowable:expression>
        </flowable:field>
      </extensionElements>
    </serviceTask>
    <sequenceFlow id="sid-84648711-833A-4ABE-AD08-3E32B026F247" sourceRef="RejectKey1" targetRef="RejectHttpKey1"></sequenceFlow>
    <sequenceFlow id="sid-448B4748-A744-43D9-B3EB-FC0846035F20" sourceRef="RejectHttpKey1" targetRef="sid-E86D23D8-DC24-44D0-B96D-BA3E8CF801C0"></sequenceFlow>
    <endEvent id="sid-683697FC-2E68-45C9-BE63-0F526FC2F3AB"></endEvent>
    <serviceTask id="AcceptHttpKey1" name="审批通过的HTTP消息" flowable:type="http">
      <extensionElements>
        <flowable:field name="requestMethod">
          <flowable:string><![CDATA[POST]]></flowable:string>
        </flowable:field>
        <flowable:field name="requestUrl">
          <flowable:string><![CDATA[http://127.0.0.1:9901/test]]></flowable:string>
        </flowable:field>
        <flowable:field name="requestBody">
          <flowable:expression><![CDATA[Accept Holiday employee ${employee} apply ${noOfHolidays} days with reason ${description}]]></flowable:expression>
        </flowable:field>
      </extensionElements>
    </serviceTask>
    <sequenceFlow id="sid-9788654A-171C-45B9-9A41-94A35C531AA8" sourceRef="AcceptHttpKey1" targetRef="sid-683697FC-2E68-45C9-BE63-0F526FC2F3AB"></sequenceFlow>
    <sequenceFlow id="sid-C4456145-0531-492F-AA80-E733CD0C35C9" sourceRef="AcceptKey1" targetRef="AcceptHttpKey1"></sequenceFlow>
    <sequenceFlow id="SeqFromStartToApprove" sourceRef="startEvent1" targetRef="approveKey1"></sequenceFlow>
    <sequenceFlow id="SeqFromApproveToGW" sourceRef="approveKey1" targetRef="sid-D7F080C0-BC9D-4C03-B9EB-2D81E4010CA6"></sequenceFlow>
    <sequenceFlow id="SeqRejectKey1" sourceRef="sid-D7F080C0-BC9D-4C03-B9EB-2D81E4010CA6" targetRef="RejectKey1">
      <conditionExpression xsi:type="tFormalExpression"><![CDATA[${!approved}]]></conditionExpression>
    </sequenceFlow>
    <sequenceFlow id="ReqAcceptKey1" sourceRef="sid-D7F080C0-BC9D-4C03-B9EB-2D81E4010CA6" targetRef="AcceptKey1">
      <conditionExpression xsi:type="tFormalExpression"><![CDATA[${approved}]]></conditionExpression>
    </sequenceFlow>
  </process>
  <bpmndi:BPMNDiagram id="BPMNDiagram_flow_h1">
   ... 省
  </bpmndi:BPMNDiagram>
</definitions>
节点说明
这个简单的流程中使用了flowable的几个节点
流程定义的组成

process
bpmndi:BPMNDiagram
startEvent的定时节点如何定义?
<startEvent id="timer_start1" name="定时器节点" isInterrupting="false">
    <timerEventDefinition>
        <timeDate>2021-06-30T15:01:02</timeDate>
        <timeCycle>R/P1DT0S</timeCycle>
        <timeDuration>P10DT0S</timeDuration>
    </timerEventDefinition>
</startEvent>
时间定义参考ISO8601标准,可以参考@https://www.cnblogs.com/xdao/p/iso8601.html
格式解析
R2/2015-06-04T19:25:16.828696-07:00/P1DT10S

上面的字符串通过"/"分为了三部分即:

重复次数/开始时间/运行间隔

重复次数
R - 将永远重复
R1 - 将重复一次
R231 - 将重复231次。
开始时间
任务第一次运行的时间。如果开始日期时间已经过去,Kala将返回一个错误。

其中"T"用来分割日期和时间,时间后面跟着的"-07:00"表示西七区,注意"-"是连字符,不是减号。

时区默认是0时区,可以用"Z"表示,也可以不写。

对于我国,要使用"+08:00",表示东八区。
上面的字符串表示 2015年6月4日,19点25分16秒828696纳秒,西七区。

运行间隔
运行间隔以"P"开始,和上面一样也是用"T"分割日期和时间,如P1Y2M10DT2H30M15S

P 开始标记
1Y - 一年
2M - 两个月
10D - 十天
T - 时间和日期分的割标记
2H - 两个小时
30M - 三十分钟
15S 十五秒钟
例子,注意如果没有年月日,"T"也不能省略

P1DT1M - 一天一分钟执行一次
P1W - 一周执行一次
PT1H - 一小时执行一次
PT10S - 十秒执行一次
启动流程的代码:
  public ProcessInstanceResponse startProcessInstance(HolidayRequest holidayRequest) {

        Map<String, Object> variables = new HashMap<String, Object>();
        variables.put("employee", holidayRequest.getEmpName());
        variables.put("noOfHolidays", holidayRequest.getNoOfHolidays());
        variables.put("description", holidayRequest.getRequestDescription());
        variables.put("initiator", "admin");

        ProcessInstance processInstance =
                runtimeService.startProcessInstanceByKey(holidayRequest.getProcessKey(), variables);

        return new ProcessInstanceResponse(processInstance.getId(), processInstance.isEnded());
    }
启动流程后,会在数据库中增加记录
ACT_RU_ACTINST 增加流程实例信息。
ACT_RU_VARIABLE 增加variables变量列表的变量,这个变量会贯穿流程实例的全程。
分配任务的代码:
TaskService taskService;

// taskId是任务Id,userId是用户id,表示将任务分配给这个用户
taskService.setAssignee(taskId, userId);
分配任务后,会在数据库中设置审批人信息
ACT_RU_TASK 表的字段 ASSIGEE_表示审批人是谁
获取待办任务的代码
// 跟进userId用户id查询分配给这个用户或将这个用户设为候选的任务列表
List<Task> taskList = taskService.createTaskQuery().taskCandidateOrAssigned(userId).list();
会查询ACT_RU_TASK表,获取审批人的任务。
完成任务也叫做审批任务
taskService.complete(taskId, variables);
流程运行时,实例和变量说明什么
可以在管理页面看到启动流程实例是填写的变量列表
启动流程增加的变量
variables.put("employee", holidayRequest.getEmpName());
variables.put("noOfHolidays", holidayRequest.getNoOfHolidays());
variables.put("description", holidayRequest.getRequestDescription());
variables.put("initiator", "admin");
人工节点审批时增加的变量是什么
variables.put("approved", approved);
taskService.complete(taskId, variables);
即:变量时贯穿流程实例的全声明周期,流程的很多自定义功能可以通过变量和扩展属性进行实现。

展示流程实例的运行图

done.
祝玩得开心~
原文:https://www.cnblogs.com/voipman/p/15250364.html