本小节是ASP.NET Web API第2章的第3小节,原文共分为7个部分,分成了7篇文章,故这里也分为7个帖子贴出,以下是本小节的第1部分 — 译者注。
本文引自:http://www.asp.net/web-api/overview/creating-web-apis/using-web-api-with-entity-framework/using-web-api-with-entity-framework,-part-1
By Mike Wasson | July 3, 2012
作者:Mike Wasson | 日期:2012-7-3
This tutorial shows how to use ASP.NET Web API with ADO.NET Entity Framework,
using code-first development.
本教程展示如何以ADO.NET实体框架、采用code-first开发(代码先行开发模式)来使用ASP.NET Web API。
Entity Framework is an object/relational mapping framework. It maps the
domain objects in your code to entities in a relational database. For the most
part, you do not have to worry about the database layer, because Entity
Framework takes care of it for you. Your code manipulates the objects, and
changes are persisted to a database.
实体框架(Entity
Framework)是一个对象/关系的映射框架。它把代码形式的域对象映射成关系数据库中的实体。在很大程序上,你不必担心数据库层,因为实体框架会为你照顾它。你可以对这些对象进行操纵,并把所做的修改持久化到数据库。
In this tutorial, you will create a simple store application. There are two
main parts to the application. Normal users can view products and create
orders:
在本教程中,你将创建一个简单的商店应用程序。该应用程序有两个主要部件。常规用户可以查看产品并创建订单(见图2-8):
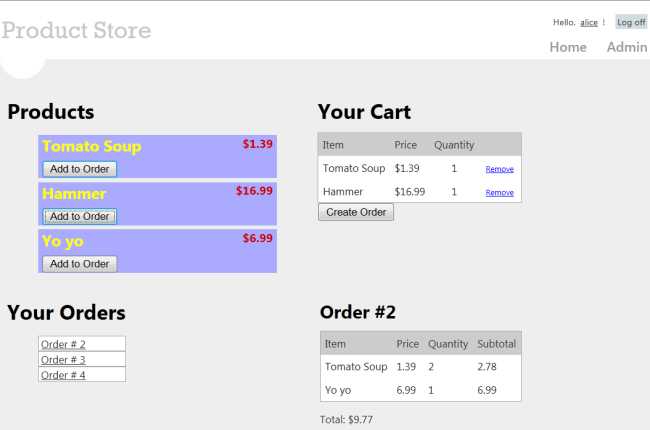
图2-8. ProductStore应用程序的浏览界面
注:作者对此应用程序作了简化,把一个在线商店常规的查看功能(产品列表、购物车、订单条目、订单细节)全部显示在一个Web页面上 — 译者注
Administrators can create, delete, or edit products:
管理员可以创建、删除,或编辑产品(见图2-9):
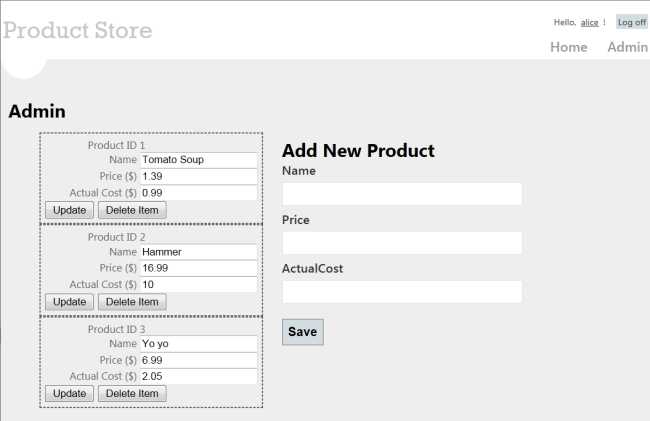 图2-9. ProductStore应用程序的管理界面
注:同样,作者对此应用程序作了简化,把一个在线商店的常规管理功能(产品的CRUD操作)全部显示在一个Web页面上 — 译者注
Here’s what you’ll learn:
以下是你将学习的:
Although this tutorial is self-contained, you might want to read the
following tutorials first:
虽然这个教程是自包含的,但你也许想先阅读前面的两个教程:
Some knowledge of ASP.NET MVC is also helpful.
有一些ASP.NET
MVC方面的知识也是有帮助的。
At a high level, here is the architecture of the application:
从一种高级层面上讲,以下是该应用程序的体系结构:
上述体系结构如图2-10所示(译者注):
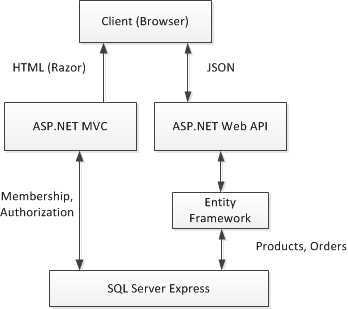
图2-10. 应用程序的体系结构
The following diagram shows how the domain objects are represented at various
layers of the application: The database layer, the object model, and finally the
wire format, which is used to transmit data to the client via HTTP.
下图展示了域对象在应用程序的各个层面上是如何表示的:数据库层(Database Layer)、对象模型(Object
Model),以及最终的线条型格式(Wire Format),该格式用来通过HTTP把数据传送给客户端(见图2-11)。
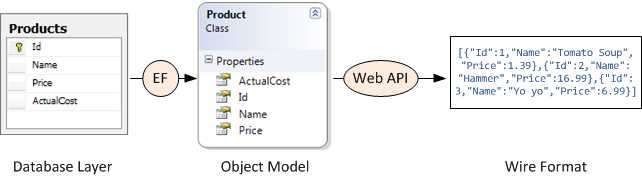
图2-11. 域对象在各层面上的表示
说明:由图2-11可见,在一个应用程序中由EF负责数据库与域模型对象之间的映射(当然是通过EF的对象关系映射ORM),由Web API负责域对象与线条格式的数据(JSON或XML)之间的转换,这些数据可以为客户端页面提供服务 — 译者注
You can create the tutorial project using either Visual Web Developer Express
or the full version of Visual Studio
可以用Visual Web Developer
Express(VS的开发者版)或完整版的Visual Studio来创建这个教程项目。
From the Start page, click New Project.
从“开始页”点击“新项目”。
In the Templates pane, select Installed Templates and expand the Visual C#
node. Under Visual C#, select Web. In the list of project templates, select
ASP.NET MVC 4 Web Application. Name the project "ProductStore" and click OK.
在“模板”面板中选择“已安装模板”,并展开“Visual C#”节点。选择其下的“Web”。在项目模板列表中选择“ASP.NET MVC 4
Web应用程序”。命名此项目为“ProductStore(产品商店)”,并点击“OK”(见图2-12)。
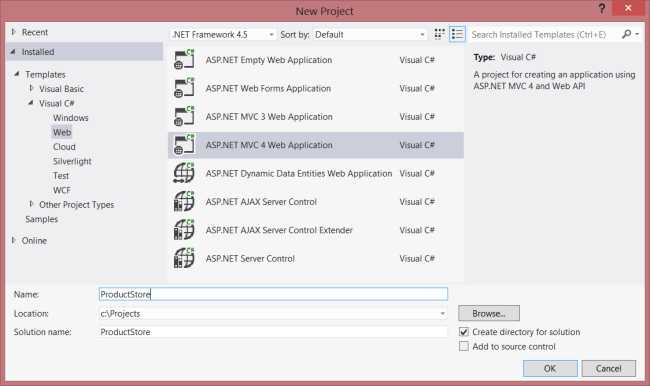
图2-12. 创建ProductStore项目
In the New ASP.NET MVC 4 Project dialog, select Internet Application and
click OK.
在“新的ASP.NET MVC 4项目”对话框中选择“Internet应用程序”,点击“OK”(见图2-13)。
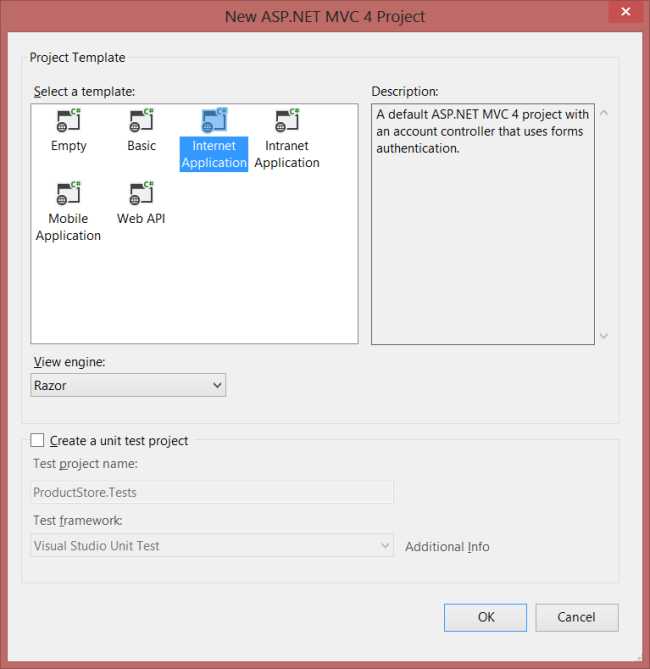
图2-13. 选择应用程序模板
The "Internet Application" template creates an ASP.NET MVC application that
supports forms authentication. If you run the application now, it already has
some features:
“Internet应用程序”模板会创建一个支持表单认证的ASP.NET
MVC应用程序。如果现在运行此应用程序,它已经具有了一些特性:
Membership information is persisted in a database that gets created
automatically. For more information about forms authentication in ASP.NET MVC,
see Walkthrough: Using Forms Authentication in ASP.NET MVC.
成员(Membership)信息会被持久化在一个自动创建的数据库中。关于ASP.NET MVC中表单认证的更多信息,请参阅“演练:在ASP.NET
MVC中使用表单认证”。
This step is cosmetic, but it will make the pages render like the earlier
screen shots.
这一步骤是装饰性的,但它会使页面渲染成前述的屏幕截图。
In Solution Explorer, expand the Content folder and open the file named
Site.css. Add the following CSS styles:
在“解决方案资源管理器”中展开“Content”文件夹,并打开名为Site.css的文件。添加以下CSS样式:
.content {
    clear: both;
    width: 90%;
}
li {
    list-style-type: none;
}
#products li {
    width: 300px;
    background-color: #aaf;
    font-size: 1.5em;
    font-weight: bold;
    color: #ff0;
    margin: 0 0 5px 0;
    padding: 0 5px 0 5px;
}
.price  {
    float: right;
    color: #c00;
    font-size: 0.75em;
}
.details thead td {
    background-color: #CCCCCC;
    color: #333333;
}
.details td {
        padding: 6px;
}
.details td.qty {
        text-align: center;
}
#cart a {
        color: Blue;
        font-size: .75em;
}
#update-products li {
    padding: 5px;
    color: #666;
    border-style: dashed;
    border-width: 2px;
    border-color: #666;
}
#update-products li .item {
        width: 120px;
        display: inline-block;
        text-align: right;
}
【ASP.NET Web API教程】2.3 与实体框架一起使用Web API
原文:http://www.cnblogs.com/lonelyxmas/p/3560756.html