Contents
Large client side applications have always been hard to write, hard to organize and hard to maintain. They tend to quickly grow out of control as you add more functionality and developers to a project. Ext JS 4 comes with a new application architecture that not only organizes your code but reduces the amount you have to write.
富客户端应用程序一直很难编写,维护整理也很难进行。随着功能的增加和开发者的增多,程序很快变得难以控制。Ext JS 4 拥有一套新的应用结构,能够帮助你有效组织程序,并减少编写代码数量。
Our application architecture follows an MVC-like pattern with Models and Controllers being introduced for the first time. There are many MVC architectures, most of which are slightly different from one another. Here‘s how we define ours:
我们的应用结构首次引用了 MVC 模式。现在市面上存在许多 MVC 构架,彼此或多或少都有一些差别。现在介绍我们是如何定义 MVC 的:
Model is a collection of fields and their data (e.g. a User model with username and password fields). Models know how to persist themselves through the data package, and can be linked to other models through associations. Models work a lot like the Ext JS 3 Record class, and are normally used with Stores to present data into grids and other components 模型 (Model) 是一个包含了一些字段和字段下数据的集合(例如用户模型包含了用户名和密码字段)。模型了解怎样处理数据包,能和其他模型建立连接。模型的工作模式和 Ext JS 3 下的 Record 类很相似,通常配合 Stores 向网格 (grid) 和其他组件提供数据。
View is any type of component - grids, trees and panels are all views.视图 (View) 任何组件都属于视图——网格、树和面板都属于视图的范畴。
Controllers are special places to put all of the code that makes your app work - whether that‘s rendering views, instantiating Models, or any other app logic. 控制器 (Controllers) 控制器是放置所有保持应用正常运行的代码的地方——渲染视图、初始化模型或者其他的逻辑成分。
In this guide we‘ll be creating a very simple application that manages User data. By the end you will know how to put simple applications together using the new Ext JS 4 application architecture.
在本教程中我们会创建一个简单的用户数据管理系统。教程结束后你会学习到怎样使用新的 Ext JS 4 应用构架创建应用程序。
The application architecture is as much about providing structure and consistency as it is about actual classes and framework code. Following the conventions unlocks a number of important benefits:
应用程序架构既提供了实际的类和框架代码,也提供了程序结构和一致性。按照约定编写代码有以下几点好处:
Ext JS 4 applications follow a unified directory structure that is the same for every app. Please check out the Getting Started guide for a detailed explanation on the basic file structure of an application. In MVC layout, all classes are placed into the app/ folder, which in turn contains sub-folders to namespace your models, views, controllers and stores. Here is how the folder structure for the simple example app will look when we‘re done:
Ext JS 4 应用遵守统一的文件结构。请阅读 Ext JS 4 手册中文版 - 开始使用 Ext JS 4 中相关的章节学习有关文件结构的内容。用 MVC 模式开发程序时,所有的类文件应该被放置在 app 文件夹内,app 文件夹内还应包含 models、views、controllers 和 stores 等文件夹。下面是一个文件结构的例子:
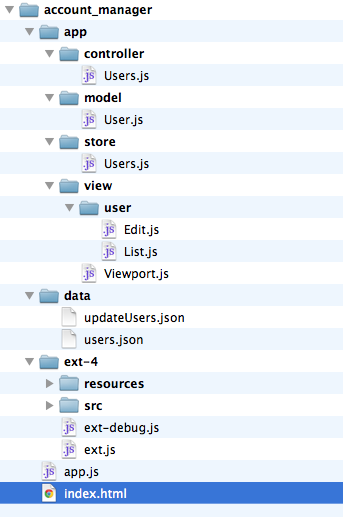
In this example, we are encapsulating the whole application inside one folder called ‘account_manager‘. Essential files from the Ext JS 4 SDK are wrapped inside ext-4/ folder. Hence the content of our index.html looks like this:
在这个示例中我们把整个程序封装进一个叫 ‘account_manage‘ 的文件夹内。Ext JS 4 SDK 本身的文件被放在 ext-4.0 文件夹内。因此 index.html 文件的内容应该类似这样:
<html>
<head>
    <title>Account Manager</title>

    <link rel="stylesheet" type="text/css" href="ext-4/resources/css/ext-all.css">

    <script type="text/javascript" src="ext-4/ext-debug.js"></script>

    <script type="text/javascript" src="app.js"></script>
</head>
<body></body>
</html>
Every Ext JS 4 application starts with an instance of Application class. The Application contains global settings for your application (such as the app‘s name), as well as maintains references to all of the models, views and controllers used by the app. An Application also contains a launch function, which is run automatically when everything is loaded.
每个 Ext JS 4 应用都从一个Application 类的示例开始。Application 包含了应用的全局设置(比如应用的名字)以及对应用中使用的模型、视图和控制器的引用。Application 还应包含一个 launch 函数,launch 函数会在所有资源都载入成功后运行。
Let‘s create a simple Account Manager app that will help us manage User accounts. First we need to pick a global namespace for this application. All Ext JS 4 applications should only use a single global variable, with all of the application‘s classes nested inside it. Usually we want a short global variable so in this case we‘re going to use "AM":
现在一起创建一个简单的账号管理器用来帮助我们管理账号。首先我们需要为应用挑选一个全局命名空间。所有的 Ext JS 4 应用程序都应该只使用一个全局变量用来嵌入应用中所有需要的类。通常我们使用一个简短的名字,这里我们使用“AM”:
Ext.application({
    requires: [‘Ext.container.Viewport‘],
    name: ‘AM‘,

    appFolder: ‘app‘,

    launch: function() {
        Ext.create(‘Ext.container.Viewport‘, {
            layout: ‘fit‘,
            items: [
                {
                    xtype: ‘panel‘,
                    title: ‘Users‘,
                    html : ‘List of users will go here‘
                }
            ]
        });
    }
});
There are a few things going on here. First we invoked Ext.application to create a new instance of Application class, to which we passed the name‘AM‘. This automatically sets up a global variable AM for us, and registers the namespace to Ext.Loader, with the corresponding path of ‘app‘ set via the appFolder config option. We also provided a simple launch function that just creates a Viewport which contains a single Panel that will fill the screen.
以上代码,做了如下几件事。首先,调用Ext.application创建一个应用程序类的实例,设置了一个“AM”的命名空间,他将作为整个应用的全局变量,也将作为 Ext.Loader的命名空间,然后通过appFolder来指定配置选项设置相应的路径。最后,创建了一个简单的launch函数,这里仅仅创建了一个Viewport ,其中包含一个Panel,使其充满整个窗口。
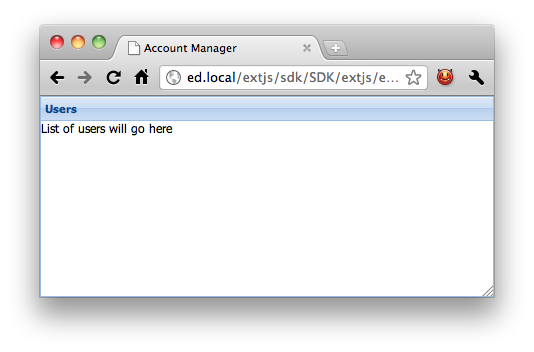
Controllers are the glue that binds an application together. All they really do is listen for events (usually from views) and take some actions. Continuing our Account Manager application, lets create a controller. Create a file called app/controller/Users.js and add the following code:
控制器是整个应用程序的关键,他负责监听事件,并对某些事件做出相应的动作。现在我们创建一个控制器,将其命名为Users.js,其路径是app/controller/Users.js。然后,我们为Users.js添加如下代码:
1 Ext.define(‘AM.controller.Users‘, {
2     extend: ‘Ext.app.Controller‘,
3
4     init: function() {
5         console.log(‘Initialized Users! This happens before the Application launch function is called‘);
6     }
7 });
Now lets add our newly created Users controller to the application config in app.js:
完成之后,我们将创建好的控制器添加到程序配置文件app.js中
Ext.application({
    ...

    controllers: [
        ‘Users‘
    ],

    ...
});
When we load our application by visiting index.html inside a browser, the Users controller is automatically loaded (because we specified it in the Application definition above), and its init function is called just before the Application‘s launch function.
当我们访问index.html时,用户控制器(Users.js)自动加载(因为我们在上面的app.js中的定义中指定了)。它的init函数会在Application的launch函数之前调用。
The init function is a great place to set up how your controller interacts with the view, and is usually used in conjunction with another Controller function -control. The control function makes it easy to listen to events on your view classes and take some action with a handler function. Let‘s update ourUsers controller to tell us when the panel is rendered:
Init函数里非常适合设置控制器与视图的交互,它通常和另一个控制器函数的配合使用 -control。control函数使得监听视图类的事件处理函数并执行一些处理函数的动作变得很容易。让我们更新我们的用户控制器,在呈现面板时通知我们:
Ext.define(‘AM.controller.Users‘, {
    extend: ‘Ext.app.Controller‘,

    init: function() {
        this.control({
            ‘viewport > panel‘: {
                render: this.onPanelRendered
            }
        });
    },

    onPanelRendered: function() {
        console.log(‘The panel was rendered‘);
    }
});
We‘ve updated the init function to use this.control to set up listeners on views in our application. The control function uses the new ComponentQuery engine to quickly and easily get references to components on the page. If you are not familiar with ComponentQuery yet, be sure to check out the ComponentQuery documentation for a full explanation. In brief though, it allows us to pass a CSS-like selector that will find every matching component on the page.
我们已经更新了init函数使用this.control设置我们应用程序的视图上的监听器。Control函数使用新的ComponentQuery引擎,快速、方便地获取页面上的组件引用。如果您还不熟悉ComponentQuery,一定要看 ComponentQuery documentation文档,那篇解释的更加全面。简而言之,它使我们能够通过一个类似CSS的选择器找到页面上的每一个匹配组件。
In our init function above we supplied ‘viewport > panel‘, which translates to "find me every Panel that is a direct child of a Viewport". We then supplied an object that maps event names (just render in this case) to handler functions. The overall effect is that whenever any component that matches our selector fires a render event, our onPanelRendered function is called.
在我们上面的init函数中的“viewport > panel”,相当于“找到每一个是Viewport直接子节点的Panel”。然后,我们提供了一个对象,映射事件的名称(这个例子中是render )到处理函数。整体效果是,每当我们的选择匹配到任何组件时,就触发render事件,并调用onPanelRendered函数。
When we run our application now we see the following:
运行应用程序,效果如下:
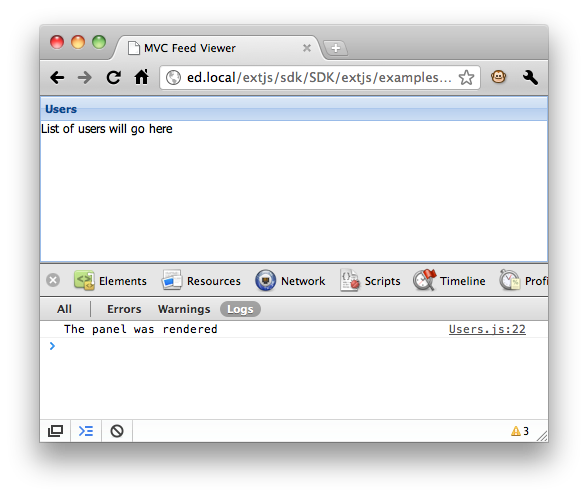
Not exactly the most exciting application ever, but it shows how easy it is to get started with organized code. Let‘s flesh the app out a little now by adding a grid.
虽然不完全是有史以来最令人兴奋的应用程序,但它开始显示出它组织代码是多么的容易。让我们再为程序加入Grid。
Until now our application has only been a few lines long and only inhabits two files - app.js and app/controller/Users.js. Now that we want to add a grid showing all of the users in our system, it‘s time to organize our logic a little better and start using views.
到现在为止,我们的应用程序只有几行,只有两个文件- app.js 和app/controller/Users.js。现在我们要添加一个Grid,显示在我们的系统中的所有用户,现在是把我们的逻辑组织的好一点并开始使用View(视图)的时间了。
A View is nothing more than a Component, usually defined as a subclass of an Ext JS component. We‘re going to create our Users grid now by creating a new file called app/view/user/List.js and putting the following into it:
视图就是一个组件(Component),通常会定义为Ext JS组件的一个子类。我们将通过创建一个新文件app/view/user/List.js创建用户grid ,下面是代码:
Ext.define(‘AM.view.user.List‘ ,{
    extend: ‘Ext.grid.Panel‘,
    alias: ‘widget.userlist‘,

    title: ‘All Users‘,

    initComponent: function() {
        this.store = {
            fields: [‘name‘, ‘email‘],
            data  : [
                {name: ‘Ed‘,    email: ‘ed@sencha.com‘},
                {name: ‘Tommy‘, email: ‘tommy@sencha.com‘}
            ]
        };

        this.columns = [
            {header: ‘Name‘,  dataIndex: ‘name‘,  flex: 1},
            {header: ‘Email‘, dataIndex: ‘email‘, flex: 1}
        ];

        this.callParent(arguments);
    }
});
Our View class is nothing more than a normal class. In this case we happen to extend the Grid Component and set up an alias so that we can use it as an xtype (more on that in a moment). We also passed in the store configuration and the columns that the grid should render.
我们的View类是只是一个普通的类。在这种情况下,我们扩展了Grid组件,并设置一个别名,使我们可以使用它作为一个的xtype(在某一时刻)。我们还配置了store和grid应该添加的columns。
Next we need to add this view to our Users controller. Because we set an alias using the special ‘widget.‘ format, we can use ‘userlist‘ as an xtype now, just like we had used ‘panel‘ previously.
下一步,我们需要添加这个view到我们的Users controller上。因为我们设置的别名使用了特殊的“widget”格式,我们现在可以使用“userlist”作为xtype,就像我们以前曾使用“panel”作为xtype一样。
Ext.define(‘AM.controller.Users‘, {
    extend: ‘Ext.app.Controller‘,

    views: [
        ‘user.List‘
    ],

    init: ...

    onPanelRendered: ...
});
And then render it inside the main viewport by modifying the launch method in app.js to:
并且把它附加到主Viewport上,需要修改app.js的launch方法:
Ext.application({
    ...

    launch: function() {
        Ext.create(‘Ext.container.Viewport‘, {
            layout: ‘fit‘,
            items: {
                xtype: ‘userlist‘
            }
        });
    }
});
The only other thing to note here is that we specified ‘user.List‘ inside the views array. This tells the application to load that file automatically so that we can use it when we launch. The application uses Ext JS 4‘s new dynamic loading system to automatically pull this file from the server. Here‘s what we see when we refresh the page now:
其他唯一要注意的是,我们在View数组内指定“user.List”。这告诉应用程序自动加载该文件,所以当我们启动程序的时候就可以用它。该应用程序使用Ext JS4的新动态加载系统自动从服务器获取这个文件。下面是我们所看到的,当我们现在刷新页面的:
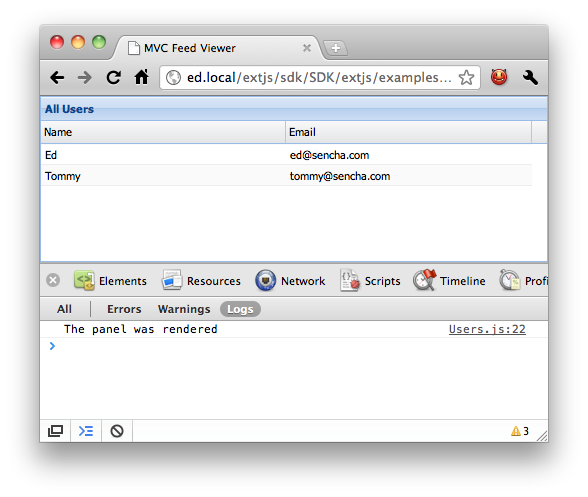
Note that our onPanelRendered function is still being called. This is because our grid class still matches the ‘viewport > panel‘ selector. The reason for this is that our class extends Grid, which in turn extends Panel.
请注意,我们onPanelRendered函数仍然是被调用。这是因为我们的grid类仍然匹配“viewport > panel”选择器。这是因为我们的类继承自Grid,Grid又继承自Panel。
At the moment, the listeners we add to this selector will actually be called for every Panel or Panel subclass that is a direct child of the viewport, so let‘s tighten that up a bit using our new xtype. While we‘re at it, let‘s instead listen for double clicks on rows in the grid so that we can later edit that User:
目前,我们添加到这个选择器上的listeners,实际上被每一个是viewport 直接孩子的Panel或Panel的子类调用,因此,让我们用新的xtype给它收紧(不要匹配的这么宽泛)。虽然我们在它的时候,让我们把监听事件换成双击grid中行的事件,使我们可以在以后编辑该用户:
Ext.define(‘AM.controller.Users‘, {
    extend: ‘Ext.app.Controller‘,

    views: [
        ‘user.List‘
    ],

    init: function() {
        this.control({
            ‘userlist‘: {
                itemdblclick: this.editUser
            }
        });
    },

    editUser: function(grid, record) {
        console.log(‘Double clicked on ‘ + record.get(‘name‘));
    }
});
Note that we changed the ComponentQuery selector (to simply ‘userlist‘), the event name (to ‘itemdblclick‘) and the handler function name (to‘editUser‘). For now we‘re just logging out the name of the User we double clicked:
请注意,我们改变了ComponentQuery选择器(“userlist”),事件的名称(“itemdblclick”)和处理函数名称(“editUser”)。现在我们只是记录了我们双击的用户名称:
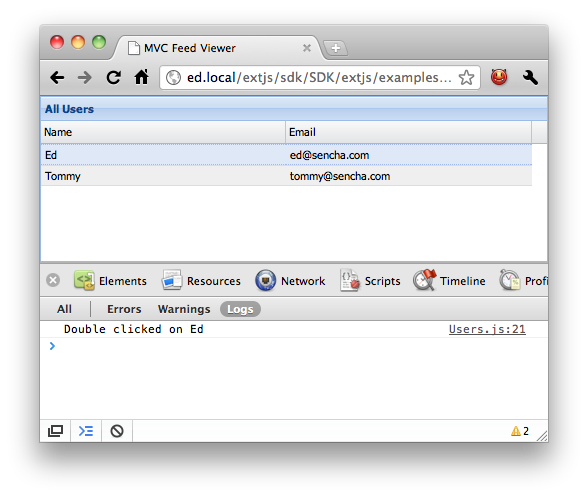
Logging to the console is all well and good but we really want to edit our Users. Let‘s do that now, starting with a new view in app/view/user/Edit.js:
记录到控制台,一切都很好,但我们真的要编辑我们的用户。让我们做,就现在,建一个新的视图app/view/user/Edit.js:
Ext.define(‘AM.view.user.Edit‘, {
    extend: ‘Ext.window.Window‘,
    alias: ‘widget.useredit‘,

    title: ‘Edit User‘,
    layout: ‘fit‘,
    autoShow: true,

    initComponent: function() {
        this.items = [
            {
                xtype: ‘form‘,
                items: [
                    {
                        xtype: ‘textfield‘,
                        name : ‘name‘,
                        fieldLabel: ‘Name‘
                    },
                    {
                        xtype: ‘textfield‘,
                        name : ‘email‘,
                        fieldLabel: ‘Email‘
                    }
                ]
            }
        ];

        this.buttons = [
            {
                text: ‘Save‘,
                action: ‘save‘
            },
            {
                text: ‘Cancel‘,
                scope: this,
                handler: this.close
            }
        ];

        this.callParent(arguments);
    }
});
Again we‘re just defining a subclass of an existing component - this time Ext.window.Window. Once more we used initComponent to specify the complex objects items and buttons. We used a ‘fit‘ layout and a form as the single item, which contains fields to edit the name and the email address. Finally we created two buttons, one which just closes the window, and the other that will be used to save our changes.
同样,我们只是定义一个现有组件的子类 - 这一次继承Ext.window.Window。我们再次用initComponent指定复杂的对象项和按钮。我们使用“fit”布局,并添加一个form作为单项,其中包含的字段编辑的名称和电子邮件地址。最后,我们创建了两个按钮,一个是关闭窗口,另一个是保存修改。 现在我们要做的是添加视图控制器,使其装入用户:
All we have to do now is add the view to the controller, render it and load the User into it:
现在我们要做的是添加视图到控制器中,附加到界面并使其加载用户:
Ext.define(‘AM.controller.Users‘, {
    extend: ‘Ext.app.Controller‘,

    views: [
        ‘user.List‘,
        ‘user.Edit‘
    ],

    init: ...

    editUser: function(grid, record) {
        var view = Ext.widget(‘useredit‘);

        view.down(‘form‘).loadRecord(record);
    }
});
First we created the view using the convenient method Ext.widget, which is equivalent to Ext.create(‘widget.useredit‘). Then we leveraged ComponentQuery once more to quickly get a reference to the edit window‘s form. Every component in Ext JS 4 has a down function, which accepts a ComponentQuery selector to quickly find any child component.
首先,我们创建的视图使用了一个很方便的方法Ext.widget,这相当于Ext.create(‘widget.useredit’)。然后我们利用ComponentQuery再次快速获取到编辑窗口Form的引用。在Ext JS4的每个组件有一个down()函数,它接受一个ComponentQuery选择器,可以快速找到任何子组件。
Double clicking a row in our grid now yields something like this:
在我们的Grid上双击行,结果看起来像这样:
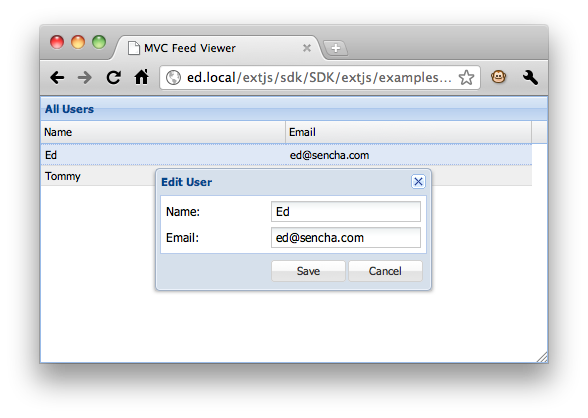
Now that we have our edit form it‘s almost time to start editing our users and saving those changes. Before we do that though, we should refactor our code a little.
现在,我们有了我们的edit Form,差不多可以开始编辑我们的用户并保存这些改变了。虽然在这样做之前,我们应该重构我们的代码一点点。
At the moment the AM.view.user.List component creates a Store inline. This works well but we‘d like to be able to reference that Store elsewhere in the application so that we can update the data in it. We‘ll start by breaking the Store out into its own file - app/store/Users.js:
现在AM.view.user.List用内联方式创建了一个Store,它工作的很好,但是我们希望能够更新数据。首先,我们将Store放到单独的文件中- app/store/Users.js:
Ext.define(‘AM.store.Users‘, {
    extend: ‘Ext.data.Store‘,
    fields: [‘name‘, ‘email‘],
    data: [
        {name: ‘Ed‘,    email: ‘ed@sencha.com‘},
        {name: ‘Tommy‘, email: ‘tommy@sencha.com‘}
    ]
});
Now we‘ll just make 2 small changes - first we‘ll ask our Users controller to include this Store when it loads:
现在,我们只是做两个小变化 - 首先,我们将要求用户控制器加载时包括此Store:
Ext.define(‘AM.controller.Users‘, {
    extend: ‘Ext.app.Controller‘,
    stores: [
        ‘Users‘
    ],
    ...
});
then we‘ll update app/view/user/List.js to simply reference the Store by id:
然后我们更新 app/view/user/List.js简单的用id来引用这个Store
Ext.define(‘AM.view.user.List‘ ,{
    extend: ‘Ext.grid.Panel‘,
    alias: ‘widget.userlist‘,
    title: ‘All Users‘,

    // we no longer define the Users store in the `initComponent` method
    store: ‘Users‘,

    initComponent: function() {

        this.columns = [
        ...
});
By including the stores that our Users controller cares about in its definition they are automatically loaded onto the page and given a storeId, which makes them really easy to reference in our views (by simply configuring store: ‘Users‘ in this case).
包括Store在内,我们的用户控制器关心在其定义中他们会自动加载到页面上,并给予的StoreID,这使得它们很容易引用我们的View(通过简单的配置store:这里是“user”)。
At the moment we‘ve just defined our fields (‘name‘ and ‘email‘) inline on the store. This works well enough but in Ext JS 4 we have a powerfulExt.data.Model class that we‘d like to take advantage of when it comes to editing our Users. We‘ll finish this section by refactoring our Store to use a Model, which we‘ll put in app/model/User.js:
目前,我们刚刚在Store里定义了我们的字段(“name”和“email”)。这已经足够了,但在Ext JS4我们有一个强大的Ext.data.Model的类,我们想利用它的优势来编辑我们的Users。在本节里我们将重构我们的Store来使用Model,使用文件app/model/User.js:
Ext.define(‘AM.model.User‘, {
    extend: ‘Ext.data.Model‘,
    fields: [‘name‘, ‘email‘]
});
That‘s all we need to do to define our Model. Now we‘ll just update our Store to reference the Model name instead of providing fields inline...
这就是定义我们的模型所需要做的全部工作,现在我们只需要更新Store来引用模型名称来代替内联,并让 Users controller也获取一个模型:
Ext.define(‘AM.store.Users‘, {
    extend: ‘Ext.data.Store‘,
    model: ‘AM.model.User‘,

    data: [
        {name: ‘Ed‘,    email: ‘ed@sencha.com‘},
        {name: ‘Tommy‘, email: ‘tommy@sencha.com‘}
    ]
});
And we‘ll ask the Users controller to get a reference to the User model too:
Ext.define(‘AM.controller.Users‘, {
    extend: ‘Ext.app.Controller‘,
    stores: [‘Users‘],
    models: [‘User‘],
    ...
});
Our refactoring will make the next section easier but should not have affected the application‘s current behavior. If we reload the page now and double click on a row we see that the edit User window still appears as expected. Now it‘s time to finish the editing functionality:
我们的重构会让下一节变得很容易,但却不会影响应用程序的当前行为。如果我们现在刷新页面,双击一个行,我们会看到“edit User”窗口仍然和预期显示一样。现在来完成编辑功能:

Now that we have our users grid loading data and opening an edit window when we double click each row, we‘d like to save the changes that the user makes. The Edit User window that the defined above contains a form (with fields for name and email), and a save button. First let‘s update our controller‘s init function to listen for clicks to that save button:
现在,我们让我们的users grid加载数据并当我们双击每一行打开一个编辑窗口。现在我们想要保存修改。Edit User窗口定义了一个表单(包含name和email字段)和保存按钮。首先,让我们更新控制器的init函数来监听保存按钮的点击:
Ext.define(‘AM.controller.Users‘, {
    ...
    init: function() {
        this.control({
            ‘viewport > userlist‘: {
                itemdblclick: this.editUser
            },
            ‘useredit button[action=save]‘: {
                click: this.updateUser
            }
        });
    },
    ...
    updateUser: function(button) {
        console.log(‘clicked the Save button‘);
    }
    ...
});
We added a second ComponentQuery selector to our this.control call - this time ‘useredit button[action=save]‘. This works the same way as the first selector - it uses the ‘useredit‘ xtype that we defined above to focus in on our edit user window, and then looks for any buttons with the‘save‘ action inside that window. When we defined our edit user window we passed {action: ‘save‘} to the save button, which gives us an easy way to target that button.
我们在this.control调用里增加了第二个ComponentQuery选择器- 这一次是“useredit button[action=save]”。它第一个选择器以同样的方式工作 - 它使用我们上面定义的“useredit”xtype来查找到编辑用户窗口,然后查找该窗口内的“保存”行为按钮。当我们定义我们的编辑用户窗口的时候,我们把 {action: ‘save‘} 定义到保存按钮,这给了我们一个简单的方法锁定目标按钮。
We can satisfy ourselves that the updateUser function is called when we click the Save button:
当我们点击“保存”按钮时,updateUser函数被调用,:
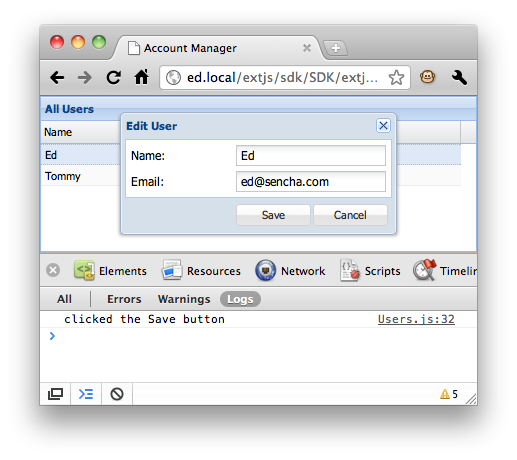
Now that we‘ve seen our handler is correctly attached to the Save button‘s click event, let‘s fill in the real logic for the updateUser function. In this function we need to get the data out of the form, update our User with it and then save that back to the Users store we created above. Let‘s see how we might do that:
现在,我们已经看到应用正确地处理了连接到保存按钮的Click事件。让我们填写updateUser函数的真正的逻辑。在这个函数中,我们需要获取Form的数据,更新我们的用户,然后保存,存储回给我们上面创建的Users store。让我们看看如何做到这一点:
updateUser: function(button) {
    var win    = button.up(‘window‘),
        form   = win.down(‘form‘),
        record = form.getRecord(),
        values = form.getValues();

    record.set(values);
    win.close();
}
Let‘s break down what‘s going on here. Our click event gave us a reference to the button that the user clicked on, but what we really want is access to the form that contains the data and the window itself. To get things working quickly we‘ll just use ComponentQuery again here, first usingbutton.up(‘window‘) to get a reference to the Edit User window, then win.down(‘form‘) to get the form.
让我们说说这里发生了什么事情。我们的点击事件给了我们一个用户点击的按钮的引用,但我们真正想要访问的是包含数据的form和窗口本身,。我们再次使用ComponentQuery,第一次使用button.up(‘window‘) ,以获得编辑用户窗口的引用,然后win.down(‘form‘)得到form。
After that we simply fetch the record that‘s currently loaded into the form and update it with whatever the user has typed into the form. Finally we close the window to bring attention back to the grid. Here‘s what we see when we run our app again, change the name field to ‘Ed Spencer‘ and click save:
之后,我们只需获取当前form加载的记录并且更新它。最后,我们关闭该窗口,把注意力转移到grid。在这里我们看到,我们运行了我们的应用程序,更改name字段为“Ed Spencer”,并点击保存:
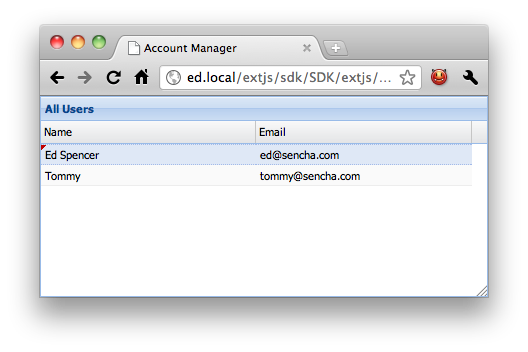
Easy enough. Let‘s finish this up now by making it interact with our server side. At the moment we are hard coding the two User records into the Users Store, so let‘s start by reading those over AJAX instead:
这很容易做到。我们现在要得它与我们的服务器端进行交互。目前,我们是把两个用户记录硬编码到Users Store中,让我们开始看些AJAX代码:
Ext.define(‘AM.store.Users‘, {
    extend: ‘Ext.data.Store‘,
    model: ‘AM.model.User‘,
    autoLoad: true,

    proxy: {
        type: ‘ajax‘,
        url: ‘data/users.json‘,
        reader: {
            type: ‘json‘,
            root: ‘users‘,
            successProperty: ‘success‘
        }
    }
});
Here we removed the ‘data‘ property and replaced it with a Proxy. Proxies are the way to load and save data from a Store or a Model in Ext JS 4. There are proxies for AJAX, JSON-P and HTML5 localStorage among others. Here we‘ve used a simple AJAX proxy, which we‘ve told to load data from the url‘data/users.json‘.
在这里,我们删除‘data ‘属性,并用一个 Proxy取代它。Proxies(代理)是Ext JS4用来从Store或Model加载和保存数据的方式。有AJAX、JSON- P、HTML5本机存储和其他方式的代理。这里我们使用一个简单的AJAX代理,从URL“data/users.json”加载数据。
We also attached a Reader to the Proxy. The reader is responsible for decoding the server response into a format the Store can understand. This time we used a JSON Reader, and specified the root and successProperty configurations. Finally we‘ll create our data/users.json file and paste our previous data into it:
我们还把reader附加到代理上。reader负责把服务器响应的数据解码成Store可以理解的格式。这次我们使用了JSONreader,并指定根和successProperty配置(参看 Json Reader文档)。最后,我们将建立data/users.json 文件,把之前的数据粘贴进去:
{
    "success": true,
    "users": [
        {"id": 1, "name": ‘Ed‘,    "email": "ed@sencha.com"},
        {"id": 2, "name": ‘Tommy‘, "email": "tommy@sencha.com"}
    ]
}
The only other change we made to the Store was to set autoLoad to true, which means the Store will ask its Proxy to load that data immediately. If we refresh the page now we‘ll see the same outcome as before, except that we‘re now no longer hard coding the data into our application.
唯一的变化是Store的autoLoad 被设置为true,这意味着商店将要求其Proxy立即加载数据。如果我们现在刷新页面,我们会看到像以前相同的结果,除了我们现在不再是硬编码应用程序的数据了。
The last thing we want to do here is send our changes back to the server. For this example we‘re just using static JSON files on the server side so we won‘t see any database changes but we can at least verify that everything is plugged together correctly. First we‘ll make a small change to our new proxy to tell it to send updates back to a different url:
我们要在这里做的最后一件事是把我们的修改发送回服务器。对于这个例子,我们只是在服务器端使用静态的JSON文件,所以我们不会看到任何数据库更改,但我们至少可以确认一切是正确的放到了一起。首先,我们将做一个小变化,告诉我们新的proxy更新要发送到一个不同的URL:
proxy: {
    type: ‘ajax‘,
    api: {
        read: ‘data/users.json‘,
        update: ‘data/updateUsers.json‘
    },
    reader: {
        type: ‘json‘,
        root: ‘users‘,
        successProperty: ‘success‘
    }
}
We‘re still reading the data from users.json but any updates will be sent to updateUsers.json. This is just so we know things are working without overwriting our test data. After updating a record, the updateUsers.json file just contains {"success": true}. Since it is updated through a HTTP POST command, you may have to create an empty file to avoid receiving a 404 error.
The only other change we need to make is to tell our Store to synchronize itself after editing, which we do by adding one more line inside the updateUser function, which now looks like this:
我们还是从users.json读取数据,任何更新都会发送到updateUsers.json。这样我们就可以返回一个虚拟的回应,让我们知道程序工作正常。updateUsers.json文件只包含{"success": true}。我们需要做的唯一改变是要告诉Store编辑后同步自己,于是在updateUser函数里再加一行,现在看起来像这样:
updateUser: function(button) {
    var win    = button.up(‘window‘),
        form   = win.down(‘form‘),
        record = form.getRecord(),
        values = form.getValues();

    record.set(values);
    win.close();
    // synchronize the store after editing the record
    this.getUsersStore().sync();
}
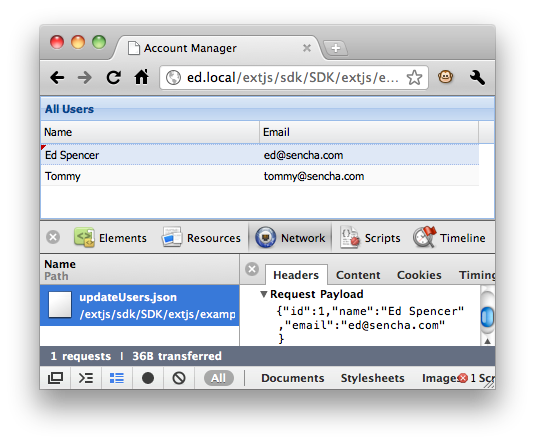
Now we can run through our full example and make sure that everything works. We‘ll edit a row, hit the Save button and see that the request is correctly sent to updateUser.json
现在,我们就可以运行我们完整的例子,并确保一切正常。我们将编辑一行,点击“保存”按钮,看到请求正确发送到updateUser.json
The newly introduced Sencha SDK Tools (download here) makes deployment of any Ext JS 4 application easier than ever. The tools allows you to generate a manifest of all dependencies in the form of a JSB3 (JSBuilder file format) file, and create a minimal custom build of just what your application needs within minutes.
新推出的Sencha SDK工具(下载)使得任何Ext JS4应用程序的部署比以往任何时候都更容易。这些工具允许您生成一个JSB3(JSBuilder文件格式)文件格式的所有依赖关系的清单,并只需要在几分钟之内就创建一个最小自定义的应用程序构建。
Please refer to the Getting Started guide for detailed instructions.
请参阅入门指南详细说明(Getting Started guide)。
We‘ve created a very simple application that manages User data and sends any updates back to the server. We started out simple and gradually refactored our code to make it cleaner and more organized. At this point it‘s easy to add more functionality to our application without creating spaghetti code. The full source code for this application can be found in the Ext JS 4 SDK download, inside the examples/app/simple folder.
我们已经创建了一个非常简单的应用程序,管理用户数据和并把任何更新发送回服务器。我们从简单的代码开始,逐步重构,使其更清洁,更优雅。在这之上上,很容易添加更多的功能,而无需为我们的应用程序创建意大利面条式的代码。该应用程序的完整的源代码可以到Ext JS4 SDK下载,在examples/app/simple文件夹中。
原文:http://www.cnblogs.com/jimcheng/p/4268635.html