使用Maven创建Richfaces 4.x项目
开发环境
- IntelliJ IDEA 13
- Maven 3.1.1
- Richfaces 4.3.5.Final
Step 1 - 创建项目
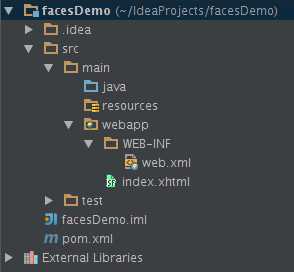
使用Maven创建Web项目(名为 facesDemo ),建成后目录结构如下:
Step 2 - 添加依赖
修改 pom.xml 文件,添加必要的依赖文件:
<?xml version="1.0" encoding="UTF-8"?>
<project xmlns="http://maven.apache.org/POM/4.0.0"
         xmlns:xsi="http://www.w3.org/2001/XMLSchema-instance"
         xsi:schemaLocation="http://maven.apache.org/POM/4.0.0 http://maven.apache.org/xsd/maven-4.0.0.xsd">
  <modelVersion>4.0.0</modelVersion>

  <groupId>facesDemo</groupId>
  <artifactId>facesDemo</artifactId>
  <version>1.0-SNAPSHOT</version>
  <packaging>war</packaging>

  <build>
    <finalName>facesDemo</finalName>
  </build>

  <properties>
    <richfaces.version>4.3.5.Final</richfaces.version>
  </properties>

  <dependencyManagement>
    <dependencies>
      <dependency>
        <groupId>org.richfaces</groupId>
        <artifactId>richfaces-bom</artifactId>
        <version>${richfaces.version}</version>
        <scope>import</scope>
        <type>pom</type>
      </dependency>
    </dependencies>
  </dependencyManagement>

  <dependencies>
    <dependency>
      <groupId>org.richfaces.ui</groupId>
      <artifactId>richfaces-components-ui</artifactId>
    </dependency>
    <dependency>
      <groupId>org.richfaces.core</groupId>
      <artifactId>richfaces-core-impl</artifactId>
    </dependency>

    <dependency>
      <groupId>com.sun.faces</groupId>
      <artifactId>jsf-api</artifactId>
    </dependency>
    <dependency>
      <groupId>com.sun.faces</groupId>
      <artifactId>jsf-impl</artifactId>
    </dependency>
    <dependency>
      <groupId>jstl</groupId>
      <artifactId>jstl</artifactId>
      <version>1.2</version>
    </dependency>
    <dependency>
      <groupId>junit</groupId>
      <artifactId>junit</artifactId>
      <version>4.11</version>
      <scope>test</scope>
    </dependency>
  </dependencies>
</project>
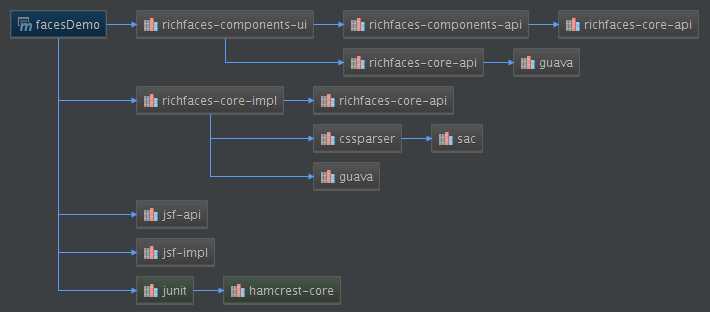
文件之间依赖关系如下所示:
Step 3 - 配置项目
在 web.xml 中配置Richfaces:
<?xml version="1.0" encoding="UTF-8"?>
<web-app xmlns="http://java.sun.com/xml/ns/javaee"
         xmlns:xsi="http://www.w3.org/2001/XMLSchema-instance"
         xsi:schemaLocation="http://java.sun.com/xml/ns/javaee
                             http://java.sun.com/xml/ns/javaee/web-app_3_0.xsd"
         version="3.0">
  <welcome-file-list>
    <welcome-file>index.xhtml</welcome-file>
  </welcome-file-list>

  <context-param>
    <param-name>javax.faces.DEFAULT_SUFFIX</param-name>
    <param-value>.xhtml</param-value>
  </context-param>
  <context-param>
    <param-name>javax.faces.PROJECT_STAGE</param-name>
    <param-value>Development</param-value>
  </context-param>

  <servlet>
    <servlet-name>facesServlet</servlet-name>
    <servlet-class>javax.faces.webapp.FacesServlet</servlet-class>
    <load-on-startup>0</load-on-startup>
  </servlet>
  <servlet-mapping>
    <servlet-name>facesServlet</servlet-name>
    <url-pattern>*.xhtml</url-pattern>
  </servlet-mapping>
</web-app>
Step 4 - 创建文件
在 webapp 目录下新建 index.xhtml 文件,内容如下:
<ui:composition xmlns="http://www.w3.org/1999/xhtml"
                xmlns:h="http://java.sun.com/jsf/html"
                xmlns:f="http://java.sun.com/jsf/core"
                xmlns:ui="http://java.sun.com/jsf/facelets"
                xmlns:a4j="http://richfaces.org/a4j"
                xmlns:rich="http://richfaces.org/rich">
  <f:view>
    <h:head></h:head>
    <h:body>
      <rich:panel header="Richfaces Demo">
        <h:outputLabel value="Hello Richfaces"/>
      </rich:panel>
    </h:body>
  </f:view>
</ui:composition>
大功告成,打包部署后页面就可以显示了:
