| 一、概述 |
Android平台中常用的动画主要有两类,一类是View动画,一类是3.0后新增的属性动画。属性动画与View动画相比功能更加强大,主要体现在以下两个方面:
1、 属性动画不仅仅能应用到View上,还可以应用到Object对象上。
2、 属性动画将会真正改变Object对象属性的值。
如此强大的动画,我们没有理由不去学习使用,下面我们就根据API文档的介绍开始学习如何使用属性动画。
| 二、属性动画的学习与使用 |
首先我们要先了解属性动画的一些关键属性,文档中给出了这么几个:

Duration:这个很好理解,动画的持续时间。
Time interpolation:时间差值,主要用来定义动画的变化率,系统中已经提供许多定义好的插值器,具体可以参照下表:
Repeat count and behavior:重复次数和模式,用于定义说明动画的重复次数及如何重复。
Animator sets:动画集合,用于组合动画,可以指定动画的执行顺序。
Frame refresh delay:刷帧延迟。
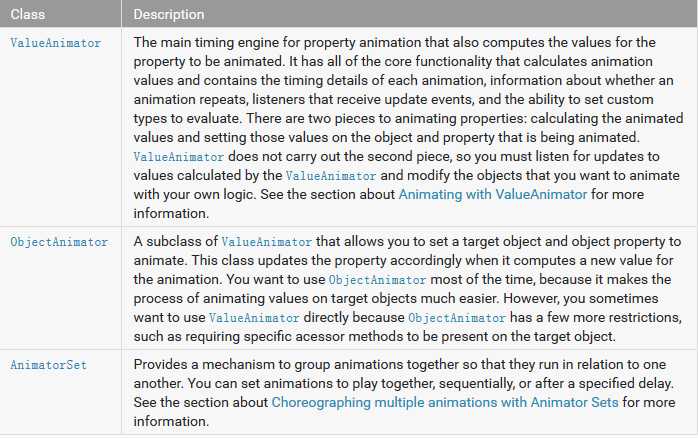
了解了这些属性的意义后,我们在来看看与属性动画相关的类有哪些,从表中我们可以看到主要有3个,分别是ValueAnimator、ObjectAnimator、AnimatorSet,其中ObjectAnimator是ValueAnimator的子类。
大多数情况下我们使用ObjectAnimator即可方便的完成非常不错的动画效果,下面让我们先体验一下。先上布局文件,非常简单,只有一张图片和一个按钮。
<?xml version="1.0" encoding="utf-8"?>
<RelativeLayout xmlns:android="http://schemas.android.com/apk/res/android"
    android:layout_width="match_parent"
    android:layout_height="match_parent" >
    <ImageView
        android:layout_width="100dp"
        android:layout_height="100dp"
        android:id="@+id/imageView"
        android:scaleType="fitXY"
        android:src="@drawable/animator_img"
        android:contentDescription="@null"/>
    <Button
        android:layout_width="match_parent"
        android:layout_height="wrap_content"
        android:id="@+id/btnOK"
        android:text="OK"
        android:layout_alignParentBottom="true"/>
</RelativeLayout>
Java:
findViewById(R.id.btnOK).setOnClickListener(new OnClickListener() {
@Override
public void onClick(View v) {
ObjectAnimator
.ofFloat(imageView, "translationX", 0f,300f)
.setDuration(2000)
.start();
}
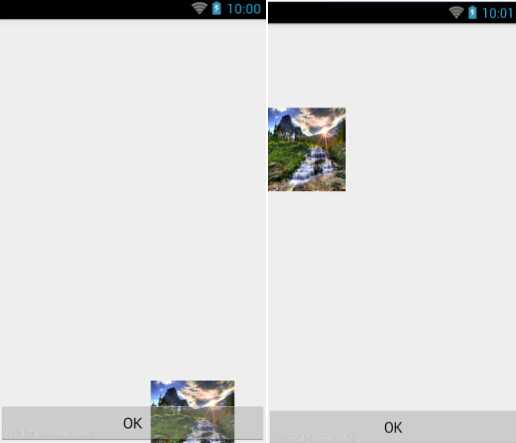
});效果图如下:

通过以上的演示,我们可以看到使用ObjectAnimator可以非常方便的完成一个动画,仅仅一行代码,同时通过Toast我们可以看出图片的位置属性确实是改变了。
我们具体了解一下ObjectAnimator,ObjectAnimator提供了ofInt、ofFloat、ofObject等方法,这些方法中基本都需要如下参数:
Object target:动画作用的目标对象。
String propertyName:动画的作用属性,注意目标对象必须为此属性提供get/set方法。
Float/int… values:可变参数,用于定义动画的起始、中间、结束时的数值。
默认情况下,动画变化效果是线性,我们可以通过setInterpolator方法设置一个插值器来改变动画的变化率。
AnimatorSet:用于组合动画 ,下面我们通过一个例子来演示它的具体用法,主要代码如下:
AnimatorSet animatorSet = new AnimatorSet();
            ObjectAnimator animator1 = ObjectAnimator.ofFloat(imageView, "x",  0,screenWidth-imgWidth);
            animator1.setDuration(2000);
            animator1.setInterpolator(new DecelerateInterpolator());

            ObjectAnimator animator2 = ObjectAnimator.ofFloat(imageView, "y",  0,screenHeight-imgHeight);
            animator2.setDuration(2000);
            animator2.setInterpolator(new AccelerateInterpolator());

            ObjectAnimator animator3 = ObjectAnimator.ofFloat(imageView, "x",  screenWidth-imgWidth,0);
            animator3.setDuration(2000);
            animator3.setInterpolator(new AccelerateInterpolator());

            ObjectAnimator animator4 = ObjectAnimator.ofFloat(imageView, "y",  screenHeight-imgHeight,0);
            animator4.setDuration(2000);
            animator4.setInterpolator(new AccelerateInterpolator());

            animatorSet.play(animator1);
            animatorSet.play(animator2).after(animator1);
            animatorSet.play(animator3).after(animator2);
            animatorSet.play(animator4).after(animator3);
            animatorSet.start();
通过以上代码,我们可以看到通过AnimatorSet,我们可以任意组合动画,并且安排它们的执行顺序,图片在屏幕中按照顺时针方向走一周,并且因为插值器的使用,其变化率不一样,执行效果如下:

看懂了吗?想要测试的小伙伴,可以点击下载工程直接运行测试!有问题也可以跟帖留言讨论哦~
原文:http://blog.csdn.net/jerehedu/article/details/45305683