步骤:1.实现dataSource接口
2.声明一个集合类用于管理多个连接
3.必须要拥有一种能能力,回收连接
|
1
2
3
4
5
6
7
8
9
10
11
12
13
14
15
16
17
18
19
20
21
22
23
24
25
26
27
28
29
30
31
32
33
34
35
36
37
38
39
40
41
42
43
44
45
46
47
48
49
50
51
52
53
54
55
56
57
58
59
60
61
62
63
64
65
66
67
68
69
70
71
72
73
74
75
76
77
78
79
80
81
82
83
84
85
86
87
88
89
90
91
92
93
94
95 |
/** * 标准的连接 */public class DBPool implements
DataSource { //声明一个池管理对象 private
LinkedList<Connection> pool = new
LinkedList<Connection>(); //在初始化这个DataSourc的子类时在构造方法设置多个连接 public
DBPool(){ try{ Class.forName("com.mysql.jdbc.Driver"); for(int
i=0;i<3;i++){ final
Connection con = DriverManager.getConnection(url,"root","123"); Object proxyedConn = Proxy.newProxyInstance(DBPool.class.getClassLoader(), new
Class[]{Connection.class}, new
InvocationHandler() { public
Object invoke(Object proxyedConnection, Method method, Object[] args) throws
Throwable { if(method.getName().equals("close")){ synchronized
(pool) { pool.addLast((Connection) proxyedConnection); pool.notify(); } return
null; } //目标方法的返回值 Object returnValue=method.invoke(con, args); return
returnValue; } }); pool.add((Connection) proxyedConn); } }catch(Exception e){ throw
new RuntimeException(e.getMessage(),e); } } public
Connection getConnection() throws
SQLException { synchronized
(pool) { if(pool.size()==0){ try
{ pool.wait(); } catch
(InterruptedException e) { e.printStackTrace(); } return
getConnection(); } Connection con = pool.removeFirst(); System.err.println("siize:"+pool.size()); return
con; } } public
PrintWriter getLogWriter() throws
SQLException { // TODO Auto-generated method stub return
null; } public
void setLogWriter(PrintWriter out) throws
SQLException { // TODO Auto-generated method stub } public
void setLoginTimeout(int
seconds) throws
SQLException { // TODO Auto-generated method stub } public
int getLoginTimeout() throws
SQLException { // TODO Auto-generated method stub return
0; } public
<T> T unwrap(Class<T> iface) throws
SQLException { // TODO Auto-generated method stub return
null; } public
boolean isWrapperFor(Class<?> iface) throws
SQLException { // TODO Auto-generated method stub return
false; } public
Connection getConnection(String username, String password) throws
SQLException { // TODO Auto-generated method stub return
null; } } |
用包装模式实现数据库连接池
我这里只写部分代码,对close()方法增强
|
1
2
3
4
5
6
7
8
9
10
11
12
13
14
15
16
17
18
19
20
21
22
23
24
25
26
27
28
29
30
31
32
33
34
35
36
37
38
39
40
41
42
43
44
45
46
47
48
49
50
51
52
53 |
public class MyDataSource implements
DataSource { private
LinkedList<Connection> pool = new
LinkedList<Connection>(); public
MyDataSource() { try
{ Class.forName("com.mysql.jdbc.Driver"); for
(int i = 0; i < 3; i++) { //创建原生的连接,// com.mysql.jdbc.JDBC4Connection@8888 Connection con = DriverManager.getConnection(url, "root", "123"); //声明包装类 MyConn conn = new
MyConn(con); pool.add(conn);//将包装类添加到池中去 } } catch
(Exception e) { e.printStackTrace(); } } //此方法来自于datasource,用于返回一个连接 public
Connection getConnection() throws
SQLException { synchronized
(pool) { if
(pool.size() == 0) { try
{ pool.wait(); } catch
(InterruptedException e) { e.printStackTrace(); } return
getConnection(); } Connection con = pool.removeFirst(); System.err.println("siize:"
+ pool.size()); return
con; } } // 以下包装connection class
MyConn implements
Connection { // 声明被包装类的成员 private
Connection conn; // 通过构造接收MySql的connection的对象JDBC4Connection@8888 public
MyConn(Connection con) { this.conn = con; } //关闭连接 public
void close() throws
SQLException { synchronized
(pool) { //有人调用了关闭方法,不能关 System.err.println("有人还连接了。。。。"+this); pool.add(this); pool.notify(); } } |
下午根据刀哥的指点,暂时把c3p0放到了一边,自己开始思考怎样去做小项目练手,光学理论也不行,只有在实战中才能更好地理解它们
工作室系统开发流程
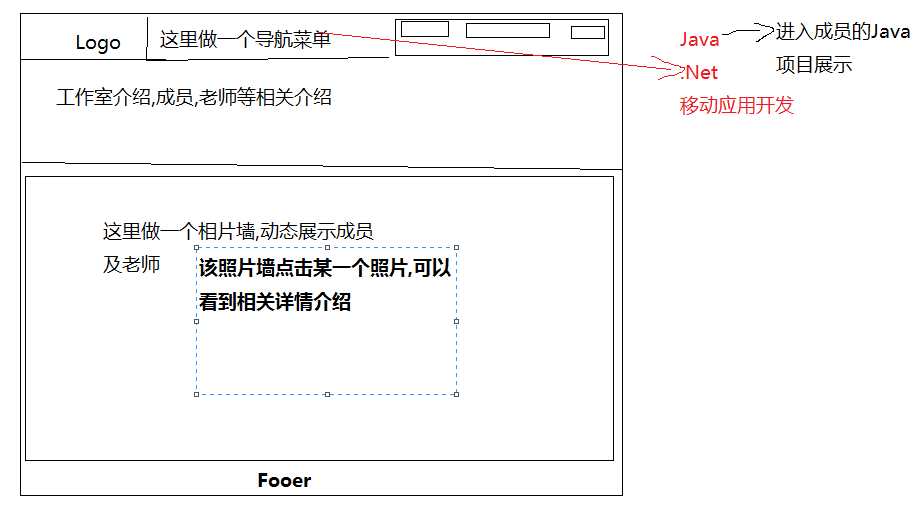
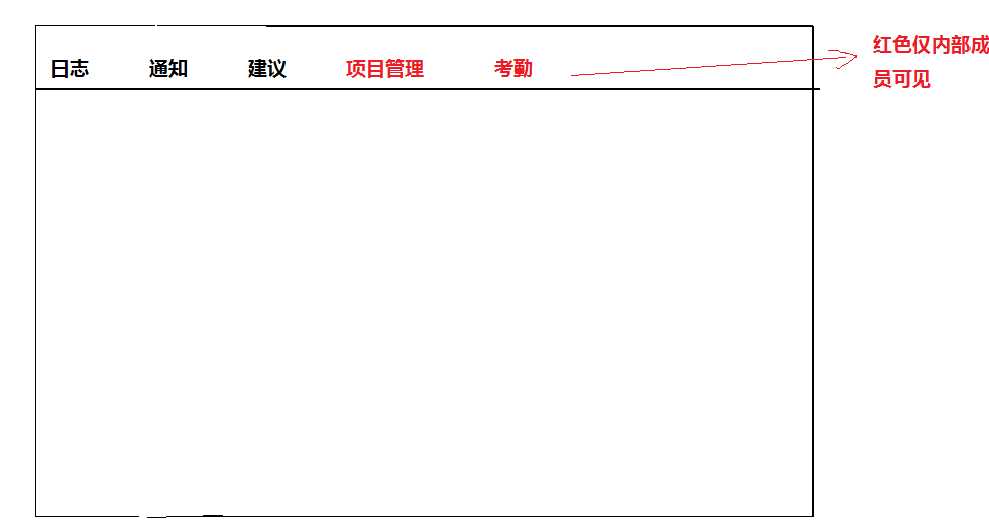
2.登录可以进入自己的相关页面,自己有相册,日志的管理,如果是管理员则可以对系统进行管理,分别是管理员界面,与用户界面
管理员界面
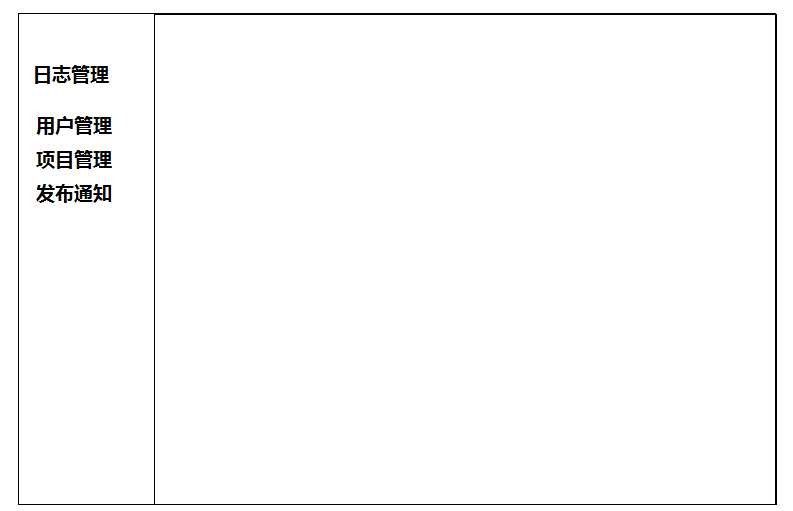
用户界面
如果非内部成员点击没有的菜单,则没有相应的功能
接下来是数据库的设计
创建用户表,博客(日志)表,菜单表,项目表,考勤记录表,系统通知表, 菜单用户关联表
ps: 由于下午上选修课,再加上 班上的事情,数据库建表,表字段,表关系的设计,等事情只能明天继续.感觉一天好忙哦~~~~
原文:http://www.cnblogs.com/ylfeiu/p/3624074.html