【自定义Cell2】【?Code】:全部通过代码添加
【1】:设置Cell
1):创建一个MsgCell类 继承UITableViewCell
.h中声明2个属性一个是用户头像,另外一个是发表的文字
@property (nonatomic,weak,readonly) UIImageView *iconView;
@property (nonatomic,weak,readonly)UIButton *msgBtn;
.m中,创建出具体的cell内容

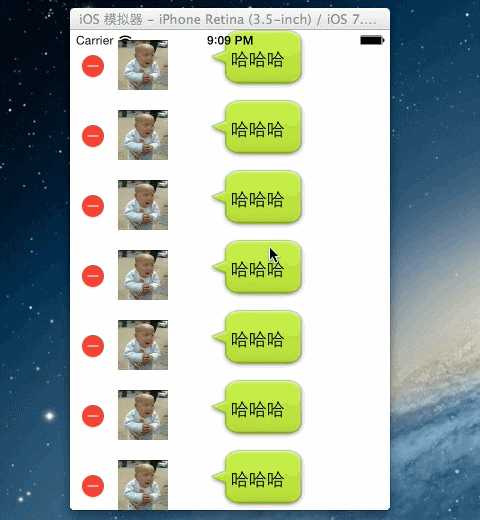
- (id)initWithStyle:(UITableViewCellStyle)style reuseIdentifier:(NSString *)reuseIdentifier
{
    self = [super initWithStyle:style reuseIdentifier:reuseIdentifier];
    if (self) {

        // 添加子控件 1,左边的头像
        UIImageView *iconView=[[UIImageView alloc] init];
        iconView.frame=CGRectMake(10, 10, 50, 50);
        [self addSubview:iconView];
        [self.contentView addSubview:iconView];
        _iconView=iconView;

        // 添加右边的对话按钮
        UIButton *btn=[[UIButton alloc]init];
        btn.frame=CGRectMake(100, 0, 100, 60);

        [btn setBackgroundImage:[UIImage imageNamed:@"chatfrom_bg_normal.png"] forState:UIControlStateNormal];
        [btn setBackgroundImage:[UIImage imageNamed:@"chatfrom_bg_focused.png"] forState:
        UIControlStateHighlighted];
     [self.contentView addSubview:btn];
        // 设置文字颜色
        [btn setTitleColor:[UIColor blackColor] forState:UIControlStateNormal];
        _msgBtn=btn;
    }
    return self;
}
创建一个ViewController:UITableViewController
#import "ViewController.h"
#import "MsgCell.h"


@implementation ViewController

- (void)viewDidLoad
{
    [super viewDidLoad];
    // Do any additional setup after loading the view, typically from a nib.
   // 去除横线
    self.tableView.separatorStyle=UITableViewCellSeparatorStyleNone;
  self.tableView.editing = YES;
}
-(NSInteger)tableView:(UITableView *)tableView numberOfRowsInSection:(NSInteger)section
{
    return 20;   // 20个cell
}

-(UITableViewCell *)tableView:(UITableView *)tableView cellForRowAtIndexPath:(NSIndexPath *)indexPath
{
 // 用static修饰的局部变量,只会初始化一次
    static NSString *ID=@"Cell";
    // 2.拿到一个标识先去缓存池中查找对应的Cell
    MsgCell *cell=[tableView dequeueReusableCellWithIdentifier:ID];
    // 3. 如果缓存池中没有,才需要创建新的标识
    if(cell==nil)
    {
        cell=[[MsgCell alloc]initWithStyle:UITableViewCellStyleDefault reuseIdentifier:ID];
    }
    cell.iconView.image=[UIImage imageNamed:@"0.png"];

    [cell.msgBtn setTitle:@"哈哈哈" forState:UIControlStateNormal];

    return  cell;

}
-(CGFloat)tableView:(UITableView *)tableView heightForRowAtIndexPath:(NSIndexPath *)indexPath
{
    // 每一行的高度自定义
    return 70;
}
@end
【UIKit】UITableView 自定义Cell2,布布扣,bubuko.com
原文:http://www.cnblogs.com/madeininfi/p/3677266.html